![[Updated] Accelerating Your Creative Process with Mac DVD Authoring](https://thmb.techidaily.com/81ce373281fd9aff14dae5d82f0fff51572cdd8c291988609733f2ca1401739f.jpg)
[Updated] Accelerating Your Creative Process with Mac DVD Authoring
Accelerating Your Creative Process with Mac DVD Authoring
Burn Video to DVD on Mac [2 Ways]


Richard Bennett
Mar 27, 2024• Proven solutions
While streaming services have made it easy for people to hit-and-play a movie anywhere, anytime, the experience of watching movies on DVD at home is a different one. But regardless of the reason you are here, this guide will teach you how to burn video to DVD on Mac and create physical media copies of memories and movies.
Read on to learn how to burn video to DVD using the best software on the internet. Yes, you will have to utilize a third-party tool to burn a video and create physical-media copies of it. Nevertheless, do not worry; the software mentioned here is completely safe to utilize.
 Epubor Audible Converter for Win: Download and convert Audible AAXC/AA/AAX to MP3 with 100% original quality preserved.
Part 1: Burn Video to DVD with Filmora
If you are a video-editor, you must have heard of the Wondershare Filmora . Yes, the powerful video editor also includes a dedicated option to burn videos to DVD after editing the videos. But even if you already have the footage and do not want to edit anything in it — the Filmora software can help you with that. All you have to do is follow these simple steps:
Step 1: Install Filmora on Mac.
Open the software and from the main interface, and click on ‘Import’ to upload the files to software. You can upload anything — photos and audios — not only videos.
Step 2: Add video to timeline
The program is so simple that you do not need to possess any technical knowledge about DVD burning. All you have to do is drag and drop the files to the timeline and then click the Export button to save the video to DVD.
 Video Converter Factory Pro
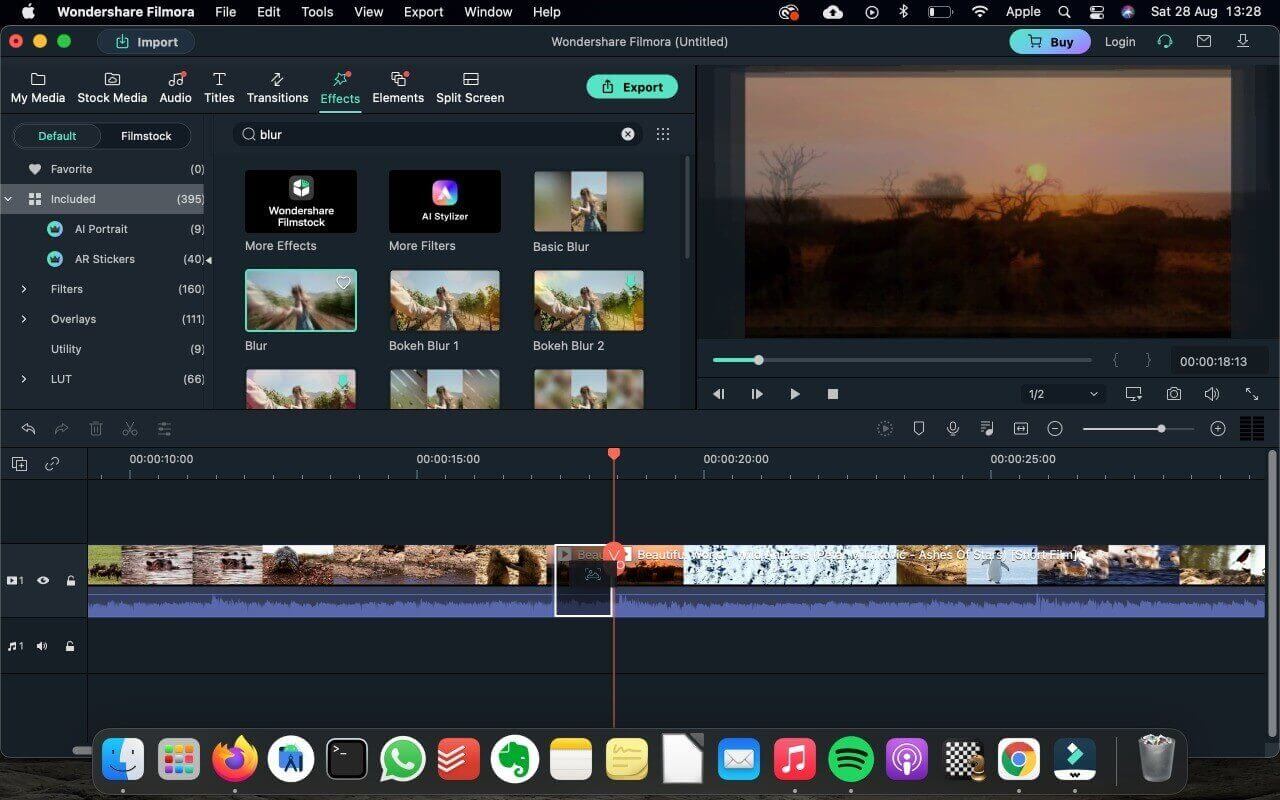
Meanwhile, you can also edit the videos if you like before clicking on Export. For instance, you can simply utilize the one-click preset options to apply effects, transition, and more. Or you can color-correct the video files, crop, trim, split, or do several other things before burning the video to DVD. The preview section allows you to view the edited video.
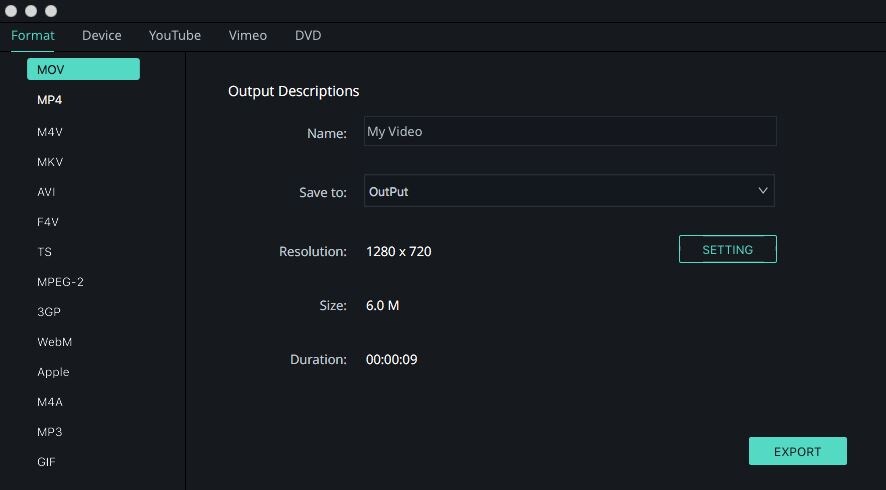
Step 3: Export video to DVD
After editing, you click on Export toggle and hover to the ‘DVD’ section within the Export options. You can choose other options present. Finally, you can burn video to DVD in DVD disc, DVD folder, and ISO disc image file format
Part 2: Burn Video to DVD with Wondershare DVD Creator
Wondershare DVD creator is a professional file burner that comes packed with many features. Of course, the one being — burn files to DVD. Follow these simple steps to burn videos to DVD using Wondershare DVD creator:
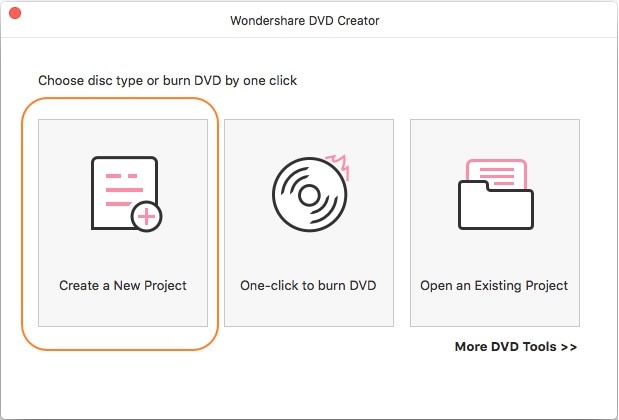
Step 1: Download and Install the Wondershare DVD Creator program. Launch the software and from the main interface, choose Create a new project.
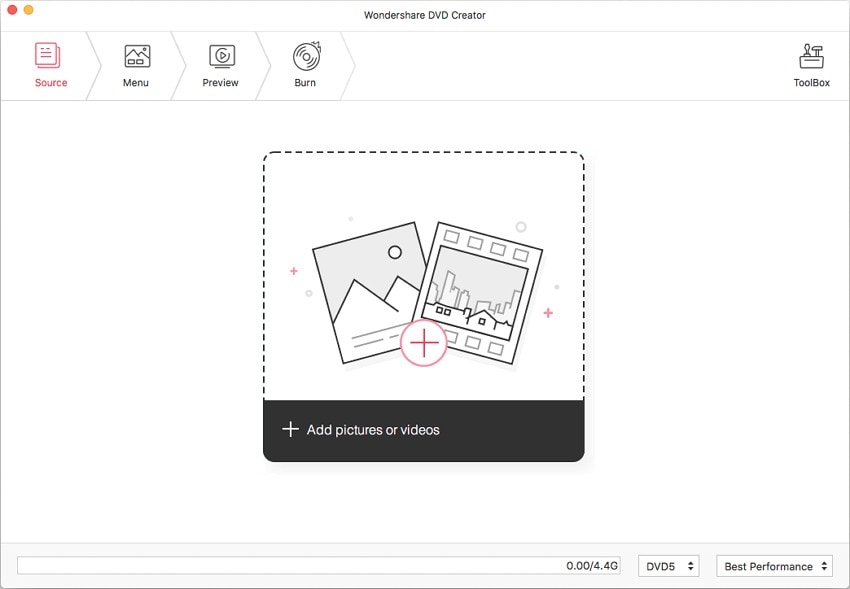
Step 2: On the next screen, click on Source. And choose ‘+’ add the video files from your Mac.
- You can also edit the video and trim, crop, add watermark or perform other editing functions to the video before beginning the burning process if you like. If not, click OK to process.
- On the next interface (Menu), you will have the option to choose the template. You will also find some other customizing options like frames and text.
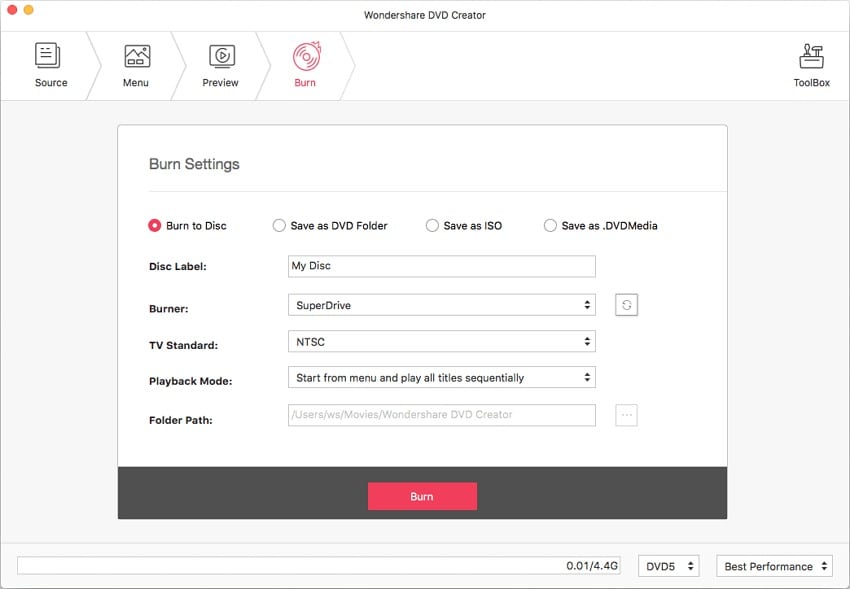
Step 3: Preview and burn video files to DVD.
- On the preview tab, you can preview the video (like the edits and templates to see if everything is done accurately or not). You can go back if you do not like.
- Select Burn to Disc.
- Finally, choose Burn to start the burning process.

Parental Control Software
## Part 3: Edit Video with FilmoraAs indicated earlier, Filmora is not only used to burn video to DVD on Mac. You can utilize the Filmora to edit videos like professionals on Mac, Windows. Packed with powerful editing tools, Filmora is aimed at users of all skill-levels and allows you to turn ordinary footage into a compelling story. The AI-backed intuitive interface empowers users to edit videos seamlessly using the three-panel view. Everything is simple with Filmora; for instance, you can simply Drag and drop filters on your timeline to change the looks of your clips. Or you choose to use advanced coloring tools like Auto Color Matching and Color Correction to fine-tune your clips exactly the way you want.
In all, be it a vlogger looking for one-click effects or an expert craving for details and wants to customize everything personally — Filmora is the one software that you can rely upon.


Features:
- Filmora has an intuitive, streamlined interface that makes rotating, merging, trimming, splitting, cropping, and flipping videos manageable and straightforward.
- One-click preset options to create animations or custom animations with one of the easiest keyframing experiences around
- The newest releases have integrated the cloud-based stock library into Filmora Mac, allowing you to access extensive effects from different platform in the program directly
Conclusion
There you go. You will not find a tool that allows you to burn video to DVD on Mac as simple as Wondershare’s Filmora and DVD Creator. And while you can utilize any of the two applications to burn files to DVD — Filmora is the best way to go if you want to utilize advanced video-editing options like the ones mentioned above. Nevertheless, if you want to just burn the video to DVD (with some basic video editing options) — Wondershare’s DVD Creator is the way to go!
Richard Bennett
Richard Bennett is a writer and a lover of all things video.
Follow @Richard Bennett
Richard Bennett
Mar 27, 2024• Proven solutions
While streaming services have made it easy for people to hit-and-play a movie anywhere, anytime, the experience of watching movies on DVD at home is a different one. But regardless of the reason you are here, this guide will teach you how to burn video to DVD on Mac and create physical media copies of memories and movies.
Read on to learn how to burn video to DVD using the best software on the internet. Yes, you will have to utilize a third-party tool to burn a video and create physical-media copies of it. Nevertheless, do not worry; the software mentioned here is completely safe to utilize.
Part 1: Burn Video to DVD with Filmora
If you are a video-editor, you must have heard of the Wondershare Filmora . Yes, the powerful video editor also includes a dedicated option to burn videos to DVD after editing the videos. But even if you already have the footage and do not want to edit anything in it — the Filmora software can help you with that. All you have to do is follow these simple steps:
Step 1: Install Filmora on Mac.
Open the software and from the main interface, and click on ‘Import’ to upload the files to software. You can upload anything — photos and audios — not only videos.
Step 2: Add video to timeline
The program is so simple that you do not need to possess any technical knowledge about DVD burning. All you have to do is drag and drop the files to the timeline and then click the Export button to save the video to DVD.
 KoolReport Pro is an advanced solution for creating data reports and dashboards in PHP. Equipped with all extended packages , KoolReport Pro is able to connect to various datasources, perform advanced data analysis, construct stunning charts and graphs and export your beautiful work to PDF, Excel, JPG or other formats. Plus, it includes powerful built-in reports such as pivot report and drill-down report which will save your time in building ones.
 It will help you to write dynamic data reports easily, to construct intuitive dashboards or to build a whole business intelligence cockpit.
KoolReport Pro package goes with Full Source Code, Royal Free, ONE (1) Year Priority Support, ONE (1) Year Free Upgrade and 30-Days Money Back Guarantee.
Developer License allows Single Developer to create Unlimited Reports, deploy on Unlimited Servers and able deliver the work to Unlimited Clients.
Meanwhile, you can also edit the videos if you like before clicking on Export. For instance, you can simply utilize the one-click preset options to apply effects, transition, and more. Or you can color-correct the video files, crop, trim, split, or do several other things before burning the video to DVD. The preview section allows you to view the edited video.
Step 3: Export video to DVD
After editing, you click on Export toggle and hover to the ‘DVD’ section within the Export options. You can choose other options present. Finally, you can burn video to DVD in DVD disc, DVD folder, and ISO disc image file format
Part 2: Burn Video to DVD with Wondershare DVD Creator
Wondershare DVD creator is a professional file burner that comes packed with many features. Of course, the one being — burn files to DVD. Follow these simple steps to burn videos to DVD using Wondershare DVD creator:
Step 1: Download and Install the Wondershare DVD Creator program. Launch the software and from the main interface, choose Create a new project.
Step 2: On the next screen, click on Source. And choose ‘+’ add the video files from your Mac.
- You can also edit the video and trim, crop, add watermark or perform other editing functions to the video before beginning the burning process if you like. If not, click OK to process.
- On the next interface (Menu), you will have the option to choose the template. You will also find some other customizing options like frames and text.
Step 3: Preview and burn video files to DVD.
- On the preview tab, you can preview the video (like the edits and templates to see if everything is done accurately or not). You can go back if you do not like.
- Select Burn to Disc.
- Finally, choose Burn to start the burning process.
Part 3: Edit Video with Filmora
As indicated earlier, Filmora is not only used to burn video to DVD on Mac. You can utilize the Filmora to edit videos like professionals on Mac, Windows. Packed with powerful editing tools, Filmora is aimed at users of all skill-levels and allows you to turn ordinary footage into a compelling story. The AI-backed intuitive interface empowers users to edit videos seamlessly using the three-panel view. Everything is simple with Filmora; for instance, you can simply Drag and drop filters on your timeline to change the looks of your clips. Or you choose to use advanced coloring tools like Auto Color Matching and Color Correction to fine-tune your clips exactly the way you want.
In all, be it a vlogger looking for one-click effects or an expert craving for details and wants to customize everything personally — Filmora is the one software that you can rely upon.
Features:
- Filmora has an intuitive, streamlined interface that makes rotating, merging, trimming, splitting, cropping, and flipping videos manageable and straightforward.
- One-click preset options to create animations or custom animations with one of the easiest keyframing experiences around
- The newest releases have integrated the cloud-based stock library into Filmora Mac, allowing you to access extensive effects from different platform in the program directly
 SwifDoo PDF 2-Year Plan
Conclusion
There you go. You will not find a tool that allows you to burn video to DVD on Mac as simple as Wondershare’s Filmora and DVD Creator. And while you can utilize any of the two applications to burn files to DVD — Filmora is the best way to go if you want to utilize advanced video-editing options like the ones mentioned above. Nevertheless, if you want to just burn the video to DVD (with some basic video editing options) — Wondershare’s DVD Creator is the way to go!
Richard Bennett
Richard Bennett is a writer and a lover of all things video.
Follow @Richard Bennett
Richard Bennett
Mar 27, 2024• Proven solutions
While streaming services have made it easy for people to hit-and-play a movie anywhere, anytime, the experience of watching movies on DVD at home is a different one. But regardless of the reason you are here, this guide will teach you how to burn video to DVD on Mac and create physical media copies of memories and movies.
Read on to learn how to burn video to DVD using the best software on the internet. Yes, you will have to utilize a third-party tool to burn a video and create physical-media copies of it. Nevertheless, do not worry; the software mentioned here is completely safe to utilize.
Part 1: Burn Video to DVD with Filmora
If you are a video-editor, you must have heard of the Wondershare Filmora . Yes, the powerful video editor also includes a dedicated option to burn videos to DVD after editing the videos. But even if you already have the footage and do not want to edit anything in it — the Filmora software can help you with that. All you have to do is follow these simple steps:
Step 1: Install Filmora on Mac.
Open the software and from the main interface, and click on ‘Import’ to upload the files to software. You can upload anything — photos and audios — not only videos.
Step 2: Add video to timeline
The program is so simple that you do not need to possess any technical knowledge about DVD burning. All you have to do is drag and drop the files to the timeline and then click the Export button to save the video to DVD.
Meanwhile, you can also edit the videos if you like before clicking on Export. For instance, you can simply utilize the one-click preset options to apply effects, transition, and more. Or you can color-correct the video files, crop, trim, split, or do several other things before burning the video to DVD. The preview section allows you to view the edited video.
Step 3: Export video to DVD
After editing, you click on Export toggle and hover to the ‘DVD’ section within the Export options. You can choose other options present. Finally, you can burn video to DVD in DVD disc, DVD folder, and ISO disc image file format
Part 2: Burn Video to DVD with Wondershare DVD Creator
Wondershare DVD creator is a professional file burner that comes packed with many features. Of course, the one being — burn files to DVD. Follow these simple steps to burn videos to DVD using Wondershare DVD creator:
Step 1: Download and Install the Wondershare DVD Creator program. Launch the software and from the main interface, choose Create a new project.

Step 2: On the next screen, click on Source. And choose ‘+’ add the video files from your Mac.
- You can also edit the video and trim, crop, add watermark or perform other editing functions to the video before beginning the burning process if you like. If not, click OK to process.
- On the next interface (Menu), you will have the option to choose the template. You will also find some other customizing options like frames and text.
Step 3: Preview and burn video files to DVD.
- On the preview tab, you can preview the video (like the edits and templates to see if everything is done accurately or not). You can go back if you do not like.
- Select Burn to Disc.
- Finally, choose Burn to start the burning process.
Part 3: Edit Video with Filmora
As indicated earlier, Filmora is not only used to burn video to DVD on Mac. You can utilize the Filmora to edit videos like professionals on Mac, Windows. Packed with powerful editing tools, Filmora is aimed at users of all skill-levels and allows you to turn ordinary footage into a compelling story. The AI-backed intuitive interface empowers users to edit videos seamlessly using the three-panel view. Everything is simple with Filmora; for instance, you can simply Drag and drop filters on your timeline to change the looks of your clips. Or you choose to use advanced coloring tools like Auto Color Matching and Color Correction to fine-tune your clips exactly the way you want.
In all, be it a vlogger looking for one-click effects or an expert craving for details and wants to customize everything personally — Filmora is the one software that you can rely upon.
Features:
- Filmora has an intuitive, streamlined interface that makes rotating, merging, trimming, splitting, cropping, and flipping videos manageable and straightforward.
- One-click preset options to create animations or custom animations with one of the easiest keyframing experiences around
- The newest releases have integrated the cloud-based stock library into Filmora Mac, allowing you to access extensive effects from different platform in the program directly
 Nero Burning ROM:
The ultimate burning program for all your needs!
Conclusion
There you go. You will not find a tool that allows you to burn video to DVD on Mac as simple as Wondershare’s Filmora and DVD Creator. And while you can utilize any of the two applications to burn files to DVD — Filmora is the best way to go if you want to utilize advanced video-editing options like the ones mentioned above. Nevertheless, if you want to just burn the video to DVD (with some basic video editing options) — Wondershare’s DVD Creator is the way to go!

Richard Bennett
Richard Bennett is a writer and a lover of all things video.
Follow @Richard Bennett
Richard Bennett
Mar 27, 2024• Proven solutions
While streaming services have made it easy for people to hit-and-play a movie anywhere, anytime, the experience of watching movies on DVD at home is a different one. But regardless of the reason you are here, this guide will teach you how to burn video to DVD on Mac and create physical media copies of memories and movies.
Read on to learn how to burn video to DVD using the best software on the internet. Yes, you will have to utilize a third-party tool to burn a video and create physical-media copies of it. Nevertheless, do not worry; the software mentioned here is completely safe to utilize.
 Glarysoft File Recovery Pro Annually - Helps to recover your lost file/data, even permanently deleted data.
Part 1: Burn Video to DVD with Filmora
If you are a video-editor, you must have heard of the Wondershare Filmora . Yes, the powerful video editor also includes a dedicated option to burn videos to DVD after editing the videos. But even if you already have the footage and do not want to edit anything in it — the Filmora software can help you with that. All you have to do is follow these simple steps:
Step 1: Install Filmora on Mac.
Open the software and from the main interface, and click on ‘Import’ to upload the files to software. You can upload anything — photos and audios — not only videos.
Step 2: Add video to timeline
The program is so simple that you do not need to possess any technical knowledge about DVD burning. All you have to do is drag and drop the files to the timeline and then click the Export button to save the video to DVD.
Meanwhile, you can also edit the videos if you like before clicking on Export. For instance, you can simply utilize the one-click preset options to apply effects, transition, and more. Or you can color-correct the video files, crop, trim, split, or do several other things before burning the video to DVD. The preview section allows you to view the edited video.
Step 3: Export video to DVD
After editing, you click on Export toggle and hover to the ‘DVD’ section within the Export options. You can choose other options present. Finally, you can burn video to DVD in DVD disc, DVD folder, and ISO disc image file format
Part 2: Burn Video to DVD with Wondershare DVD Creator
Wondershare DVD creator is a professional file burner that comes packed with many features. Of course, the one being — burn files to DVD. Follow these simple steps to burn videos to DVD using Wondershare DVD creator:
Step 1: Download and Install the Wondershare DVD Creator program. Launch the software and from the main interface, choose Create a new project.
Step 2: On the next screen, click on Source. And choose ‘+’ add the video files from your Mac.
- You can also edit the video and trim, crop, add watermark or perform other editing functions to the video before beginning the burning process if you like. If not, click OK to process.
- On the next interface (Menu), you will have the option to choose the template. You will also find some other customizing options like frames and text.
Step 3: Preview and burn video files to DVD.
- On the preview tab, you can preview the video (like the edits and templates to see if everything is done accurately or not). You can go back if you do not like.
- Select Burn to Disc.
- Finally, choose Burn to start the burning process.

Key features:
• Import from any devices and cams, including GoPro and drones. All formats supported. Сurrently the only free video editor that allows users to export in a new H265/HEVC codec, something essential for those working with 4K and HD.
• Everything for hassle-free basic editing: cut, crop and merge files, add titles and favorite music
• Visual effects, advanced color correction and trendy Instagram-like filters
• All multimedia processing done from one app: video editing capabilities reinforced by a video converter, a screen capture, a video capture, a disc burner and a YouTube uploader
• Non-linear editing: edit several files with simultaneously
• Easy export to social networks: special profiles for YouTube, Facebook, Vimeo, Twitter and Instagram
• High quality export – no conversion quality loss, double export speed even of HD files due to hardware acceleration
• Stabilization tool will turn shaky or jittery footage into a more stable video automatically.
• Essential toolset for professional video editing: blending modes, Mask tool, advanced multiple-color Chroma Key
Part 3: Edit Video with Filmora
As indicated earlier, Filmora is not only used to burn video to DVD on Mac. You can utilize the Filmora to edit videos like professionals on Mac, Windows. Packed with powerful editing tools, Filmora is aimed at users of all skill-levels and allows you to turn ordinary footage into a compelling story. The AI-backed intuitive interface empowers users to edit videos seamlessly using the three-panel view. Everything is simple with Filmora; for instance, you can simply Drag and drop filters on your timeline to change the looks of your clips. Or you choose to use advanced coloring tools like Auto Color Matching and Color Correction to fine-tune your clips exactly the way you want.
In all, be it a vlogger looking for one-click effects or an expert craving for details and wants to customize everything personally — Filmora is the one software that you can rely upon.
[](https://tools.techidaily.com/wondershare/filmora/download/)[](https://tools.techidaily.com/wondershare/filmora/download/)Features:
- Filmora has an intuitive, streamlined interface that makes rotating, merging, trimming, splitting, cropping, and flipping videos manageable and straightforward.
- One-click preset options to create animations or custom animations with one of the easiest keyframing experiences around
- The newest releases have integrated the cloud-based stock library into Filmora Mac, allowing you to access extensive effects from different platform in the program directly

Conclusion
There you go. You will not find a tool that allows you to burn video to DVD on Mac as simple as Wondershare’s Filmora and DVD Creator. And while you can utilize any of the two applications to burn files to DVD — Filmora is the best way to go if you want to utilize advanced video-editing options like the ones mentioned above. Nevertheless, if you want to just burn the video to DVD (with some basic video editing options) — Wondershare’s DVD Creator is the way to go!
Richard Bennett
Richard Bennett is a writer and a lover of all things video.
Follow @Richard Bennett
- Title: [Updated] Accelerating Your Creative Process with Mac DVD Authoring
- Author: Joseph
- Created at : 2024-07-27 07:59:14
- Updated at : 2024-07-28 07:59:14
- Link: https://extra-tips.techidaily.com/updated-accelerating-your-creative-process-with-mac-dvd-authoring/
- License: This work is licensed under CC BY-NC-SA 4.0.