"Unveiling the Secrets of Stretching Seconds Creating Spectaculous Slow-Mo Videos with Photos & Web Tools"
Unveiling the Secrets of Stretching Seconds: Creating Spectaculous Slow-Mo Videos with Photos & Web Tools
How to make slow motion video with Photos App and Online


Shanoon Cox
Mar 27, 2024• Proven solutions
While the Photos app in Windows 10 has been out for a couple years, many people are not aware of all its features. Given the way Microsoft has added powerful features to Photos, it has the capability to offer much more to users. One such feature is the option to add the effect of slow motion in Windows 10 using the Photos app. We will explain how you can use the slow motion feature in Photos, along with an option to add the effect of slow motion online.
- Part1: How to Use Slow Motion in Windows 10
- Part2: Customizing the Slow Motion Effect
- Part3: How to Edit in Slow Motion Online
Part 1:How to Use Slow Motion in Windows 10
There is no need to spend hundreds of dollars on a video program if you need to perform some basic editing and effects on your videos. For instance, you can add the slow motion effect using the Photos app that comes pre-installed on Windows 10 computers.
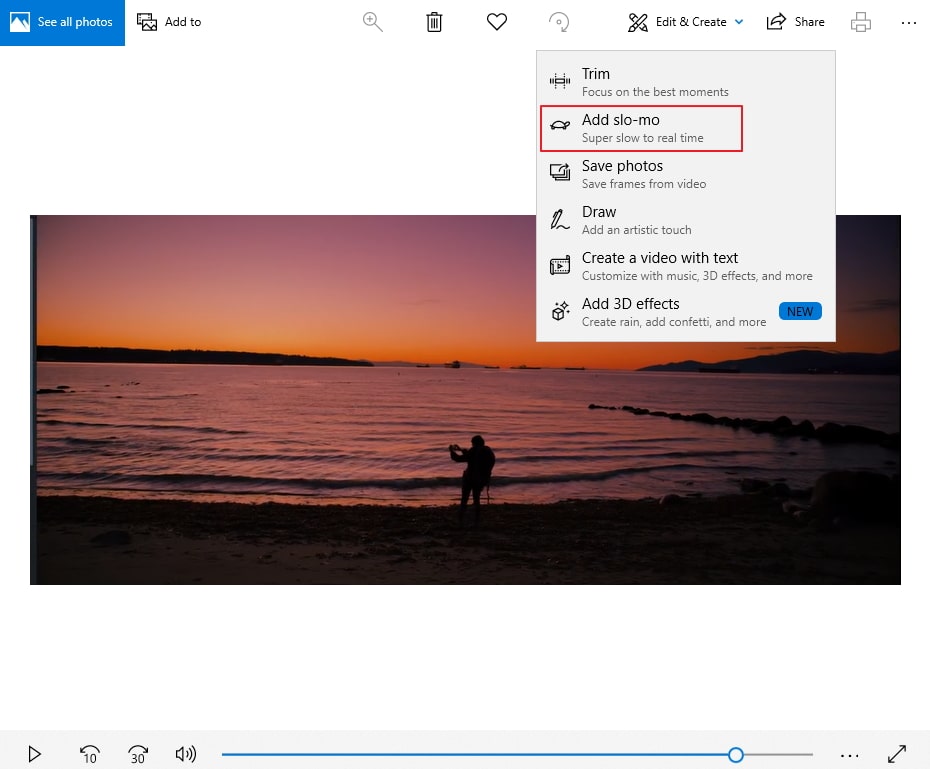
Navigate to the folder where your video file is located and right click on it. You will go to “open with” and then choose the Photos app. When it is open in the application, you can click on “Edit & Create” and then go to “Add slo-mo”.
If you do not see the option anywhere on your Photos app, there is a chance you are running an outdated version of Windows 10 on your computer. All you need to do is navigate to Windows Update through your system menu. When all the updates install, you will have the latest Photos app with this feature.
 PaperScan Professional: PaperScan Scanner Software is a powerful TWAIN & WIA scanning application centered on one idea: making document acquisition an unparalleled easy task for anyone.
Part 2:Customizing the Slow Motion Effect
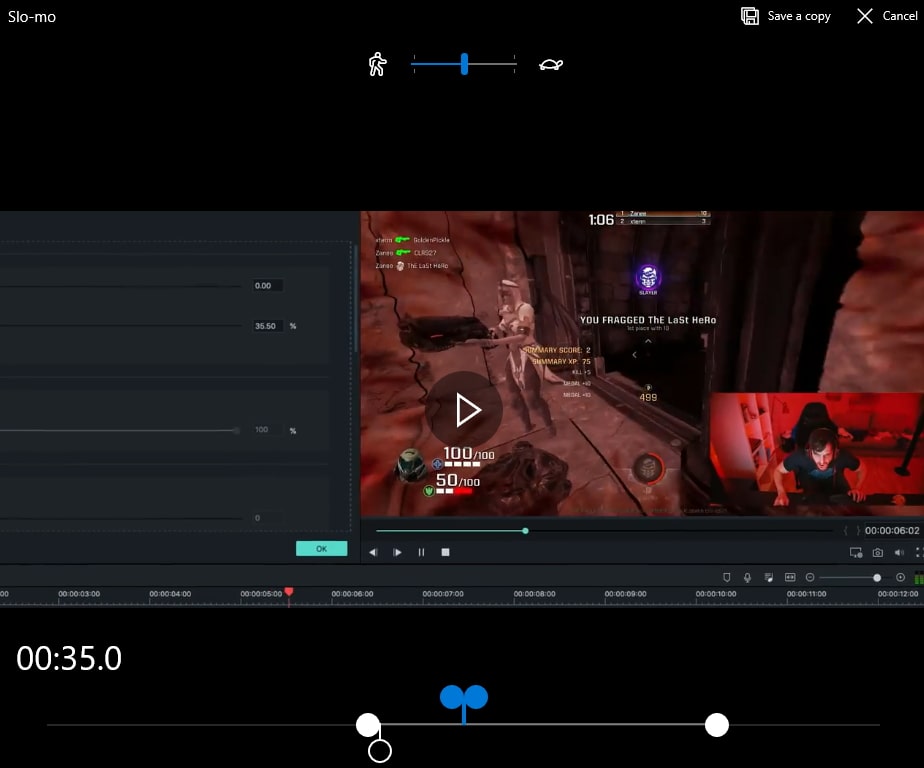
When you are using the Photos app to add a slow motion effect to your videos, you can tweak it to your liking. You will be able to select the speed using a slider, which lets you get the precise slow motion effect that you desire.
There is also the handy option of being able to select the portion of your video where you want to add this effect. Say you are producing a longer video, where you want the effect in place for a few seconds.
Now you can select the beginning and end point using the bottom slider on the Photos app. Choose the precise starting and ending of the slow motion effect, and then watch through your video to ensure it is exactly as you want.
We recommend that you save your video file under a new name when you are done making your desired changes. It ensures that you still have the original copy of the video saved on your computer or external hard drive.
You can even create multiple versions of the file with the slow motion effect applied in different ways. Then you can watch the videos you just created to decide on the best version.
You may also like: How to Use Story Remix to Edit a Video in Windows 10 Photos >>
Part 3: How to Edit in Slow Motion Online
If you are not able to access a Windows computer, you may want a solution that can be used online. The good news is that you can use some online video speed changers to add a slow motion effect to your content.
EZGif
Step 1: Select Video
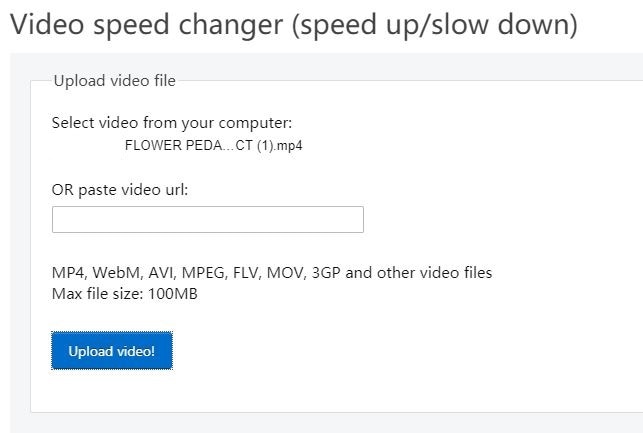
You can choose a file from your computer to add it onto the site, before you will add the effect of slow motion online. It is even possible to add files through an online URL.
Step 2: Upload
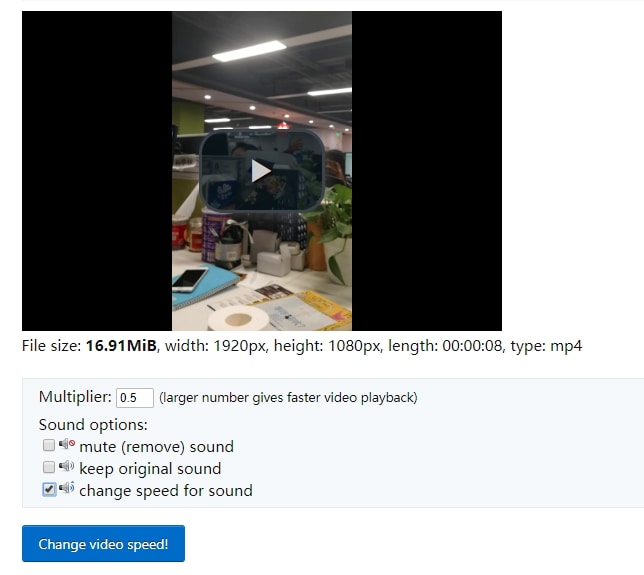
Click on the “upload video” button so that it can be added into the database. You will be limited to videos that are less than 100MB. If your video is larger, you may want to use a separate program to reduce its size before adding it to EZGif.com.
Step 3: Output
The program will let you adjust the video speed to your liking. Then you will get a URL for the output video, which will have been slowed down according to your settings. There is even an option to keep the audio track at the same speed, but you can slow down the audio at the same rate as the video if you want.
 Glary Utilities PRO - Premium all-in-one utility to clean, speed up, maintain and protect your PC
Conclusion
Now that you have understood how to add the effect of slow motion in Windows 10 Photos, you will be able to tweak your videos even more. The Photos application has many other features that you may want to check out, which will help you edit images and videos.
Shanoon Cox
Shanoon Cox is a writer and a lover of all things video.
Follow @Shanoon Cox
Shanoon Cox
Mar 27, 2024• Proven solutions
While the Photos app in Windows 10 has been out for a couple years, many people are not aware of all its features. Given the way Microsoft has added powerful features to Photos, it has the capability to offer much more to users. One such feature is the option to add the effect of slow motion in Windows 10 using the Photos app. We will explain how you can use the slow motion feature in Photos, along with an option to add the effect of slow motion online.
- Part1: How to Use Slow Motion in Windows 10
- Part2: Customizing the Slow Motion Effect
- Part3: How to Edit in Slow Motion Online
Part 1:How to Use Slow Motion in Windows 10
There is no need to spend hundreds of dollars on a video program if you need to perform some basic editing and effects on your videos. For instance, you can add the slow motion effect using the Photos app that comes pre-installed on Windows 10 computers.
Navigate to the folder where your video file is located and right click on it. You will go to “open with” and then choose the Photos app. When it is open in the application, you can click on “Edit & Create” and then go to “Add slo-mo”.
If you do not see the option anywhere on your Photos app, there is a chance you are running an outdated version of Windows 10 on your computer. All you need to do is navigate to Windows Update through your system menu. When all the updates install, you will have the latest Photos app with this feature.
Part 2:Customizing the Slow Motion Effect
When you are using the Photos app to add a slow motion effect to your videos, you can tweak it to your liking. You will be able to select the speed using a slider, which lets you get the precise slow motion effect that you desire.
There is also the handy option of being able to select the portion of your video where you want to add this effect. Say you are producing a longer video, where you want the effect in place for a few seconds.
Now you can select the beginning and end point using the bottom slider on the Photos app. Choose the precise starting and ending of the slow motion effect, and then watch through your video to ensure it is exactly as you want.
We recommend that you save your video file under a new name when you are done making your desired changes. It ensures that you still have the original copy of the video saved on your computer or external hard drive.
You can even create multiple versions of the file with the slow motion effect applied in different ways. Then you can watch the videos you just created to decide on the best version.
You may also like: How to Use Story Remix to Edit a Video in Windows 10 Photos >>
Part 3: How to Edit in Slow Motion Online
If you are not able to access a Windows computer, you may want a solution that can be used online. The good news is that you can use some online video speed changers to add a slow motion effect to your content.
EZGif
Step 1: Select Video
You can choose a file from your computer to add it onto the site, before you will add the effect of slow motion online. It is even possible to add files through an online URL.
Step 2: Upload
Click on the “upload video” button so that it can be added into the database. You will be limited to videos that are less than 100MB. If your video is larger, you may want to use a separate program to reduce its size before adding it to EZGif.com.
 DLNow Video Downloader
Step 3: Output
The program will let you adjust the video speed to your liking. Then you will get a URL for the output video, which will have been slowed down according to your settings. There is even an option to keep the audio track at the same speed, but you can slow down the audio at the same rate as the video if you want.
Conclusion
Now that you have understood how to add the effect of slow motion in Windows 10 Photos, you will be able to tweak your videos even more. The Photos application has many other features that you may want to check out, which will help you edit images and videos.
Shanoon Cox
Shanoon Cox is a writer and a lover of all things video.
Follow @Shanoon Cox
Shanoon Cox
Mar 27, 2024• Proven solutions
While the Photos app in Windows 10 has been out for a couple years, many people are not aware of all its features. Given the way Microsoft has added powerful features to Photos, it has the capability to offer much more to users. One such feature is the option to add the effect of slow motion in Windows 10 using the Photos app. We will explain how you can use the slow motion feature in Photos, along with an option to add the effect of slow motion online.
- Part1: How to Use Slow Motion in Windows 10
- Part2: Customizing the Slow Motion Effect
- Part3: How to Edit in Slow Motion Online
 Project Manager - Asset Browser for 3Ds Max
Part 1:How to Use Slow Motion in Windows 10
There is no need to spend hundreds of dollars on a video program if you need to perform some basic editing and effects on your videos. For instance, you can add the slow motion effect using the Photos app that comes pre-installed on Windows 10 computers.
Navigate to the folder where your video file is located and right click on it. You will go to “open with” and then choose the Photos app. When it is open in the application, you can click on “Edit & Create” and then go to “Add slo-mo”.
If you do not see the option anywhere on your Photos app, there is a chance you are running an outdated version of Windows 10 on your computer. All you need to do is navigate to Windows Update through your system menu. When all the updates install, you will have the latest Photos app with this feature.
 ZoneAlarm Extreme Security NextGen
Part 2:Customizing the Slow Motion Effect
When you are using the Photos app to add a slow motion effect to your videos, you can tweak it to your liking. You will be able to select the speed using a slider, which lets you get the precise slow motion effect that you desire.
There is also the handy option of being able to select the portion of your video where you want to add this effect. Say you are producing a longer video, where you want the effect in place for a few seconds.
Now you can select the beginning and end point using the bottom slider on the Photos app. Choose the precise starting and ending of the slow motion effect, and then watch through your video to ensure it is exactly as you want.
We recommend that you save your video file under a new name when you are done making your desired changes. It ensures that you still have the original copy of the video saved on your computer or external hard drive.
You can even create multiple versions of the file with the slow motion effect applied in different ways. Then you can watch the videos you just created to decide on the best version.
You may also like: How to Use Story Remix to Edit a Video in Windows 10 Photos >>
Part 3: How to Edit in Slow Motion Online
If you are not able to access a Windows computer, you may want a solution that can be used online. The good news is that you can use some online video speed changers to add a slow motion effect to your content.
EZGif
Step 1: Select Video
You can choose a file from your computer to add it onto the site, before you will add the effect of slow motion online. It is even possible to add files through an online URL.
Step 2: Upload
Click on the “upload video” button so that it can be added into the database. You will be limited to videos that are less than 100MB. If your video is larger, you may want to use a separate program to reduce its size before adding it to EZGif.com.
Step 3: Output
The program will let you adjust the video speed to your liking. Then you will get a URL for the output video, which will have been slowed down according to your settings. There is even an option to keep the audio track at the same speed, but you can slow down the audio at the same rate as the video if you want.
Conclusion
Now that you have understood how to add the effect of slow motion in Windows 10 Photos, you will be able to tweak your videos even more. The Photos application has many other features that you may want to check out, which will help you edit images and videos.
 WonderFox DVD Ripper Pro
Shanoon Cox
Shanoon Cox is a writer and a lover of all things video.
Follow @Shanoon Cox
Shanoon Cox
Mar 27, 2024• Proven solutions
While the Photos app in Windows 10 has been out for a couple years, many people are not aware of all its features. Given the way Microsoft has added powerful features to Photos, it has the capability to offer much more to users. One such feature is the option to add the effect of slow motion in Windows 10 using the Photos app. We will explain how you can use the slow motion feature in Photos, along with an option to add the effect of slow motion online.
- Part1: How to Use Slow Motion in Windows 10
- Part2: Customizing the Slow Motion Effect
- Part3: How to Edit in Slow Motion Online
Part 1:How to Use Slow Motion in Windows 10
There is no need to spend hundreds of dollars on a video program if you need to perform some basic editing and effects on your videos. For instance, you can add the slow motion effect using the Photos app that comes pre-installed on Windows 10 computers.
Navigate to the folder where your video file is located and right click on it. You will go to “open with” and then choose the Photos app. When it is open in the application, you can click on “Edit & Create” and then go to “Add slo-mo”.
If you do not see the option anywhere on your Photos app, there is a chance you are running an outdated version of Windows 10 on your computer. All you need to do is navigate to Windows Update through your system menu. When all the updates install, you will have the latest Photos app with this feature.
 WinUtilities Pro
Part 2:Customizing the Slow Motion Effect
When you are using the Photos app to add a slow motion effect to your videos, you can tweak it to your liking. You will be able to select the speed using a slider, which lets you get the precise slow motion effect that you desire.
There is also the handy option of being able to select the portion of your video where you want to add this effect. Say you are producing a longer video, where you want the effect in place for a few seconds.
Now you can select the beginning and end point using the bottom slider on the Photos app. Choose the precise starting and ending of the slow motion effect, and then watch through your video to ensure it is exactly as you want.
We recommend that you save your video file under a new name when you are done making your desired changes. It ensures that you still have the original copy of the video saved on your computer or external hard drive.
You can even create multiple versions of the file with the slow motion effect applied in different ways. Then you can watch the videos you just created to decide on the best version.
You may also like: How to Use Story Remix to Edit a Video in Windows 10 Photos >>
Part 3: How to Edit in Slow Motion Online
If you are not able to access a Windows computer, you may want a solution that can be used online. The good news is that you can use some online video speed changers to add a slow motion effect to your content.
EZGif
Step 1: Select Video
You can choose a file from your computer to add it onto the site, before you will add the effect of slow motion online. It is even possible to add files through an online URL.
Step 2: Upload
Click on the “upload video” button so that it can be added into the database. You will be limited to videos that are less than 100MB. If your video is larger, you may want to use a separate program to reduce its size before adding it to EZGif.com.
Step 3: Output
The program will let you adjust the video speed to your liking. Then you will get a URL for the output video, which will have been slowed down according to your settings. There is even an option to keep the audio track at the same speed, but you can slow down the audio at the same rate as the video if you want.
 Forex Robotron Gold Package
Conclusion
Now that you have understood how to add the effect of slow motion in Windows 10 Photos, you will be able to tweak your videos even more. The Photos application has many other features that you may want to check out, which will help you edit images and videos.
 Power Tools add-on for Google Sheets, Lifetime subscription
Shanoon Cox
Shanoon Cox is a writer and a lover of all things video.
Follow @Shanoon Cox
- Title: Unveiling the Secrets of Stretching Seconds Creating Spectaculous Slow-Mo Videos with Photos & Web Tools
- Author: Joseph
- Created at : 2024-07-27 07:06:19
- Updated at : 2024-07-28 07:06:19
- Link: https://extra-tips.techidaily.com/unveiling-the-secrets-of-stretching-seconds-creating-spectaculous-slow-mo-videos-with-photos-and-web-tools/
- License: This work is licensed under CC BY-NC-SA 4.0.