
Proven Methods for Professional Video Editing and DVD Burning on Mac
Proven Methods for Professional Video Editing and DVD Burning on Mac
Burn Video to DVD on Mac [2 Ways]

Richard Bennett
Mar 27, 2024• Proven solutions
While streaming services have made it easy for people to hit-and-play a movie anywhere, anytime, the experience of watching movies on DVD at home is a different one. But regardless of the reason you are here, this guide will teach you how to burn video to DVD on Mac and create physical media copies of memories and movies.
Read on to learn how to burn video to DVD using the best software on the internet. Yes, you will have to utilize a third-party tool to burn a video and create physical-media copies of it. Nevertheless, do not worry; the software mentioned here is completely safe to utilize.
Part 1: Burn Video to DVD with Filmora
If you are a video-editor, you must have heard of the Wondershare Filmora . Yes, the powerful video editor also includes a dedicated option to burn videos to DVD after editing the videos. But even if you already have the footage and do not want to edit anything in it — the Filmora software can help you with that. All you have to do is follow these simple steps:
Step 1: Install Filmora on Mac.
Open the software and from the main interface, and click on ‘Import’ to upload the files to software. You can upload anything — photos and audios — not only videos.
Step 2: Add video to timeline
The program is so simple that you do not need to possess any technical knowledge about DVD burning. All you have to do is drag and drop the files to the timeline and then click the Export button to save the video to DVD.
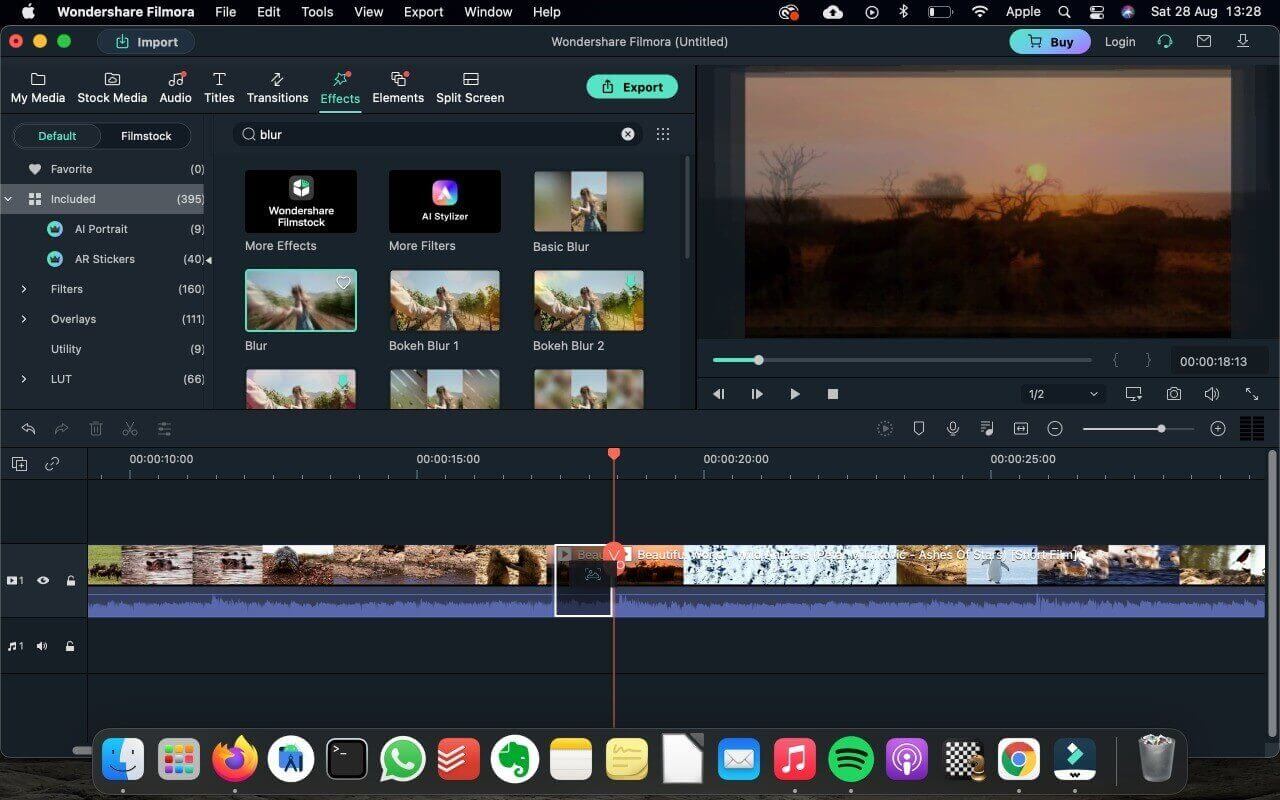
Meanwhile, you can also edit the videos if you like before clicking on Export. For instance, you can simply utilize the one-click preset options to apply effects, transition, and more. Or you can color-correct the video files, crop, trim, split, or do several other things before burning the video to DVD. The preview section allows you to view the edited video.
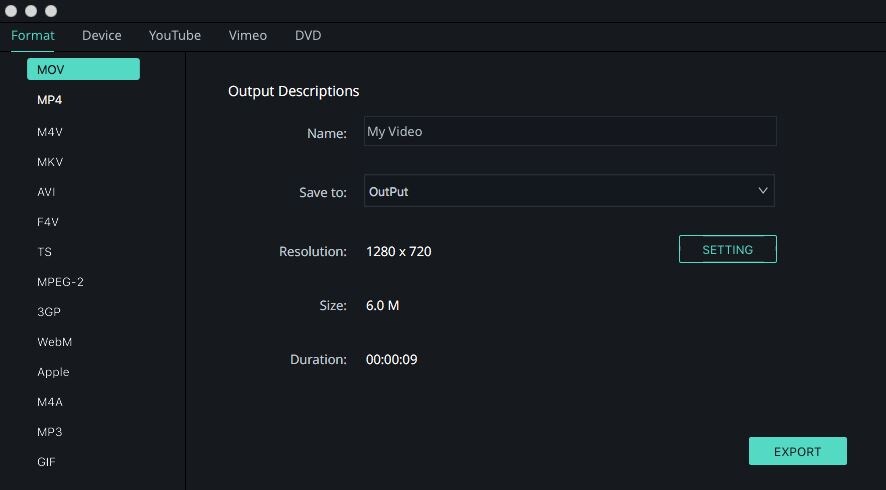
Step 3: Export video to DVD
After editing, you click on Export toggle and hover to the ‘DVD’ section within the Export options. You can choose other options present. Finally, you can burn video to DVD in DVD disc, DVD folder, and ISO disc image file format
Part 2: Burn Video to DVD with Wondershare DVD Creator
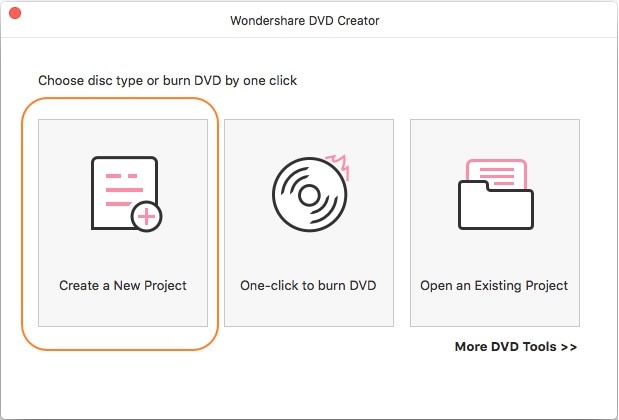
Wondershare DVD creator is a professional file burner that comes packed with many features. Of course, the one being — burn files to DVD. Follow these simple steps to burn videos to DVD using Wondershare DVD creator:
Step 1: Download and Install the Wondershare DVD Creator program. Launch the software and from the main interface, choose Create a new project.
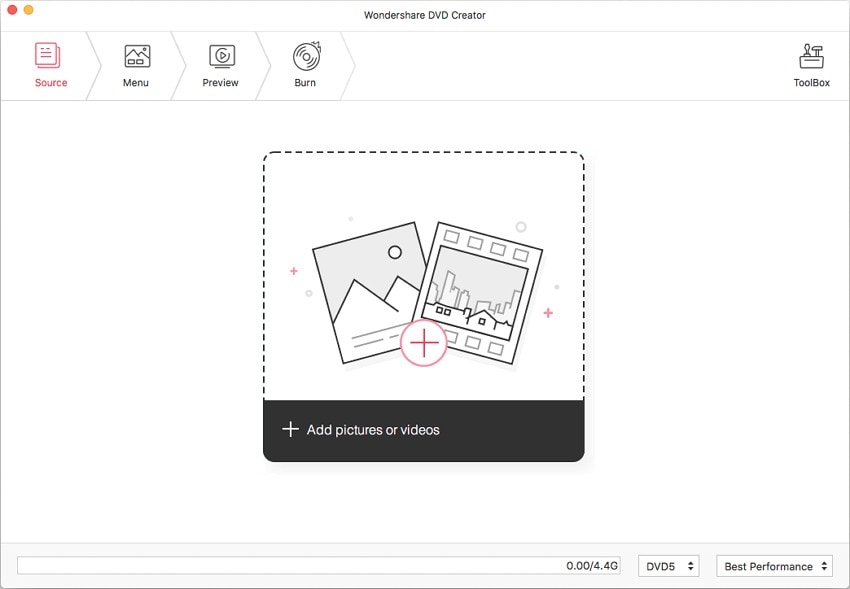
Step 2: On the next screen, click on Source. And choose ‘+’ add the video files from your Mac.
- You can also edit the video and trim, crop, add watermark or perform other editing functions to the video before beginning the burning process if you like. If not, click OK to process.
- On the next interface (Menu), you will have the option to choose the template. You will also find some other customizing options like frames and text.
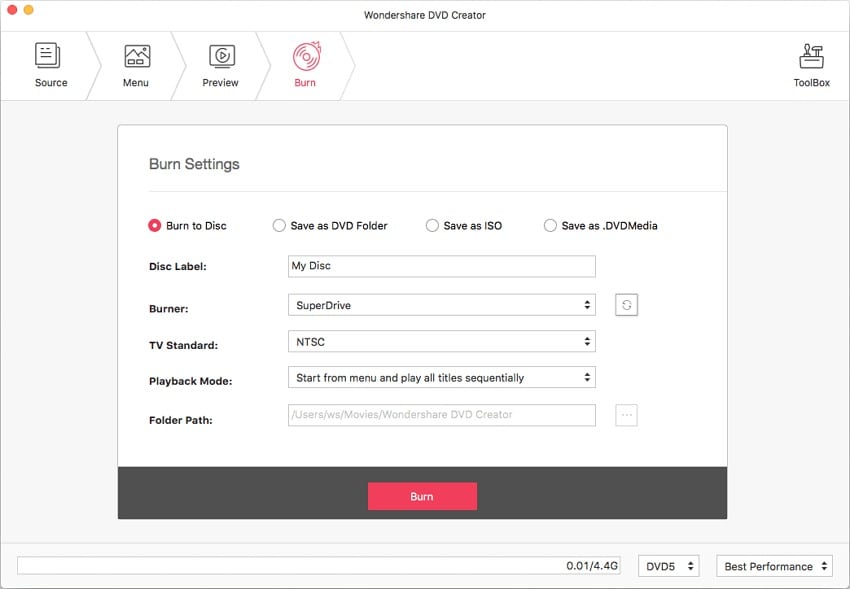
Step 3: Preview and burn video files to DVD.
- On the preview tab, you can preview the video (like the edits and templates to see if everything is done accurately or not). You can go back if you do not like.
- Select Burn to Disc.
- Finally, choose Burn to start the burning process.
Part 3: Edit Video with Filmora
As indicated earlier, Filmora is not only used to burn video to DVD on Mac. You can utilize the Filmora to edit videos like professionals on Mac, Windows. Packed with powerful editing tools, Filmora is aimed at users of all skill-levels and allows you to turn ordinary footage into a compelling story. The AI-backed intuitive interface empowers users to edit videos seamlessly using the three-panel view. Everything is simple with Filmora; for instance, you can simply Drag and drop filters on your timeline to change the looks of your clips. Or you choose to use advanced coloring tools like Auto Color Matching and Color Correction to fine-tune your clips exactly the way you want.
In all, be it a vlogger looking for one-click effects or an expert craving for details and wants to customize everything personally — Filmora is the one software that you can rely upon.


Features:
- Filmora has an intuitive, streamlined interface that makes rotating, merging, trimming, splitting, cropping, and flipping videos manageable and straightforward.
- One-click preset options to create animations or custom animations with one of the easiest keyframing experiences around
- The newest releases have integrated the cloud-based stock library into Filmora Mac, allowing you to access extensive effects from different platform in the program directly
Conclusion
There you go. You will not find a tool that allows you to burn video to DVD on Mac as simple as Wondershare’s Filmora and DVD Creator. And while you can utilize any of the two applications to burn files to DVD — Filmora is the best way to go if you want to utilize advanced video-editing options like the ones mentioned above. Nevertheless, if you want to just burn the video to DVD (with some basic video editing options) — Wondershare’s DVD Creator is the way to go!
Richard Bennett
Richard Bennett is a writer and a lover of all things video.
Follow @Richard Bennett
Richard Bennett
Mar 27, 2024• Proven solutions
While streaming services have made it easy for people to hit-and-play a movie anywhere, anytime, the experience of watching movies on DVD at home is a different one. But regardless of the reason you are here, this guide will teach you how to burn video to DVD on Mac and create physical media copies of memories and movies.
Read on to learn how to burn video to DVD using the best software on the internet. Yes, you will have to utilize a third-party tool to burn a video and create physical-media copies of it. Nevertheless, do not worry; the software mentioned here is completely safe to utilize.
Part 1: Burn Video to DVD with Filmora
If you are a video-editor, you must have heard of the Wondershare Filmora . Yes, the powerful video editor also includes a dedicated option to burn videos to DVD after editing the videos. But even if you already have the footage and do not want to edit anything in it — the Filmora software can help you with that. All you have to do is follow these simple steps:
Step 1: Install Filmora on Mac.
Open the software and from the main interface, and click on ‘Import’ to upload the files to software. You can upload anything — photos and audios — not only videos.
Step 2: Add video to timeline
The program is so simple that you do not need to possess any technical knowledge about DVD burning. All you have to do is drag and drop the files to the timeline and then click the Export button to save the video to DVD.
Meanwhile, you can also edit the videos if you like before clicking on Export. For instance, you can simply utilize the one-click preset options to apply effects, transition, and more. Or you can color-correct the video files, crop, trim, split, or do several other things before burning the video to DVD. The preview section allows you to view the edited video.
Step 3: Export video to DVD
After editing, you click on Export toggle and hover to the ‘DVD’ section within the Export options. You can choose other options present. Finally, you can burn video to DVD in DVD disc, DVD folder, and ISO disc image file format
Part 2: Burn Video to DVD with Wondershare DVD Creator
Wondershare DVD creator is a professional file burner that comes packed with many features. Of course, the one being — burn files to DVD. Follow these simple steps to burn videos to DVD using Wondershare DVD creator:
Step 1: Download and Install the Wondershare DVD Creator program. Launch the software and from the main interface, choose Create a new project.
Step 2: On the next screen, click on Source. And choose ‘+’ add the video files from your Mac.
- You can also edit the video and trim, crop, add watermark or perform other editing functions to the video before beginning the burning process if you like. If not, click OK to process.
- On the next interface (Menu), you will have the option to choose the template. You will also find some other customizing options like frames and text.
Step 3: Preview and burn video files to DVD.
- On the preview tab, you can preview the video (like the edits and templates to see if everything is done accurately or not). You can go back if you do not like.
- Select Burn to Disc.
- Finally, choose Burn to start the burning process.
Part 3: Edit Video with Filmora
As indicated earlier, Filmora is not only used to burn video to DVD on Mac. You can utilize the Filmora to edit videos like professionals on Mac, Windows. Packed with powerful editing tools, Filmora is aimed at users of all skill-levels and allows you to turn ordinary footage into a compelling story. The AI-backed intuitive interface empowers users to edit videos seamlessly using the three-panel view. Everything is simple with Filmora; for instance, you can simply Drag and drop filters on your timeline to change the looks of your clips. Or you choose to use advanced coloring tools like Auto Color Matching and Color Correction to fine-tune your clips exactly the way you want.
In all, be it a vlogger looking for one-click effects or an expert craving for details and wants to customize everything personally — Filmora is the one software that you can rely upon.
Features:
- Filmora has an intuitive, streamlined interface that makes rotating, merging, trimming, splitting, cropping, and flipping videos manageable and straightforward.
- One-click preset options to create animations or custom animations with one of the easiest keyframing experiences around
- The newest releases have integrated the cloud-based stock library into Filmora Mac, allowing you to access extensive effects from different platform in the program directly
Conclusion
There you go. You will not find a tool that allows you to burn video to DVD on Mac as simple as Wondershare’s Filmora and DVD Creator. And while you can utilize any of the two applications to burn files to DVD — Filmora is the best way to go if you want to utilize advanced video-editing options like the ones mentioned above. Nevertheless, if you want to just burn the video to DVD (with some basic video editing options) — Wondershare’s DVD Creator is the way to go!
Richard Bennett
Richard Bennett is a writer and a lover of all things video.
Follow @Richard Bennett
Also read:
- [New] 2024 Approved Mastering the Art of Profile Age Precision on TikTok
- [New] Augmenting Realities for Better Outcomes
- [New] In 2024, Essential Shortcuts for Efficient Mac Screen Recording
- [New] Premier Choices High-Quality Free Screen Recorder Software for 2024
- [Updated] 2024 Approved Social Media Screen Recorder App (Mobile, Windows, Mac)
- [Updated] From Lens to Legacy Building a Lasting Career in Travel Blogging
- 2024 Approved Capture & Crop with iOS Top iPhone Apps Reviewed
- 3 Best Tools to Hard Reset Tecno Phantom V Flip | Dr.fone
- Boosting Videos The Best 5 Tech Aids
- How to Download VLC Player for Free and Safe on Mac?
- How to Migrate Android Data From Google Pixel 8 to New Android Phone? | Dr.fone
- In 2024, A Guide to Securing Top-Tier Images for Free
- In 2024, Craft Your Story Leading Drawers in iPadOS
- In 2024, Top 7 Essential Color Correction Techniques
- Overcoming Windows WAN Port Glitches [Resolved]
- Speed Up PC Games The Ultimate Speed Controller Selection
- YouTube Video Wizardry Top Conversion Techniques to MP4/MPEG
- Title: Proven Methods for Professional Video Editing and DVD Burning on Mac
- Author: Joseph
- Created at : 2025-03-04 18:39:24
- Updated at : 2025-03-06 20:06:58
- Link: https://extra-tips.techidaily.com/proven-methods-for-professional-video-editing-and-dvd-burning-on-mac/
- License: This work is licensed under CC BY-NC-SA 4.0.