![[New] Crafting Conversational Slides with PowerPoint's Speech Features](https://thmb.techidaily.com/f44a3055113623243d984e90c974cbd9f7a4751106e76ccc80ae32530955e3a8.jpg)
[New] Crafting Conversational Slides with PowerPoint's Speech Features
Crafting Conversational Slides with PowerPoint’s Speech Features
Speech-to-text is not new, especially if you are used to the internet and many advanced devices. However, do you realize that you can use speech-to-text technology in PowerPoint? Yes! It is effortless and fun-filled: dictate, and create presentable slides with your speech. What is more fun than speaking and seeing your speech in electronic formats? This article teaches how you can create presentations via speech-to-text technology and how you can use real-time translation in PowerPoint.
Best Speech-To-Text Software Save plenty of time on transcribing subtitles and boost your editing efficiency by applying Filmora Speech-To-Text to make perfect PPT videos.
Make PPT Videos Now Make PPT Videos Now Explore STT

Part 1: How to enable speech-to-text in PowerPoint?
Using speech-to-text in PowerPoint is the same principle guiding other platforms like Microsoft Words. Also, PowerPoint presentation on a windows device is similar to a Mac. However, some control and key functions differ in the two devices. The only thing you should note when you want to use the speech-to-text function is the type of device you are using. You can enable “speech-to-text” on devices like Mac, Windows, and mobile phones.
Please note that “enabling speech-to-text” in PowerPoint differs from “using speech-to-text.” For example, you have to enable the speech-to-text first before you can use it. Also, how you enable speech-to-text in PowerPoint is based on the selected devices. Let’s discuss enabling speech-to-text on Mac and Windows.
Enable speech-to-text on Mac
- Select the control button: Mac allows you to select the control button for activating speech-to-text the first time you want to use the feature. Unlike other devices, the control option pops up when you select the speech-to-text option. It then displays some control options so that you can select the button suitable for you.
- Activate the feature: click on the apple logo on your Mac, and select “system preference.” Select “keyboard” options displayed in the system preference.

- Select the dictation option: select dictation from the keyboard option and check the “on/off” The option also has an advanced feature that allows additional commands.
 WinUtilities Pro
Once you activate the dictation from the command button, you can use the speech-to-text feature anywhere you can type on Mac - this applies to PowerPoint. However, you may need some tweaking on PowerPoint to finally use the feature as you prepare your slides.
Enable speech-to-text on Windows
Aside from the regular Cortana speech recognition on Windows, you can use the speech-to-text feature on PowerPoint. PowerPoint supports “speech-to-text” when you use the program; however, activating the Windows device through the built-in speech recognition makes the process easy and effective. Some windows PC, just like Mac, lets you first activate the speech recognition function before you proceed and use it on PowerPoint.
- On PowerPoint, click on the microphone icon on the left corner of your PowerPoint’s homepage. If the speech-to-text feature is not activated on your device, you can follow the instruction to activate it. Peradventure you do not have PowerPoint installed on your device, you can activate the dictation feature through the command button or search feature on windows.


- Click on the search button and type “dictation” or “speech services,” and the device redirects you to settings. Here, you activate the dictation button as the Mac option explained earlier. You may also press “windows key + H” to start the dictation option.


Part 2: How do I dictate PowerPoint for Mac?
It is easy to use PowerPoint on a Mac after activating the “dictation” button.
 HD Video Converter Factory Pro
Add speak to the quick access toolbar
- Sign in to the PowerPoint on your Mac device, and locate the customized quick access toolbar. The quick access toolbar includes “more commands” and other options.


- Reselect the option to “all commands.” The “all commands” should be enabled because they include many other commands, but you may not activate the options without selecting them.

- From “all commands,” locate the speak option and add the option. Upon selection, the microphone button appears on the home screen of the PowerPoint.
 Power Tools add-on for Google Sheets, 12-month subscription

Use the speak option
Now you can click on the microphone button and speak to add text.
Speak clearly, but conversationally
The smart engine needs to hear you clearly before interpreting the speech into text. Do not mumble or speak fast. Each word should be audible and clearly stated. You can use the keyboard to edit or remove excess words.

Reduce background noise
Ensure the background noise does not interrupt your speech.
Use the user dictionary
Exploit the user dictionary. Visit Settings > Languages, and info > Advanced > Personal word reference, and you can add last names and other “unofficial” words.
Part 3: How to enable real-time speech-to-text translation in PowerPoint
The only difference between real-time speech-to-text translation and other forms is the real-life experience. There are cases you need to activate speech-to-text in a life event. PowerPoint supports this through the “speech-to-text” feature available on the platform.
Set up captions and subtitles
Real-time display and translation are suitable for the multi-language purpose. You can select the real-time option on your PowerPoint and makes it display another subtitle in other languages. Thus, when you speak in a language, the captions or subtitles display another text (speech-to-text) in a different language.
- Click on the slide show, and go to subtitle settings; select spoken languages. The spoken language is the “speech input language”: the language you will speak to be translated.

- After setting the spoken language, move on to set the subtitle/caption language. The subtitle or caption language is the translated language. PowerPoint allows you to translate speech without using an application. You can make a multi-language selection without much involvement - just settings.
Tips: Many options are available for easy use and accessibility. Aside from the multi-language selection, you can explore the “slide show” settings for better understanding. You may see other options that best illustrate your need for translation in real-time on PowerPoint.
When you activate the real-time translation on PowerPoint, the settings occur in two stages: slideshow view and presenter view. You can vary the changes based on your view (as the presenter) or what people see (slideshow view).
Part 4: How to make speech-to-text and translation to create PowerPoint videos
When you want to make perfect PPT videos, you can use Filmora’s STT feature. Wondershare Filmora Speech to Text is quite different with other STT service providers. Other STT platforms/stages require you to use the application to convert speech-to-text, save, and export into other third-party software. However, Wondershare Filmora allows you to directly convert your speech-to-text on an ongoing production. For example, you can convert speech into subtitles during a video production on Wondershare Filmora.
What’s more, now Filmora’s STT feature supports direct transcription of bilingual subtitles with up to 27 languages of transcription in Filmora version 13.
Top Adavantages of Filmora STT
- Supports direct transcription of bilingual subtitles.
- Allows to transcribe video speech to text in one click.
- Boosts editing efficiency by applying the STT feature.
Make PPT Videos For Win 7 or later(64-bit)
Make PPT Videos For macOS 10.14 or later
Use Filmora STT to make PowerPoint videos translation
Step 1
Select the audio asset in the timeline, and click the “Speech-to-Text” icon in the toolbar; if there is no supported file type on the timeline, it will not be displayed.
Step 2
Click the “Speech-to-Text” icon, and it will show the parameter settings. You can choose the languages to be transcribed and to be transcribed to. Filmora’s STT feature supports direct transcription of bilingual subtitles with up to 27 languages of transcription

FAQs
Does speech-to-text require the internet?
No, it doesn’t. However, you may need the internet to set up some settings.
Does speech-to-text come with a subscription?
No. The feature is free for all registered users on PowerPoint.
 ZoneAlarm Extreme Security NextGen
Do you need an additional microphone?
You can use your device’s in-built microphone. However, you may need external gear for efficiency.
Is speech-to-text better than typing?
Speech-to-text is an additional feature for all users. Typing is, however, the default practice.
Free Download For Win 7 or later(64-bit)
Free Download For macOS 10.14 or later
Make PPT Videos Now Make PPT Videos Now Explore STT
Part 1: How to enable speech-to-text in PowerPoint?
Using speech-to-text in PowerPoint is the same principle guiding other platforms like Microsoft Words. Also, PowerPoint presentation on a windows device is similar to a Mac. However, some control and key functions differ in the two devices. The only thing you should note when you want to use the speech-to-text function is the type of device you are using. You can enable “speech-to-text” on devices like Mac, Windows, and mobile phones.
Please note that “enabling speech-to-text” in PowerPoint differs from “using speech-to-text.” For example, you have to enable the speech-to-text first before you can use it. Also, how you enable speech-to-text in PowerPoint is based on the selected devices. Let’s discuss enabling speech-to-text on Mac and Windows.
Enable speech-to-text on Mac
- Select the control button: Mac allows you to select the control button for activating speech-to-text the first time you want to use the feature. Unlike other devices, the control option pops up when you select the speech-to-text option. It then displays some control options so that you can select the button suitable for you.
- Activate the feature: click on the apple logo on your Mac, and select “system preference.” Select “keyboard” options displayed in the system preference.
- Select the dictation option: select dictation from the keyboard option and check the “on/off” The option also has an advanced feature that allows additional commands.
Once you activate the dictation from the command button, you can use the speech-to-text feature anywhere you can type on Mac - this applies to PowerPoint. However, you may need some tweaking on PowerPoint to finally use the feature as you prepare your slides.
Enable speech-to-text on Windows
Aside from the regular Cortana speech recognition on Windows, you can use the speech-to-text feature on PowerPoint. PowerPoint supports “speech-to-text” when you use the program; however, activating the Windows device through the built-in speech recognition makes the process easy and effective. Some windows PC, just like Mac, lets you first activate the speech recognition function before you proceed and use it on PowerPoint.
- On PowerPoint, click on the microphone icon on the left corner of your PowerPoint’s homepage. If the speech-to-text feature is not activated on your device, you can follow the instruction to activate it. Peradventure you do not have PowerPoint installed on your device, you can activate the dictation feature through the command button or search feature on windows.
- Click on the search button and type “dictation” or “speech services,” and the device redirects you to settings. Here, you activate the dictation button as the Mac option explained earlier. You may also press “windows key + H” to start the dictation option.
Part 2: How do I dictate PowerPoint for Mac?
It is easy to use PowerPoint on a Mac after activating the “dictation” button.
Add speak to the quick access toolbar
- Sign in to the PowerPoint on your Mac device, and locate the customized quick access toolbar. The quick access toolbar includes “more commands” and other options.
- Reselect the option to “all commands.” The “all commands” should be enabled because they include many other commands, but you may not activate the options without selecting them.
- From “all commands,” locate the speak option and add the option. Upon selection, the microphone button appears on the home screen of the PowerPoint.
Use the speak option
Now you can click on the microphone button and speak to add text.

Speak clearly, but conversationally
The smart engine needs to hear you clearly before interpreting the speech into text. Do not mumble or speak fast. Each word should be audible and clearly stated. You can use the keyboard to edit or remove excess words.
Reduce background noise
Ensure the background noise does not interrupt your speech.

Use the user dictionary
Exploit the user dictionary. Visit Settings > Languages, and info > Advanced > Personal word reference, and you can add last names and other “unofficial” words.

Part 3: How to enable real-time speech-to-text translation in PowerPoint
The only difference between real-time speech-to-text translation and other forms is the real-life experience. There are cases you need to activate speech-to-text in a life event. PowerPoint supports this through the “speech-to-text” feature available on the platform.
Set up captions and subtitles
Real-time display and translation are suitable for the multi-language purpose. You can select the real-time option on your PowerPoint and makes it display another subtitle in other languages. Thus, when you speak in a language, the captions or subtitles display another text (speech-to-text) in a different language.
- Click on the slide show, and go to subtitle settings; select spoken languages. The spoken language is the “speech input language”: the language you will speak to be translated.
 Epubor Audible Converter for Mac: Download and convert Audible AAXC/AA/AAX to MP3 with 100% original quality preserved.
- After setting the spoken language, move on to set the subtitle/caption language. The subtitle or caption language is the translated language. PowerPoint allows you to translate speech without using an application. You can make a multi-language selection without much involvement - just settings.
Tips: Many options are available for easy use and accessibility. Aside from the multi-language selection, you can explore the “slide show” settings for better understanding. You may see other options that best illustrate your need for translation in real-time on PowerPoint.
When you activate the real-time translation on PowerPoint, the settings occur in two stages: slideshow view and presenter view. You can vary the changes based on your view (as the presenter) or what people see (slideshow view).
Part 4: How to make speech-to-text and translation to create PowerPoint videos
When you want to make perfect PPT videos, you can use Filmora’s STT feature. Wondershare Filmora Speech to Text is quite different with other STT service providers. Other STT platforms/stages require you to use the application to convert speech-to-text, save, and export into other third-party software. However, Wondershare Filmora allows you to directly convert your speech-to-text on an ongoing production. For example, you can convert speech into subtitles during a video production on Wondershare Filmora.
What’s more, now Filmora’s STT feature supports direct transcription of bilingual subtitles with up to 27 languages of transcription in Filmora version 13.
Top Adavantages of Filmora STT
- Supports direct transcription of bilingual subtitles.
- Allows to transcribe video speech to text in one click.
- Boosts editing efficiency by applying the STT feature.
Make PPT Videos For Win 7 or later(64-bit)
Make PPT Videos For macOS 10.14 or later
Use Filmora STT to make PowerPoint videos translation
Step 1
Select the audio asset in the timeline, and click the “Speech-to-Text” icon in the toolbar; if there is no supported file type on the timeline, it will not be displayed.
 The Tube Sites Submitter is a fast and efficient tool for anyone who needs to upload videos quickly, easily and automatically to hundreds of tube sites in mere minutes .
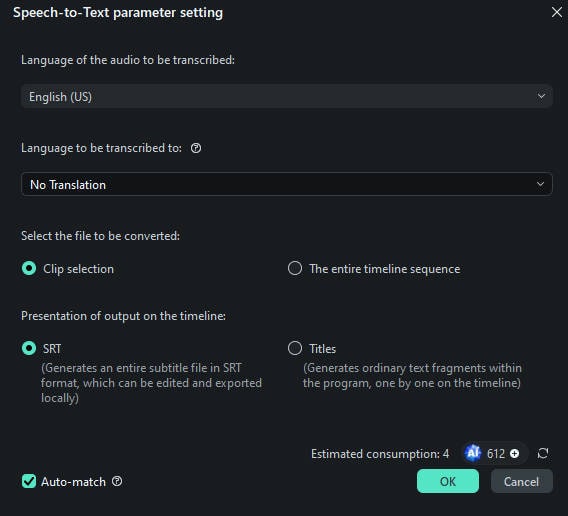
Step 2
Click the “Speech-to-Text” icon, and it will show the parameter settings. You can choose the languages to be transcribed and to be transcribed to. Filmora’s STT feature supports direct transcription of bilingual subtitles with up to 27 languages of transcription

 Any DRM Removal for Win:Remove DRM from Adobe, Kindle, Sony eReader, Kobo, etc, read your ebooks anywhere.
FAQs
Does speech-to-text require the internet?
No, it doesn’t. However, you may need the internet to set up some settings.
 CalendarBudget - Monthly subscription membership to CalendarBudget via web browser or mobile app. Support included.
 Does speech-to-text come with a subscription?
No. The feature is free for all registered users on PowerPoint.

Do you need an additional microphone?
You can use your device’s in-built microphone. However, you may need external gear for efficiency.
Is speech-to-text better than typing?
Speech-to-text is an additional feature for all users. Typing is, however, the default practice.
Free Download For Win 7 or later(64-bit)
Free Download For macOS 10.14 or later
- Title: [New] Crafting Conversational Slides with PowerPoint's Speech Features
- Author: Joseph
- Created at : 2024-07-27 08:28:01
- Updated at : 2024-07-28 08:28:01
- Link: https://extra-tips.techidaily.com/new-crafting-conversational-slides-with-powerpoints-speech-features/
- License: This work is licensed under CC BY-NC-SA 4.0.