"Masterclass Generating Professional SRT Documents"
Masterclass: Generating Professional SRT Documents
If you want to learn how to create SRT files, you’ve come to the right page to find the best solution to help you carry out the task effortlessly.
Today, irrespective of whether you’re a video content creator or you have an organization that uses video as a means of connecting with the target audience, it’s quite essential you create subtitles to caption video presentations as it will help the video reach your target audience faster.
However, if you’re finding it difficult to create an SRT file, don’t hesitate to read this article as it covers everything you need to know about creating SRT files. Plus, you’ll discover helpful pro tips to create SRT for your videos without hassles. So, without further ado, let’s dive into the article and find out more.
 Easy and Safe Partition Software & Hard Disk Manager
Part 1: What are SRT subtitles?
Before we proceed to the main discussion of the day, it’ll be necessary to understand what SRT subtitles are first.
SRT Subtitles (SubRip subtitles) are text formats that are generated from DVD-ripping software SubRip. Most companies and content creators today use them in their videos to facilitate easy understanding of their videos. Thus, allowing their videos to get higher engagement and views.
Part 2: How to create a .srt file for video on Windows?
To create a .srt file for your video on a Windows computer is pretty simple. Yes, you don’t require technical knowledge or any third-party software for such an operation. All it takes is just a few clicks.
That being said, keep in mind that before you start creating SRT subtitles for your video, you must have reviewed your video and have a copy of the audio/dialogue that you want to use as a caption in the SRT file. This will prevent you from making errors during the SRT creation process.
The stepwise guide illustrated below will walk you through how to create an SRT file for video in Windows;
Step1 Start your Windows computer and open the Notepad program. Then create a new file.
 PCDJ DEX 3 for Windows & MAC is the total entertainment DJ software solution, offering audio, video, and karaoke mixing ability. Automatic beat-sync, smart looping, 4 decks, DJ MIDI controller support, Karaoke Streaming and much more.
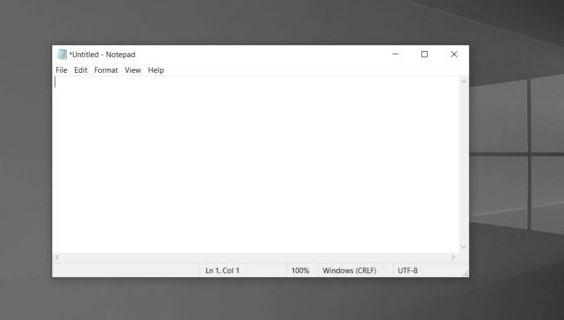
Step2 Up next, play your video and listen to the first line of the dialogue. Then pause it and write your first subtitle in the note by doing the following;
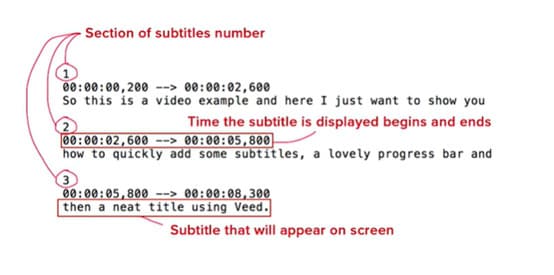
- Type 1 > under it, write the first Timestamp. The timestamp should be written in hours:minutes: seconds, milliseconds format as shown below;
1
- 00:00:07,114 –> 00:00:11,834
The times displayed indicate the beginning and end of when the subtitle appears on the viewer’s screen. Ensure to make this time as accurate as possible.
Step3 Move to the next line and type your subtitle content - the text that will show on the screen. This should be one or two sentences. Long texts should be broken into multiple subtitles to make them easy for viewers to understand.
Step4 Repeat steps 2&3 for the remaining subtitle contents.
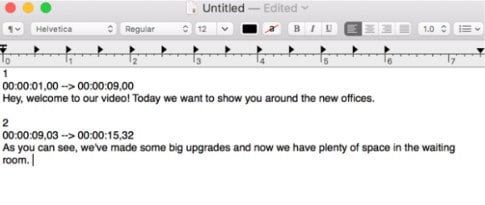
Below is an example of what an SRT subtitle should look like;
1
00:00:07,114 –> 00:00:11,834
Hello, and welcome to our presentation.
2
00:00:012,108 –> 00:00:16,357
In this video, we’ll be showing
Step5 Review the subtitle and edit every error after you’ve completed it.

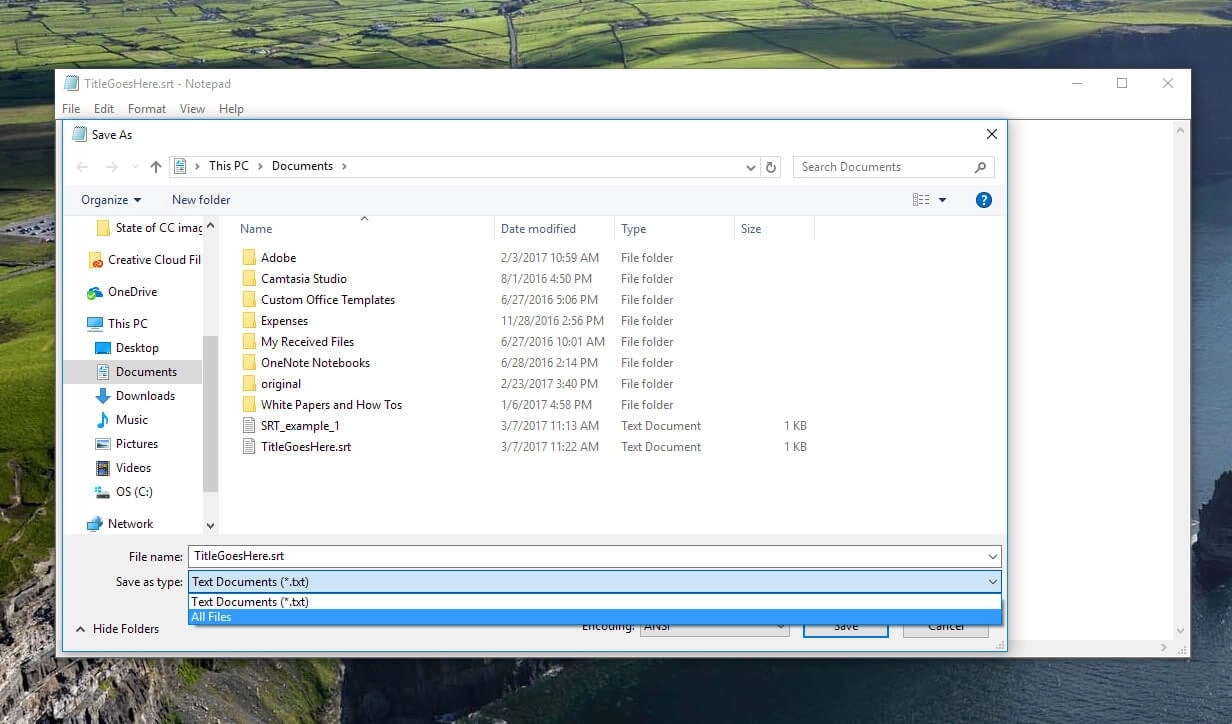
Step6 Finally, save the file in .srt format by clicking ‘File’ > Save. Then under ‘Save As’ enter the file name and add .srt as the preferred extension for your file. Click the ‘Save’ button to complete the task.
Part 3: How to create an SRT file for video on Mac?
Are you using a Mac computer? Don’t panic, we got you covered with the step-by-step instructions to create a .srt subtitle file and such a computer.
The process of creating a .srt file for video on Mac is quite similar to .srt file creation on Windows. You don’t require the installation of a third-party program. However, on Mac, you’ll use TextEdit as Notepad is not supported.
Let’s proceed to the stepwise guide on how to make an SRT file by yourself for video on Mac without wasting time;
Step1 Turn on your Mac computer and start TextEdit.
Step2 Create a new file. But before writing any subtitle captions, play the video whose subtitle you want to write and listen to the first line of the audio.
After you’ve grabbed the first line, type 1 and write the first Timestamp in hours:minutes: seconds, milliseconds.
Here is an example of what you should do;
1
00:00:07,114 –> 00:00:11,834
As mentioned earlier, the times indicate the beginning and end of when the subtitle appears on the screen.
Step3 Type your subtitle content in the next line. If it’s a long text, you need to break it down into multiple subtitles.
Step4 Repeat step 2&3 for the remaining subtitle contents.
See what an SRT subtitle looks like below;

Step5 Review and edit the subtitle.
Step6 To complete the operation, click ‘File’ at the top bar and select Save from the drop-down. Then navigate to ‘Save As’ and type your file name, and change the extension from .txt to .srt.
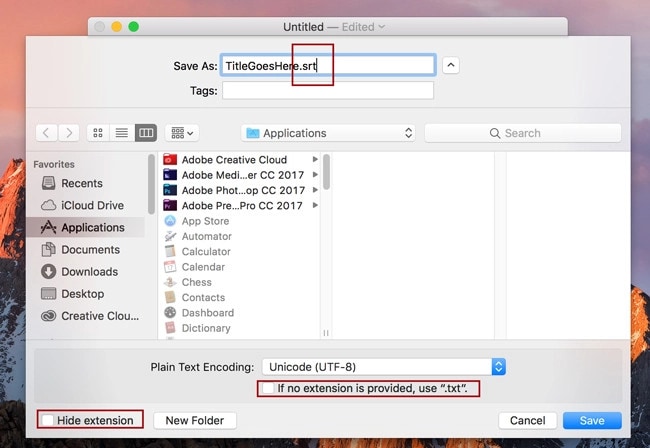
Make sure you Uncheck the ‘Hide Extension’ and ‘If no extension is provided’ checkboxes. Then click the ‘Save’ button to complete the operation!
Pro Tips: DIY SRT Creation for Videos like a Pro After Creating
Are you looking to make advanced editing on the SRT subtitles you created? Filmora is the ideal tool to help you complete the action.
Filmora is a professional video editing software that is loaded with a wide range of editing features including SRT editing to allow users to enhance the quality of the video without complications.
Unlike many other advanced .srt editors, Filmora supports the creation of SRT subtitles in over 20 languages including English. And the cool thing is you don’t need technical knowledge to operate the tool as it has a clean interface that makes navigation easier than you can ever think.
![]() FX PRO (Gold Robot + Silver Robot(Basic Package))
FX PRO (Gold Robot + Silver Robot(Basic Package))
How to use Filmora to Edit SRT files for Videos after Creating
Free Download For Win 7 or later(64-bit)
Free Download For macOS 10.14 or later
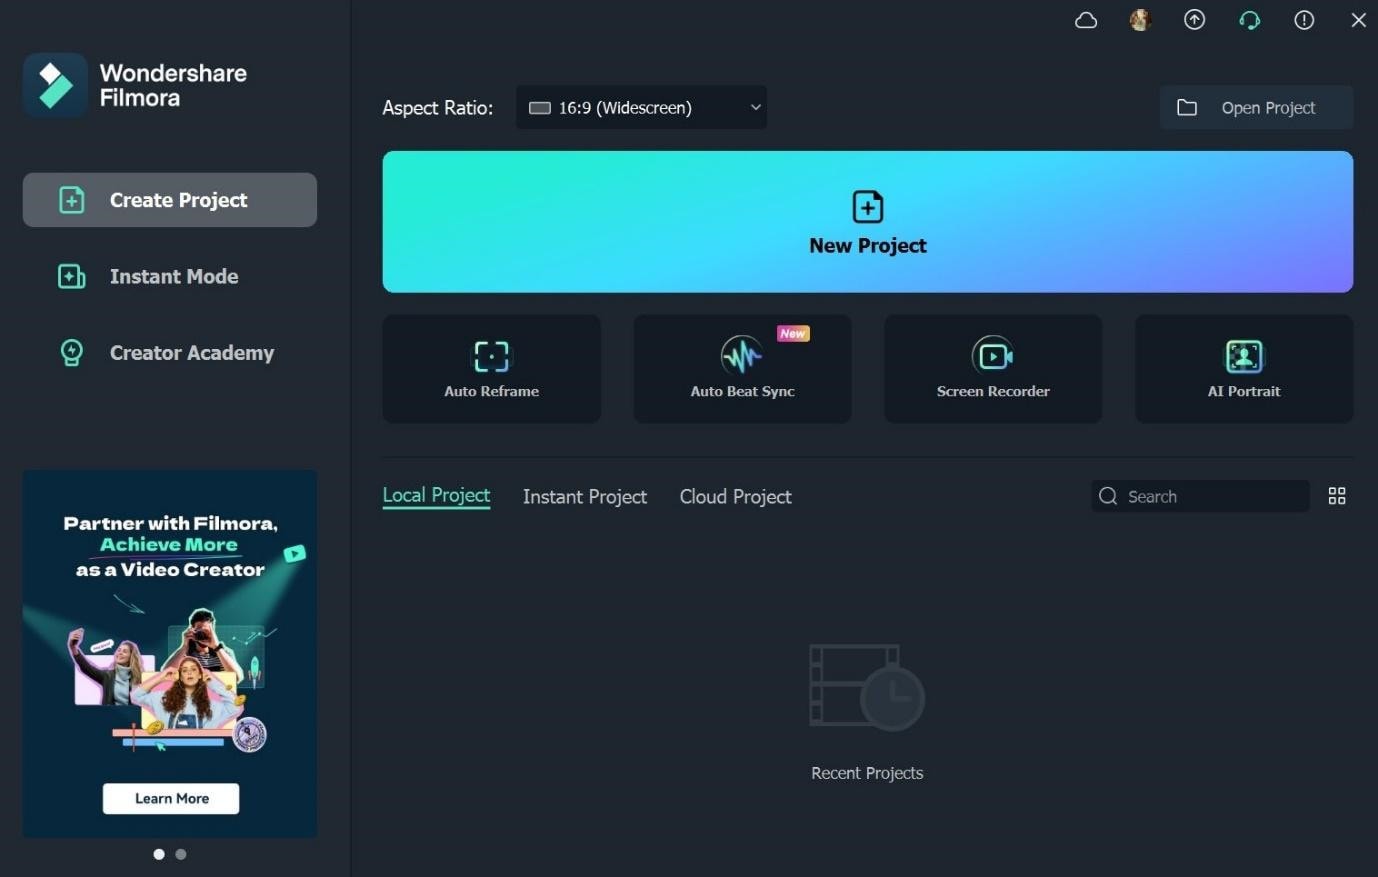
Step1 Download Filmora from the official website and install it on your computer.
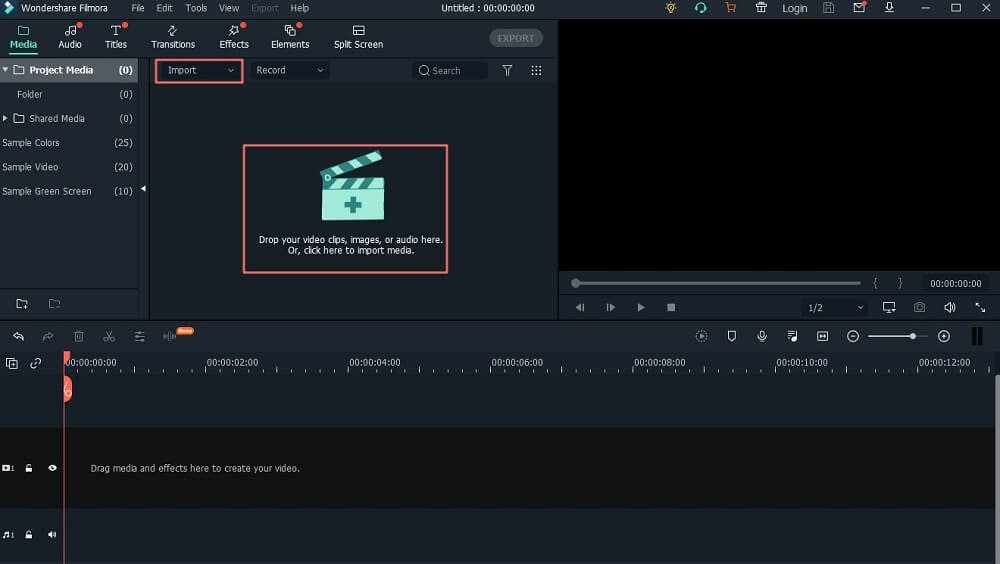
Step2 Start the Filmora program and import the SRT file that you’re looking to edit from your PC. Alternatively, you can just drag-n-drop the file.
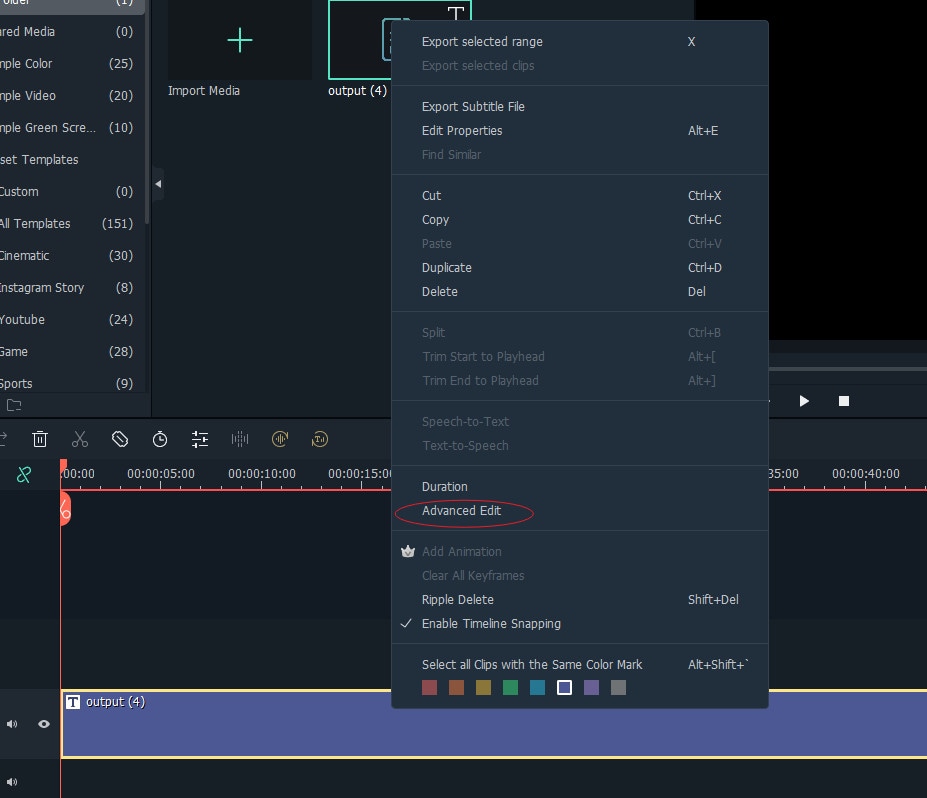
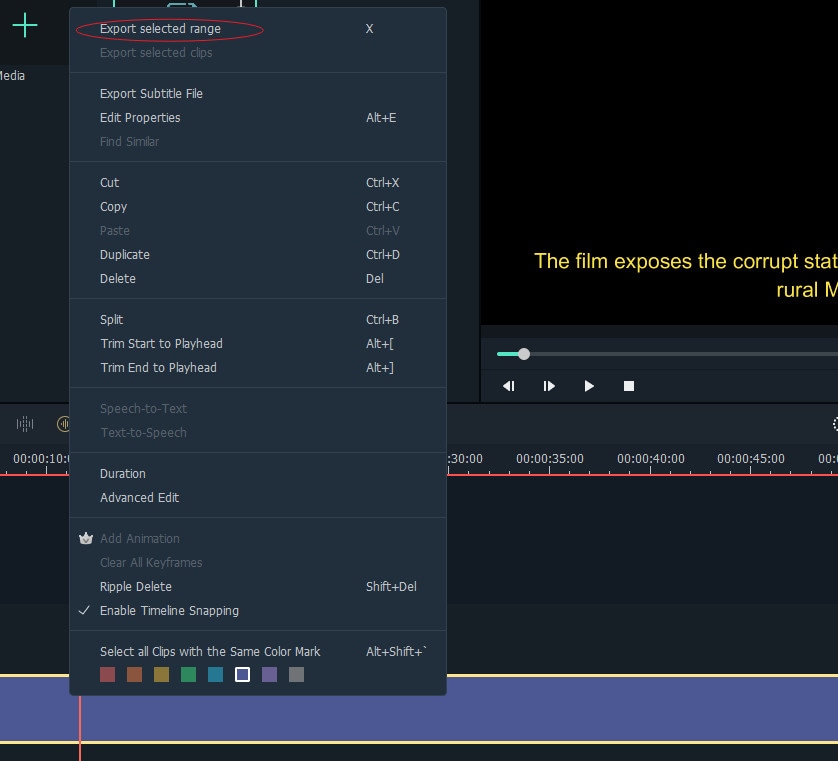
Step3 Drag-n-drop the .srt file into the Timeline. Then right-click on it and select ‘Advanced Edit’ from the pop-up list.
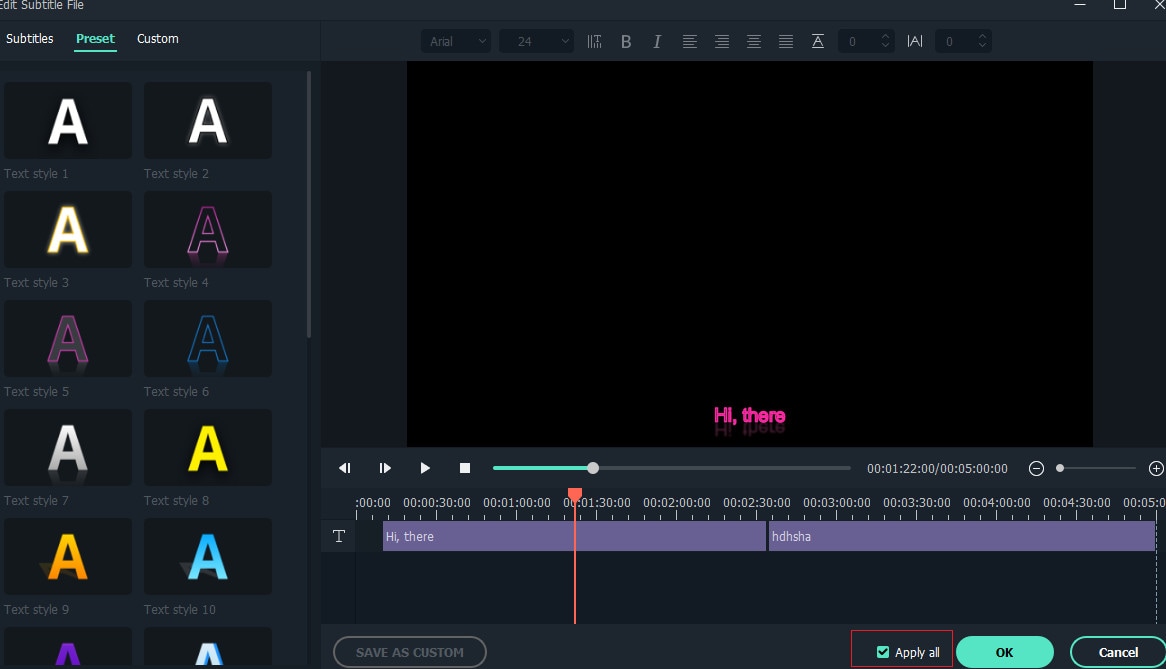
Step4 Now, edit the SRT file as per requirements. The following editing operations you can perform with Filmora include;
- Edit time code.
- Change Subtitles.
- Add/remove/merge subtitle strips.
- Change subtitle styles, like text color, shadow, fonts, etc. (same as Filmora Advanced Edit Text)
Step5 Once you’ve successfully edited the SRT file. Navigate to the timeline and right-click on the SRT file. Then select ‘Export Subtitle File’ and save it to your computer.
Filmora is the best choice for any kind of SRT editing. It doesn’t matter if it’s basic or advanced editing, all it takes is just a few clicks.
Final Words
You need SRT to make your videos easy to understand. So, if you’re looking to create SRT, this article has introduced all effective methods that you can always rely on to get the job done seamlessly.
You can create SRT on Windows using Notepad or on Mac using TextEdit. However, to edit SRT with high quality, Filmora is the best software to come to your rescue for such an operation.
Part 1: What are SRT subtitles?
Before we proceed to the main discussion of the day, it’ll be necessary to understand what SRT subtitles are first.
SRT Subtitles (SubRip subtitles) are text formats that are generated from DVD-ripping software SubRip. Most companies and content creators today use them in their videos to facilitate easy understanding of their videos. Thus, allowing their videos to get higher engagement and views.
Part 2: How to create a .srt file for video on Windows?
To create a .srt file for your video on a Windows computer is pretty simple. Yes, you don’t require technical knowledge or any third-party software for such an operation. All it takes is just a few clicks.
That being said, keep in mind that before you start creating SRT subtitles for your video, you must have reviewed your video and have a copy of the audio/dialogue that you want to use as a caption in the SRT file. This will prevent you from making errors during the SRT creation process.
The stepwise guide illustrated below will walk you through how to create an SRT file for video in Windows;
Step1 Start your Windows computer and open the Notepad program. Then create a new file.
 Greeting Card Builder
Step2 Up next, play your video and listen to the first line of the dialogue. Then pause it and write your first subtitle in the note by doing the following;
- Type 1 > under it, write the first Timestamp. The timestamp should be written in hours:minutes: seconds, milliseconds format as shown below;
1
- 00:00:07,114 –> 00:00:11,834
The times displayed indicate the beginning and end of when the subtitle appears on the viewer’s screen. Ensure to make this time as accurate as possible.
Step3 Move to the next line and type your subtitle content - the text that will show on the screen. This should be one or two sentences. Long texts should be broken into multiple subtitles to make them easy for viewers to understand.
Step4 Repeat steps 2&3 for the remaining subtitle contents.
Below is an example of what an SRT subtitle should look like;
1
00:00:07,114 –> 00:00:11,834
Hello, and welcome to our presentation.
2
00:00:012,108 –> 00:00:16,357
In this video, we’ll be showing
Step5 Review the subtitle and edit every error after you’ve completed it.
Step6 Finally, save the file in .srt format by clicking ‘File’ > Save. Then under ‘Save As’ enter the file name and add .srt as the preferred extension for your file. Click the ‘Save’ button to complete the task.
Part 3: How to create an SRT file for video on Mac?
Are you using a Mac computer? Don’t panic, we got you covered with the step-by-step instructions to create a .srt subtitle file and such a computer.
The process of creating a .srt file for video on Mac is quite similar to .srt file creation on Windows. You don’t require the installation of a third-party program. However, on Mac, you’ll use TextEdit as Notepad is not supported.
Let’s proceed to the stepwise guide on how to make an SRT file by yourself for video on Mac without wasting time;
Step1 Turn on your Mac computer and start TextEdit.
Step2 Create a new file. But before writing any subtitle captions, play the video whose subtitle you want to write and listen to the first line of the audio.
After you’ve grabbed the first line, type 1 and write the first Timestamp in hours:minutes: seconds, milliseconds.
Here is an example of what you should do;
1
00:00:07,114 –> 00:00:11,834
As mentioned earlier, the times indicate the beginning and end of when the subtitle appears on the screen.
Step3 Type your subtitle content in the next line. If it’s a long text, you need to break it down into multiple subtitles.
Step4 Repeat step 2&3 for the remaining subtitle contents.
See what an SRT subtitle looks like below;
Step5 Review and edit the subtitle.
Step6 To complete the operation, click ‘File’ at the top bar and select Save from the drop-down. Then navigate to ‘Save As’ and type your file name, and change the extension from .txt to .srt.
Make sure you Uncheck the ‘Hide Extension’ and ‘If no extension is provided’ checkboxes. Then click the ‘Save’ button to complete the operation!
Pro Tips: DIY SRT Creation for Videos like a Pro After Creating
Are you looking to make advanced editing on the SRT subtitles you created? Filmora is the ideal tool to help you complete the action.
Filmora is a professional video editing software that is loaded with a wide range of editing features including SRT editing to allow users to enhance the quality of the video without complications.
Unlike many other advanced .srt editors, Filmora supports the creation of SRT subtitles in over 20 languages including English. And the cool thing is you don’t need technical knowledge to operate the tool as it has a clean interface that makes navigation easier than you can ever think.
How to use Filmora to Edit SRT files for Videos after Creating
Free Download For Win 7 or later(64-bit)
Free Download For macOS 10.14 or later
Step1 Download Filmora from the official website and install it on your computer.
Step2 Start the Filmora program and import the SRT file that you’re looking to edit from your PC. Alternatively, you can just drag-n-drop the file.
Step3 Drag-n-drop the .srt file into the Timeline. Then right-click on it and select ‘Advanced Edit’ from the pop-up list.
 Simple and intuitive video editing
Step4 Now, edit the SRT file as per requirements. The following editing operations you can perform with Filmora include;
- Edit time code.
- Change Subtitles.
- Add/remove/merge subtitle strips.
- Change subtitle styles, like text color, shadow, fonts, etc. (same as Filmora Advanced Edit Text)
Step5 Once you’ve successfully edited the SRT file. Navigate to the timeline and right-click on the SRT file. Then select ‘Export Subtitle File’ and save it to your computer.
Filmora is the best choice for any kind of SRT editing. It doesn’t matter if it’s basic or advanced editing, all it takes is just a few clicks.

Final Words
You need SRT to make your videos easy to understand. So, if you’re looking to create SRT, this article has introduced all effective methods that you can always rely on to get the job done seamlessly.
You can create SRT on Windows using Notepad or on Mac using TextEdit. However, to edit SRT with high quality, Filmora is the best software to come to your rescue for such an operation.
- Title: Masterclass Generating Professional SRT Documents
- Author: Joseph
- Created at : 2024-07-27 09:40:20
- Updated at : 2024-07-28 09:40:20
- Link: https://extra-tips.techidaily.com/masterclass-generating-professional-srt-documents/
- License: This work is licensed under CC BY-NC-SA 4.0.