:max_bytes(150000):strip_icc()/Holding-iPhone-Emergency-SOS-Power-Off-Screen-8630001-1896d5a5d1e84350b096a0098f4e45c4.jpg)
"In 2024, Capture Selfie Snap Shots with Vintage iPhone X"
Capture Selfie: Snap Shots with Vintage iPhone X
How to Take Portrait Photo with Old iPhone X/8 Plus/7 Plus

Ollie Mattison
Mar 27, 2024• Proven solutions
Until recently, iPhone cameras didn’t have lenses that enabled its users to produce smooth blurry backgrounds around the subject of a photo. The so-called Bokeh effect adds depth to the photo and it also allows the photographer to separate the model in the foreground from the background. Furthermore, creating a portrait photo with Apple’s smartphones has never been easier, because the latest models of iPhones that have a twin-lens system make this process fun and easy.
In this article, we are going to show you how to take photos in Portrait Mode, on iPhone X, 8 Plus, and 7 Plus, but we are also going to take a look at a few apps for older versions of iPhone that also enable you to create amazing portraits.
Tips for iPhone portrait photos
For iPhone 7 Plus/8 Plus/X users
Using the Portrait Mode on an iPhone
The quality of cameras on iPhones has been improving over the years, and Portrait Mode on Apple’s twin-lens devices is the clear result of that process. All twin-lens iPhones have a Portrait mode that can be accessed through the menu located near the bottom of the camera app screen. Pano, Square or Time-Lapse modes are also available.
However, the Portrait Mode is only featured on iOS 10.1 or some more recent versions of the iOS, so if you want to use the Portrait Mode you need to upgrade your device’s iOS. After you launched the camera app, swipe left and look for the Portrait Mode. Once you find the feature, make sure it is marked yellow, in order to start using its tools. The app will display several different lighting options including the Natural Light preset that is essential for creating photos with Portrait Lightning.

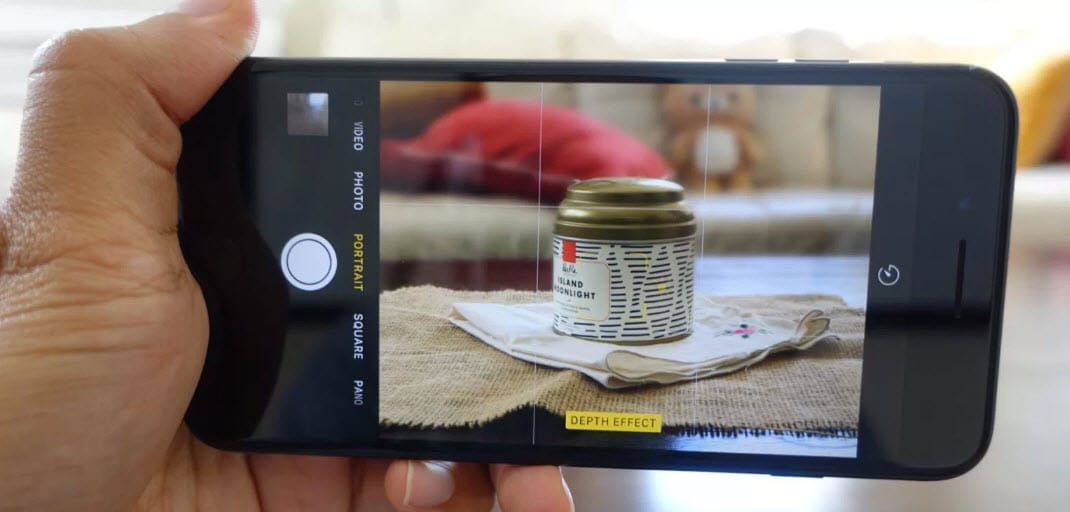
Image resource: 9to5mac
Portrait mode enables you to set the timer, turn off the flash or apply photo filters, but it doesn’t allow its users to create live photos. When using this mode you only have to apply basic photography rules, like don’t point your camera in the direction from which the light is coming from and do your best to get within a reasonable distance from the subject of your photos. If you decide to take photos in this mode indoors, you may get slightly underwhelming results because it still doesn’t perform great in low-light conditions.
Taking selfies in Portrait Mode with iPhone X
The iPhone X can also take Portrait selfies thanks to the TrueDepth front camera system. Unlike the rear camera system, the front-facing camera doesn’t have multiple physical camera lenses; instead, it uses sensors from the TrueDepth system to measure a precise depth map.
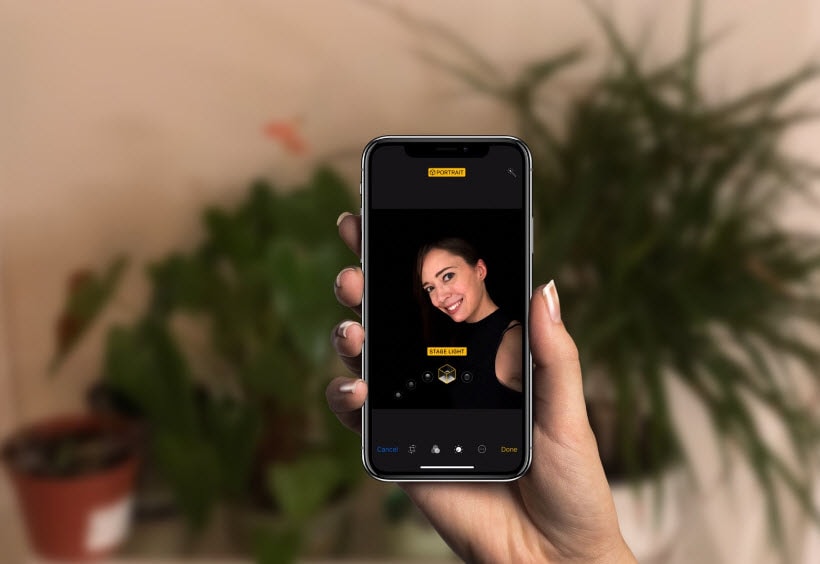
Image resource: imore
Launch the Camera app, and swipe to the Portrait option, and then tap on the Camera Swap feature to start using the front camera on your iPhone. Find the Portrait Lightning feature in the camera’s Portrait mode, then select one of the options provided by the Portrait Lightning such as Studio Light or Natural light, and proceed to snap a selfie by tapping on the shutter button.
If there is not enough light or if you are too far away from the camera, the app will show messages that remind you to add more light to your shot or hold the camera closer to the subject of the photo. It is worth noting that the app will not let you take a photo until you do everything that messages on the screen demand from you. However, the Portrait Mode doesn’t allow you to take several photos at once, but it still produces amazing pictures that can be easily shared on social media.
For iPhone 8, 7 or older iPhones users
FabFocus
Price: $3.99
Compatible with: iOS 8.0 or later
Older iPhone models may not have a twin-lens system, but with the aid of a camera app such as FabFocus, iPhone photographers can easily take photos with smooth blurry backgrounds. The Automatic Depth of Field and Bokeh options enable you to add as much blur as you want to your photos and create DSLR-like images. The app also contains basic photo editing tools that can be used to touch-up the photo before you share it with your friends.
Tadaa SLR
Price: $3.99
Compatible with: iOS 8.0 or later
Advertised as the best depth-of-field app for iPhones on the market today, Tadaa SLR sets high photography standards. To make things even better, the app is so easy to use that you just need to set the focal point of the photo and tap on the shutter button to snap a photo. However, Tadaa SLR is only a camera app that doesn’t offer a lot of photo editing options.
Bokeh Lens
Price: $0.99
Compatible with: iOS 8.0 or later


The term Bokeh comes from the Japanese language and it represents the aesthetic quality of the out of focus parts of photos. The Bokeh Lens app is designed to make the process of creating a shallow depth of field as fast and fun as it can be. The app lets you fine-tune the level of bokeh you are creating a photo, while it also allows you to select the areas you want to keep in focus.
Defocus
Price: $1.99
Compatible with: iOS 8.0 or later

![]()
The plethora of blur options provided by the Defocus camera app is impressive. Dynamic Blur and Pain Blur tools provide a lot of creative freedom to the app’s users while uploading a photo from the iPhone’s camera roll and adding a bokeh effect to a photo is also an option. Defocus offers superb photo sharing features, which means that you can share your photos on any social media network directly from the app.
Ollie Mattison
Ollie Mattison is a writer and a lover of all things video.
Follow @Ollie Mattison
Ollie Mattison
Mar 27, 2024• Proven solutions
Until recently, iPhone cameras didn’t have lenses that enabled its users to produce smooth blurry backgrounds around the subject of a photo. The so-called Bokeh effect adds depth to the photo and it also allows the photographer to separate the model in the foreground from the background. Furthermore, creating a portrait photo with Apple’s smartphones has never been easier, because the latest models of iPhones that have a twin-lens system make this process fun and easy.
In this article, we are going to show you how to take photos in Portrait Mode, on iPhone X, 8 Plus, and 7 Plus, but we are also going to take a look at a few apps for older versions of iPhone that also enable you to create amazing portraits.
Tips for iPhone portrait photos
For iPhone 7 Plus/8 Plus/X users
Using the Portrait Mode on an iPhone
The quality of cameras on iPhones has been improving over the years, and Portrait Mode on Apple’s twin-lens devices is the clear result of that process. All twin-lens iPhones have a Portrait mode that can be accessed through the menu located near the bottom of the camera app screen. Pano, Square or Time-Lapse modes are also available.
However, the Portrait Mode is only featured on iOS 10.1 or some more recent versions of the iOS, so if you want to use the Portrait Mode you need to upgrade your device’s iOS. After you launched the camera app, swipe left and look for the Portrait Mode. Once you find the feature, make sure it is marked yellow, in order to start using its tools. The app will display several different lighting options including the Natural Light preset that is essential for creating photos with Portrait Lightning.
 Easy and Safe Partition Software & Hard Disk Manager
Image resource: 9to5mac
Portrait mode enables you to set the timer, turn off the flash or apply photo filters, but it doesn’t allow its users to create live photos. When using this mode you only have to apply basic photography rules, like don’t point your camera in the direction from which the light is coming from and do your best to get within a reasonable distance from the subject of your photos. If you decide to take photos in this mode indoors, you may get slightly underwhelming results because it still doesn’t perform great in low-light conditions.
Taking selfies in Portrait Mode with iPhone X
The iPhone X can also take Portrait selfies thanks to the TrueDepth front camera system. Unlike the rear camera system, the front-facing camera doesn’t have multiple physical camera lenses; instead, it uses sensors from the TrueDepth system to measure a precise depth map.
Image resource: imore
Launch the Camera app, and swipe to the Portrait option, and then tap on the Camera Swap feature to start using the front camera on your iPhone. Find the Portrait Lightning feature in the camera’s Portrait mode, then select one of the options provided by the Portrait Lightning such as Studio Light or Natural light, and proceed to snap a selfie by tapping on the shutter button.
If there is not enough light or if you are too far away from the camera, the app will show messages that remind you to add more light to your shot or hold the camera closer to the subject of the photo. It is worth noting that the app will not let you take a photo until you do everything that messages on the screen demand from you. However, the Portrait Mode doesn’t allow you to take several photos at once, but it still produces amazing pictures that can be easily shared on social media.


For iPhone 8, 7 or older iPhones users
FabFocus
Price: $3.99
Compatible with: iOS 8.0 or later
Older iPhone models may not have a twin-lens system, but with the aid of a camera app such as FabFocus, iPhone photographers can easily take photos with smooth blurry backgrounds. The Automatic Depth of Field and Bokeh options enable you to add as much blur as you want to your photos and create DSLR-like images. The app also contains basic photo editing tools that can be used to touch-up the photo before you share it with your friends.
Tadaa SLR
Price: $3.99
Compatible with: iOS 8.0 or later
Advertised as the best depth-of-field app for iPhones on the market today, Tadaa SLR sets high photography standards. To make things even better, the app is so easy to use that you just need to set the focal point of the photo and tap on the shutter button to snap a photo. However, Tadaa SLR is only a camera app that doesn’t offer a lot of photo editing options.
Bokeh Lens
Price: $0.99
Compatible with: iOS 8.0 or later
The term Bokeh comes from the Japanese language and it represents the aesthetic quality of the out of focus parts of photos. The Bokeh Lens app is designed to make the process of creating a shallow depth of field as fast and fun as it can be. The app lets you fine-tune the level of bokeh you are creating a photo, while it also allows you to select the areas you want to keep in focus.
Defocus
Price: $1.99
Compatible with: iOS 8.0 or later

![]()
The plethora of blur options provided by the Defocus camera app is impressive. Dynamic Blur and Pain Blur tools provide a lot of creative freedom to the app’s users while uploading a photo from the iPhone’s camera roll and adding a bokeh effect to a photo is also an option. Defocus offers superb photo sharing features, which means that you can share your photos on any social media network directly from the app.

Ollie Mattison
Ollie Mattison is a writer and a lover of all things video.
Follow @Ollie Mattison
Ollie Mattison
Mar 27, 2024• Proven solutions
Until recently, iPhone cameras didn’t have lenses that enabled its users to produce smooth blurry backgrounds around the subject of a photo. The so-called Bokeh effect adds depth to the photo and it also allows the photographer to separate the model in the foreground from the background. Furthermore, creating a portrait photo with Apple’s smartphones has never been easier, because the latest models of iPhones that have a twin-lens system make this process fun and easy.
In this article, we are going to show you how to take photos in Portrait Mode, on iPhone X, 8 Plus, and 7 Plus, but we are also going to take a look at a few apps for older versions of iPhone that also enable you to create amazing portraits.
Tips for iPhone portrait photos
For iPhone 7 Plus/8 Plus/X users
Using the Portrait Mode on an iPhone
The quality of cameras on iPhones has been improving over the years, and Portrait Mode on Apple’s twin-lens devices is the clear result of that process. All twin-lens iPhones have a Portrait mode that can be accessed through the menu located near the bottom of the camera app screen. Pano, Square or Time-Lapse modes are also available.
However, the Portrait Mode is only featured on iOS 10.1 or some more recent versions of the iOS, so if you want to use the Portrait Mode you need to upgrade your device’s iOS. After you launched the camera app, swipe left and look for the Portrait Mode. Once you find the feature, make sure it is marked yellow, in order to start using its tools. The app will display several different lighting options including the Natural Light preset that is essential for creating photos with Portrait Lightning.
Image resource: 9to5mac
Portrait mode enables you to set the timer, turn off the flash or apply photo filters, but it doesn’t allow its users to create live photos. When using this mode you only have to apply basic photography rules, like don’t point your camera in the direction from which the light is coming from and do your best to get within a reasonable distance from the subject of your photos. If you decide to take photos in this mode indoors, you may get slightly underwhelming results because it still doesn’t perform great in low-light conditions.
Taking selfies in Portrait Mode with iPhone X
The iPhone X can also take Portrait selfies thanks to the TrueDepth front camera system. Unlike the rear camera system, the front-facing camera doesn’t have multiple physical camera lenses; instead, it uses sensors from the TrueDepth system to measure a precise depth map.
Image resource: imore
Launch the Camera app, and swipe to the Portrait option, and then tap on the Camera Swap feature to start using the front camera on your iPhone. Find the Portrait Lightning feature in the camera’s Portrait mode, then select one of the options provided by the Portrait Lightning such as Studio Light or Natural light, and proceed to snap a selfie by tapping on the shutter button.
If there is not enough light or if you are too far away from the camera, the app will show messages that remind you to add more light to your shot or hold the camera closer to the subject of the photo. It is worth noting that the app will not let you take a photo until you do everything that messages on the screen demand from you. However, the Portrait Mode doesn’t allow you to take several photos at once, but it still produces amazing pictures that can be easily shared on social media.
For iPhone 8, 7 or older iPhones users
FabFocus
Price: $3.99
Compatible with: iOS 8.0 or later
Older iPhone models may not have a twin-lens system, but with the aid of a camera app such as FabFocus, iPhone photographers can easily take photos with smooth blurry backgrounds. The Automatic Depth of Field and Bokeh options enable you to add as much blur as you want to your photos and create DSLR-like images. The app also contains basic photo editing tools that can be used to touch-up the photo before you share it with your friends.
Tadaa SLR
Price: $3.99
Compatible with: iOS 8.0 or later
 Allavsoft Batch Download Online Videos, Music Offline to MP4, MP3, MOV, etc format
Advertised as the best depth-of-field app for iPhones on the market today, Tadaa SLR sets high photography standards. To make things even better, the app is so easy to use that you just need to set the focal point of the photo and tap on the shutter button to snap a photo. However, Tadaa SLR is only a camera app that doesn’t offer a lot of photo editing options.
Bokeh Lens
Price: $0.99
Compatible with: iOS 8.0 or later
 KoolReport Pro is an advanced solution for creating data reports and dashboards in PHP. Equipped with all extended packages , KoolReport Pro is able to connect to various datasources, perform advanced data analysis, construct stunning charts and graphs and export your beautiful work to PDF, Excel, JPG or other formats. Plus, it includes powerful built-in reports such as pivot report and drill-down report which will save your time in building ones.
 It will help you to write dynamic data reports easily, to construct intuitive dashboards or to build a whole business intelligence cockpit.
KoolReport Pro package goes with Full Source Code, Royal Free, ONE (1) Year Priority Support, ONE (1) Year Free Upgrade and 30-Days Money Back Guarantee.
Developer License allows Single Developer to create Unlimited Reports, deploy on Unlimited Servers and able deliver the work to Unlimited Clients.
The term Bokeh comes from the Japanese language and it represents the aesthetic quality of the out of focus parts of photos. The Bokeh Lens app is designed to make the process of creating a shallow depth of field as fast and fun as it can be. The app lets you fine-tune the level of bokeh you are creating a photo, while it also allows you to select the areas you want to keep in focus.
Defocus
Price: $1.99
Compatible with: iOS 8.0 or later
![]()
The plethora of blur options provided by the Defocus camera app is impressive. Dynamic Blur and Pain Blur tools provide a lot of creative freedom to the app’s users while uploading a photo from the iPhone’s camera roll and adding a bokeh effect to a photo is also an option. Defocus offers superb photo sharing features, which means that you can share your photos on any social media network directly from the app.
Ollie Mattison
Ollie Mattison is a writer and a lover of all things video.
Follow @Ollie Mattison
Ollie Mattison
Mar 27, 2024• Proven solutions
Until recently, iPhone cameras didn’t have lenses that enabled its users to produce smooth blurry backgrounds around the subject of a photo. The so-called Bokeh effect adds depth to the photo and it also allows the photographer to separate the model in the foreground from the background. Furthermore, creating a portrait photo with Apple’s smartphones has never been easier, because the latest models of iPhones that have a twin-lens system make this process fun and easy.
In this article, we are going to show you how to take photos in Portrait Mode, on iPhone X, 8 Plus, and 7 Plus, but we are also going to take a look at a few apps for older versions of iPhone that also enable you to create amazing portraits.
Tips for iPhone portrait photos
For iPhone 7 Plus/8 Plus/X users
Using the Portrait Mode on an iPhone
The quality of cameras on iPhones has been improving over the years, and Portrait Mode on Apple’s twin-lens devices is the clear result of that process. All twin-lens iPhones have a Portrait mode that can be accessed through the menu located near the bottom of the camera app screen. Pano, Square or Time-Lapse modes are also available.
However, the Portrait Mode is only featured on iOS 10.1 or some more recent versions of the iOS, so if you want to use the Portrait Mode you need to upgrade your device’s iOS. After you launched the camera app, swipe left and look for the Portrait Mode. Once you find the feature, make sure it is marked yellow, in order to start using its tools. The app will display several different lighting options including the Natural Light preset that is essential for creating photos with Portrait Lightning.
Image resource: 9to5mac
Portrait mode enables you to set the timer, turn off the flash or apply photo filters, but it doesn’t allow its users to create live photos. When using this mode you only have to apply basic photography rules, like don’t point your camera in the direction from which the light is coming from and do your best to get within a reasonable distance from the subject of your photos. If you decide to take photos in this mode indoors, you may get slightly underwhelming results because it still doesn’t perform great in low-light conditions.
Taking selfies in Portrait Mode with iPhone X
The iPhone X can also take Portrait selfies thanks to the TrueDepth front camera system. Unlike the rear camera system, the front-facing camera doesn’t have multiple physical camera lenses; instead, it uses sensors from the TrueDepth system to measure a precise depth map.
Image resource: imore
Launch the Camera app, and swipe to the Portrait option, and then tap on the Camera Swap feature to start using the front camera on your iPhone. Find the Portrait Lightning feature in the camera’s Portrait mode, then select one of the options provided by the Portrait Lightning such as Studio Light or Natural light, and proceed to snap a selfie by tapping on the shutter button.
If there is not enough light or if you are too far away from the camera, the app will show messages that remind you to add more light to your shot or hold the camera closer to the subject of the photo. It is worth noting that the app will not let you take a photo until you do everything that messages on the screen demand from you. However, the Portrait Mode doesn’t allow you to take several photos at once, but it still produces amazing pictures that can be easily shared on social media.
For iPhone 8, 7 or older iPhones users
FabFocus
Price: $3.99
Compatible with: iOS 8.0 or later
Older iPhone models may not have a twin-lens system, but with the aid of a camera app such as FabFocus, iPhone photographers can easily take photos with smooth blurry backgrounds. The Automatic Depth of Field and Bokeh options enable you to add as much blur as you want to your photos and create DSLR-like images. The app also contains basic photo editing tools that can be used to touch-up the photo before you share it with your friends.
Tadaa SLR
Price: $3.99
Compatible with: iOS 8.0 or later
Advertised as the best depth-of-field app for iPhones on the market today, Tadaa SLR sets high photography standards. To make things even better, the app is so easy to use that you just need to set the focal point of the photo and tap on the shutter button to snap a photo. However, Tadaa SLR is only a camera app that doesn’t offer a lot of photo editing options.
Bokeh Lens
Price: $0.99
Compatible with: iOS 8.0 or later
The term Bokeh comes from the Japanese language and it represents the aesthetic quality of the out of focus parts of photos. The Bokeh Lens app is designed to make the process of creating a shallow depth of field as fast and fun as it can be. The app lets you fine-tune the level of bokeh you are creating a photo, while it also allows you to select the areas you want to keep in focus.
Defocus
Price: $1.99
Compatible with: iOS 8.0 or later
![]()
The plethora of blur options provided by the Defocus camera app is impressive. Dynamic Blur and Pain Blur tools provide a lot of creative freedom to the app’s users while uploading a photo from the iPhone’s camera roll and adding a bokeh effect to a photo is also an option. Defocus offers superb photo sharing features, which means that you can share your photos on any social media network directly from the app.
Ollie Mattison
Ollie Mattison is a writer and a lover of all things video.
Follow @Ollie Mattison
- Title: In 2024, Capture Selfie Snap Shots with Vintage iPhone X
- Author: Joseph
- Created at : 2024-07-27 09:24:00
- Updated at : 2024-07-28 09:24:00
- Link: https://extra-tips.techidaily.com/in-2024-capture-selfie-snap-shots-with-vintage-iphone-x/
- License: This work is licensed under CC BY-NC-SA 4.0.