
In 2024, Avoiding Darkness with Lightroom’s Dynamic Range Technique
Avoiding Darkness with Lightroom’s Dynamic Range Technique
Lightroom is certain one of the best HDR software for all levels of photographers. Whether it’s your first time creating an HDR merge or you simply want to take advantage of the speed and accuracy that this software provides, using Lightroom HDR is a far more powerful and pleasant desktop , mobile , and web compatible tool to create awesome high dynamic range photos.
How to Create HDR Images in Lightroom?
You can use Lightroom HDR to properly balance images and provide high dynamic range and color vibrancy in pictures and videos. You can get high-quality images with no ghosting or bad alignment in the finished files and get enhanced visibility. In addition, features like Lightroom Enfuse are available for further editing.
How to get high dynamic range photos with Lightroom?
Step1Open the Lightroom software and right-click on the menu. On Mac PCs, press Ctrl + Mac icon.
Step2Hover your cursor on top of the “Photo Merge” option. From the drop-down menu, choose HDR.
Step3When the subsequent window loads in some time, tap the check mark beside the Auto Align option. All images will rearrange in an ordered sequence.
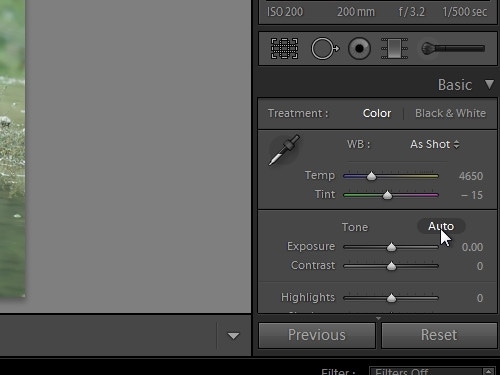
Step4Click on the Auto Tone feature to get shadow and highlight-related detailing.
Step5Adjust the Deghosting quantity from None to Medium or High.
Step6Press Merge to export the HDR image. It will create one RAW file.
Step7Access the Develop module for further editing to the standard image file, changing elements like White/Black points, Exposure, and Vibrance settings.
Step8Finally, save the file.
How to Use HDR Merge in Lightroom?
It is straightforward and usable for people to use the Lightroom HDR Merge function to add multiple images into a stack and prepare HDRs. The steps for that are simple to carry out, but you need to upgrade your software to the latest version first for the best results.
How to perform HDR merge with Lightroom?
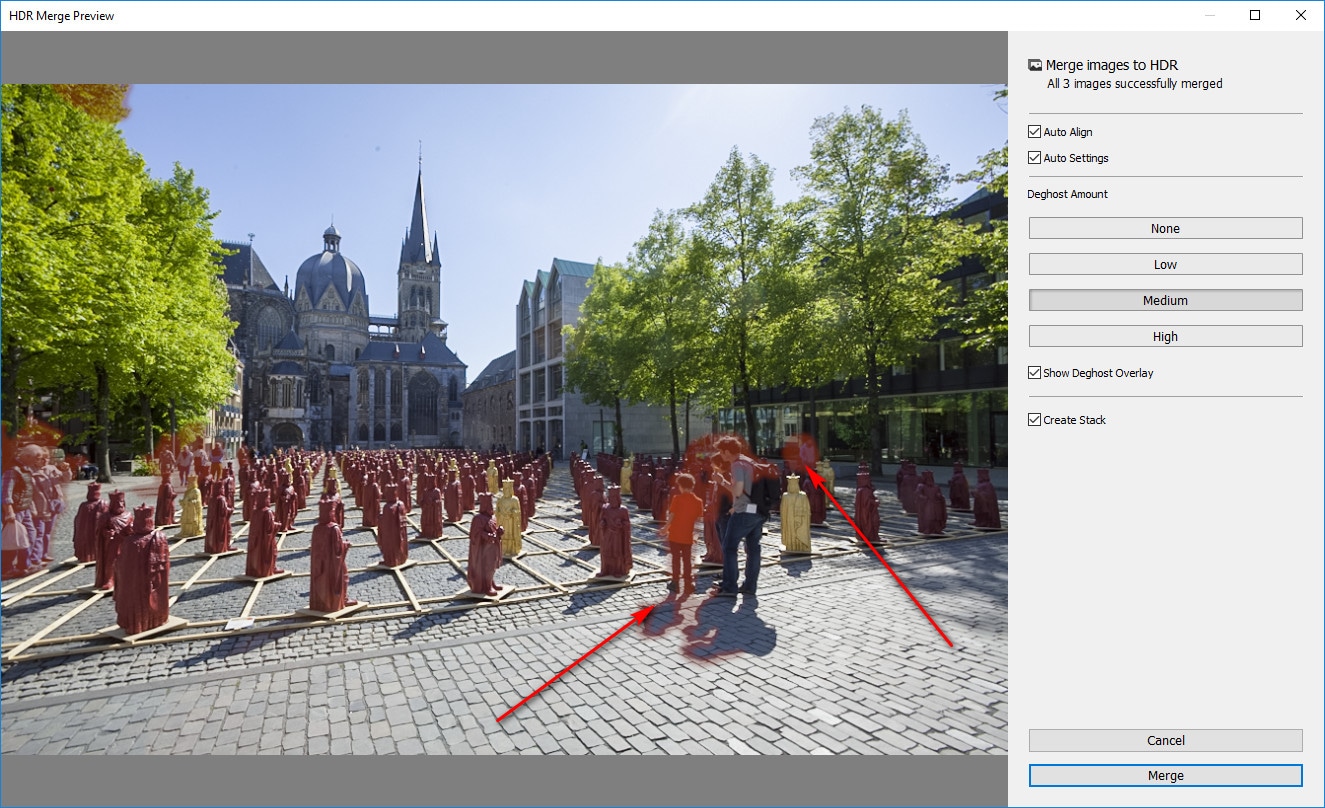
Step1Open the Lightroom Classic software and control-click/CMD all pictures you want to merge.
Step2Click on Photo > Photo Merge. Then, choose the HDR option.
Alternatively, you can press the Ctrl and H keys on your keyboard.

Step3When the HDR Merge Preview box opens, click the tick boxes beside Auto Tone and Auto Align to OFF. This is only if necessary, so see the previewed images to decide if you want to keep the default settings or not.
Step4In some of the exposure-bracketed pictures that merge, there are patches of semi-transparent spots in the HDR image. To avoid this, you can adjust deghosting between None and High, based on how many of the different artifacts you want to remove.
Step5Preview all changes and make further adjustments, if necessary.
Step6After the merging takes place, click on the Create Stack choice to group multiple exposure-bracketed images. After you do so, the HDR image will appear at the front position of the stacked images.
 Forex Robotron Basic Package
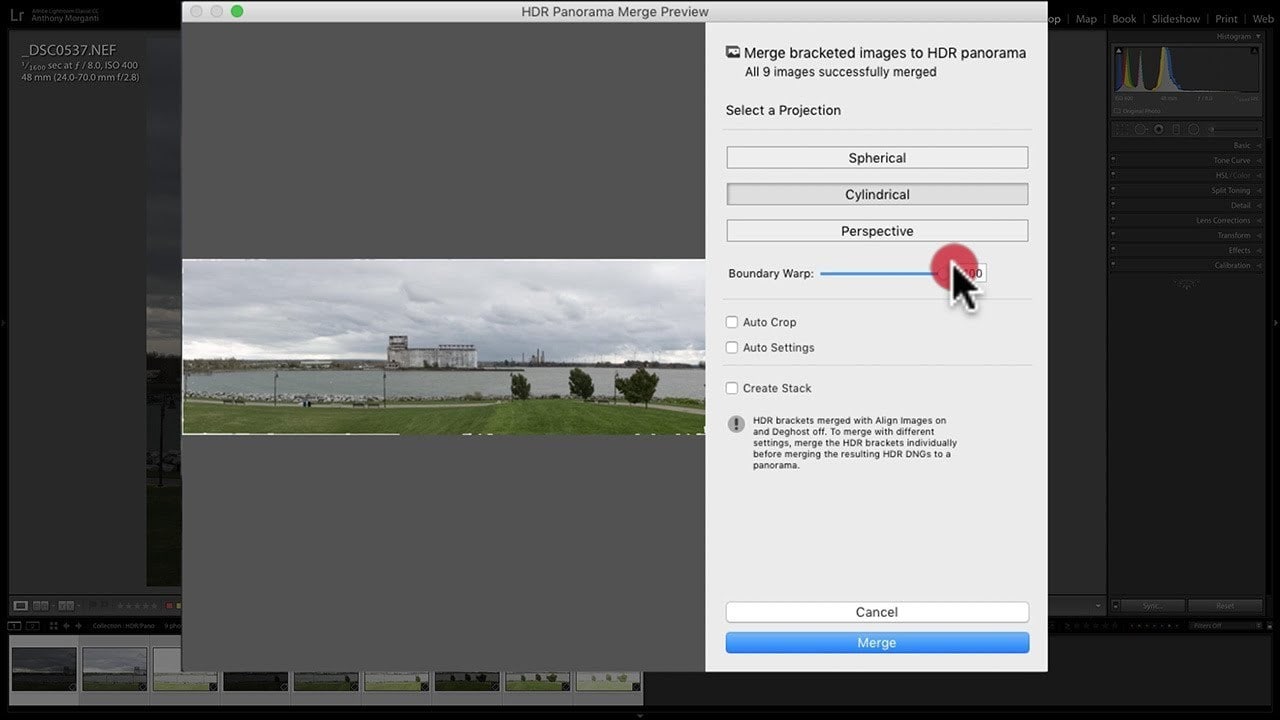
Step7Click the Merge button to save the HDR photo as a .dng image file.
Is Lightroom or Photoshop better for HDR?
Both Photoshop and Lightroom are suitable solutions for different improvements to image processing quality. But there are variations between these two Adobe productions.
Lightroom has many editing pre-sets
To note, many HDR Lightroom presets are available for more accessible editing work, like merging images after selecting multiple shots in the Library grid view. You can right-click on top of the chosen pictures and edit them in the HDR Pro (Photoshop) platforms. It will automatically begin the merging process.

Lightroom merges in HDR Raw format
However, while Photoshop HDR Pro is notable for HDR-centric editing and merging, Lightroom allows users to merge the RAW files in the software into HDR RAW files. So, photographers using Lightroom HDR merge can customize the images better and provide higher dynamic range quality with no formatting change. On the other hand, Photoshop allows Photoshop PSD file type merging mainly.
Photoshop HDR Pro offers 8-bit/16-bit/32-bit file options
The Photoshop HDR Pro version allows 8-bit/16-bit files. You can change them to 32-bit files by tapping the top-right section of this software window. Here, you can use the setting “Complete Toning in Adobe Raw” instead of operating the standard HDR editor controls. You can also control the ghosting mode here.

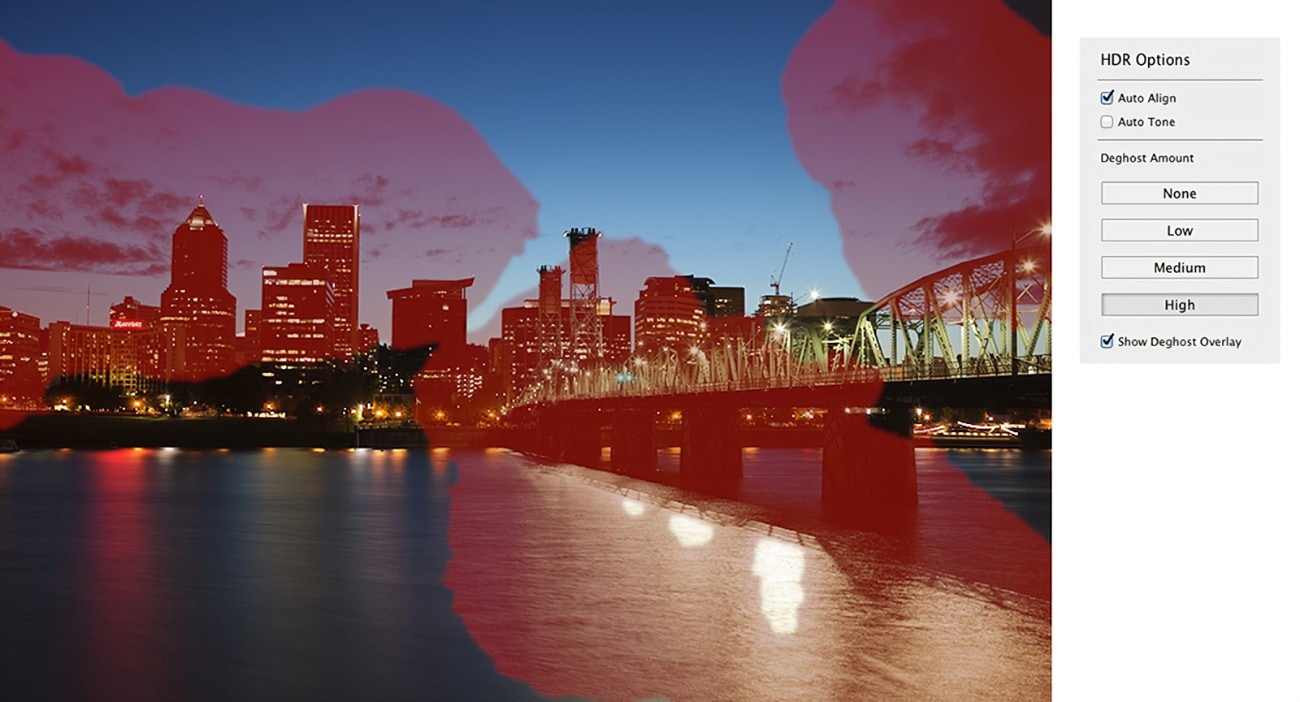
Photoshop vs. Lightroom Deghosting feature
On the other hand, features like Lightroom bracketing make it a suitable choice for photo editing. The HDR Merge Preview allows users to see the chosen images before any processing is started. The default settings for Deghost Amount, Auto Tone, and Auto Align are ticked, with the Deghost choice set as None.
After making any changes, you can tap the Merge button to complete the whole process. Lightroom automatically saves the image you merge in 32-bit .dng file format, adding a suffix-HDR to the file’s name. You can edit the standard file in the Develop environment later.
So, in terms of 32-bit processing, both products are helpful, but customization options are more with Photoshop.
Pros & Cons for Lightroom HDR
Pros
- Automatically saves image files in 32.bit DNG format.
- Better learning curve compared to the Photoshop HDR Pro version.
- Easy load multiple bracketing images to do Lightroom HDR merge via the Library.
Cons
- Does not include 8 and 16-bit options as default.
- Blurry images are still possible after processing.
Pros & Cons for Photoshop HDR Pro
Pros
- No stand-alone software is necessary to use this feature.
- More personalization benefits with 32-fit file editing.
- You can use both editing and tone mapping functions separately and get realistic image looks.
Cons
- More artifacts that require extra cleaning can appear if there are many moving objects visible in one scene.
- Beginners will struggle with this solution since it is relatively complex.
 Jet Profiler for MySQL, Enterprise Version: Jet Profiler for MySQL is real-time query performance and diagnostics tool for the MySQL database server. Its detailed query information, graphical interface and ease of use makes this a great tool for finding performance bottlenecks in your MySQL databases.
 Comparison Table Between Lightroom and Photoshop
For a more precise understanding, here is a comparative overview of the HDR functionality in Adobe Lightroom HDR and Photoshop products. Then, make your choice about which is better based on the information, and check your personalized needs with HDR processing and merging.
| Lightroom | Photoshop | |
|---|---|---|
| Usable Features | It includes specific lens correction tools like “Remove Chromatic Aberration” and “Profile Corrections” for optimized editing. | You can use it for tone mapping and aligning all layers in images, removing ghost effects or blurring lines, etc. |
| Ghost Removal | Standard-level ghost removal feature. | Better deghosting function. |
| Best For | This is suitable for both beginner-level and experienced editing experts. | People with the most technical knowledge/skillset and experience with HDR editing. |
| Editing Environment | You can make further edits in the Develop mode, like zooming, which is impossible in Preview mode. | Most of the editing functions are available in one environment. |
| Output | The output file is RAW/HDR RAW formats. | The output file is in PSD format. |
 CollageIt Pro
Frequently Asked Questions in Lightroom HDR
1. How do I stack photos in Lightroom for HDR?
It is possible to stack images prepared with HDR technology using Lightroom. Here, you can use Lightroom batch HDR to group multiple similar-looking photos for more effortless organization. Using this method, you can group and keep multiple similar images or those with the same subject in one section of the Filmstrip or Grid view, reducing clutter.
You have to open the Library module and access Filmstrip or Grid view. Then, choose the photos to stack from one collection or folder.
Next, click on Photo> Stacking.
Then, press the Group into Stack option.
2. How many photos are best for a photo merge using Lightroom?
While using the standard-level HDR shooter in the HDR Lightroom mobile or web software, especially with one ± 2.0 bracket, you can merge around three photos. On the other hand, you combine four shots with HDR if you use the five-shot ± 4.0 stop shooter. To note, the highest number of files one can add is around nine images.
3. What is Deghost in Lightroom HDR?
In Lightroom, Deghost is a software feature related to HDR photography. It can remove all translucent layers visible within the final Photo that is processed. This occurs during the frame-to-frame motion.

Final Words
Overall, it is simple to create high-quality images in HDR effect with the Adobe Lightroom software and merge many of these images quickly. You can make further editing to remove unwanted artifacts and blurred sections and optimize overall HDR picture quality. Alternatively, Photoshop HDR Pro is a useful Adobe tool to trust for 32-bit image processing.
Before using the HDR effect through Lightroom for stacked photo editing and merging, you should all related details first.
Free Download For Win 7 or later(64-bit)
Free Download For macOS 10.14 or later
Pros- No stand-alone software is necessary to use this feature.
- More personalization benefits with 32-fit file editing.
- You can use both editing and tone mapping functions separately and get realistic image looks.
Cons
- More artifacts that require extra cleaning can appear if there are many moving objects visible in one scene.
- Beginners will struggle with this solution since it is relatively complex.

Comparison Table Between Lightroom and Photoshop
For a more precise understanding, here is a comparative overview of the HDR functionality in Adobe Lightroom HDR and Photoshop products. Then, make your choice about which is better based on the information, and check your personalized needs with HDR processing and merging.
| Lightroom | Photoshop | |
|---|---|---|
| Usable Features | It includes specific lens correction tools like “Remove Chromatic Aberration” and “Profile Corrections” for optimized editing. | You can use it for tone mapping and aligning all layers in images, removing ghost effects or blurring lines, etc. |
| Ghost Removal | Standard-level ghost removal feature. | Better deghosting function. |
| Best For | This is suitable for both beginner-level and experienced editing experts. | People with the most technical knowledge/skillset and experience with HDR editing. |
| Editing Environment | You can make further edits in the Develop mode, like zooming, which is impossible in Preview mode. | Most of the editing functions are available in one environment. |
| Output | The output file is RAW/HDR RAW formats. | The output file is in PSD format. |
Frequently Asked Questions in Lightroom HDR
1. How do I stack photos in Lightroom for HDR?
It is possible to stack images prepared with HDR technology using Lightroom. Here, you can use Lightroom batch HDR to group multiple similar-looking photos for more effortless organization. Using this method, you can group and keep multiple similar images or those with the same subject in one section of the Filmstrip or Grid view, reducing clutter.
You have to open the Library module and access Filmstrip or Grid view. Then, choose the photos to stack from one collection or folder.
Next, click on Photo> Stacking.
Then, press the Group into Stack option.
2. How many photos are best for a photo merge using Lightroom?
While using the standard-level HDR shooter in the HDR Lightroom mobile or web software, especially with one ± 2.0 bracket, you can merge around three photos. On the other hand, you combine four shots with HDR if you use the five-shot ± 4.0 stop shooter. To note, the highest number of files one can add is around nine images.
3. What is Deghost in Lightroom HDR?
In Lightroom, Deghost is a software feature related to HDR photography. It can remove all translucent layers visible within the final Photo that is processed. This occurs during the frame-to-frame motion.
Final Words
Overall, it is simple to create high-quality images in HDR effect with the Adobe Lightroom software and merge many of these images quickly. You can make further editing to remove unwanted artifacts and blurred sections and optimize overall HDR picture quality. Alternatively, Photoshop HDR Pro is a useful Adobe tool to trust for 32-bit image processing.
Before using the HDR effect through Lightroom for stacked photo editing and merging, you should all related details first.
Free Download For Win 7 or later(64-bit)
Free Download For macOS 10.14 or later
- Title: In 2024, Avoiding Darkness with Lightroom’s Dynamic Range Technique
- Author: Joseph
- Created at : 2024-07-27 09:02:35
- Updated at : 2024-07-28 09:02:35
- Link: https://extra-tips.techidaily.com/in-2024-avoiding-darkness-with-lightrooms-dynamic-range-technique/
- License: This work is licensed under CC BY-NC-SA 4.0.