
"Hands-On Instructions for iPhone Content Syncing"
Hands-On Instructions for iPhone Content Syncing
How to Transfer Photos and Videos from iPhone to iPhone

Ollie Mattison
Mar 27, 2024• Proven solutions
Did you recently switch to iPhone X and now you are looking for a way to transfer your photos or videos to your new device? If this is the case you’ve come to the right place because we are going to show you a few different methods that will enable you to transfer all of your photos and videos to your new phone. Sharing is caring, so you will also be able to share your pictures and videos with your friends once you learn how to transfer photos and videos from an iPhone to an iPhone.
 EmEditor Professional (Lifetime License, non-store app)
How to Transfer Photos and Videos from iPhone to iPhone X/8/7
Methods of transferring videos and photos listed below are simple, but you should choose the one that you find the most helpful.
Using the iCloud Photo Stream
Pros: Remarkably easy, and the transfer is automatic so you don’t really have to do anything.
Cons: Once you turn off the iCloud Photo Library all the files that weren’t transferred will be deleted. The storage space is limited, too.
In order to start transferring photos and videos from one iPhone to another, you must first enable the iCloud Photo Library on both devices and you must share the same Apple ID on both iPhones. Afterwards, head over to Settings, and open the iCloud feature, then tap on Photos and enable the Photo Stream. Once you do this the transfer will start automatically if you are connected to the Internet.
 ZoneAlarm Extreme Security NextGen
![]()
Using iTunes
Pros: You don’t depend on the quality of the WiFi connection.
Cons: You must transfer pictures twice, which can take a lot of time, especially if you are moving large files.
Even though this method doesn’t allow you to transfer photos and videos from iPhone to iPhone directly it is still one of the safest ways to move your images from one device to another.
If you are a Mac user, you should connect your iPhone to your Mac with a USB cable and open the iPhoto. Select the images you want to transfer and click on the Import or Import Selected option and wait for the transfer to end.
![]()
The process of moving images and videos to a PC is fairly simple, just connect your iPhone to the computer with a USB cable and select the Import Pictures and Videos option when the AutoPlay window pops up. Pick the destination folder and click Import to start transferring your photos and videos.
You May Also Like:
How to Transfer Photos/Videos from iPhone to PC >>
How to Transfer Videos/Photos from PC to iPhone >>
Once the pictures and videos are on your computer, launch iTunes and connect the iPhone to which you want to transfer the photos and videos to a PC or Mac with a USB cable. Click on the Device button and select the Photos tab, then check the Sync Photo checkbox and choose the folder, afterward just click Apply.
Using AirDrop
Pros: This is by far the easiest method of transferring images from one iPhone to another.
Cons: This is not the best option if you want to transfer a large number of files.
In order to start transferring a photo from one iPhone to another, you must first enable AirDrop on both devices. Access the Control Center by swiping up from the bottom of the iPhone’s screen, tap on the AirDrop and choose the Everyone option.
Take the iPhone where the images you want to transfer are located, and go to the Photos app. Tap on the Select button and proceed to pick the pictures you’d like to move to the second iPhone. Tap on the Share button and select the name of the device to which you want to transfer the files.

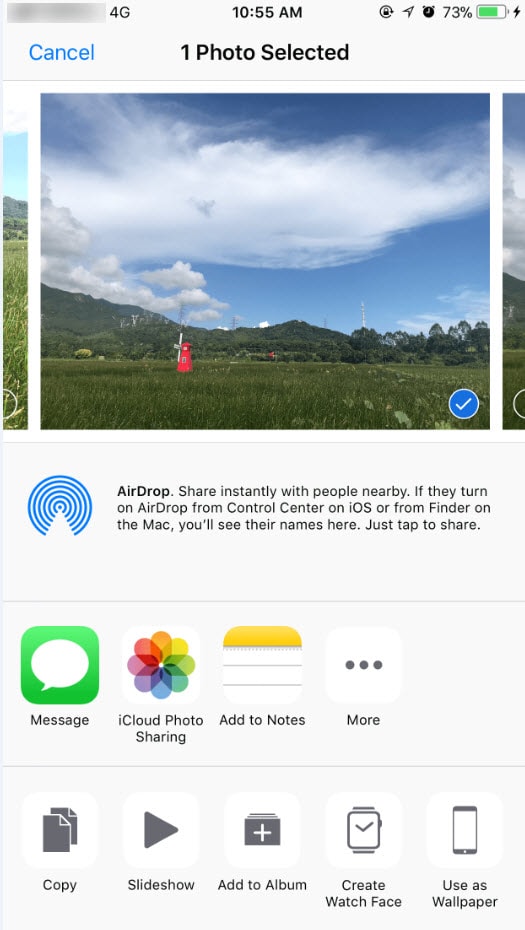
A window will pop out on the iPhone which receives the files so just tap Accept to commence transferring images.
Other third-party applications
The methods we described in this article are not the only free methods of transferring photos and videos from an iPhone to another iPhone. GoogleDrive or Google Photos offer equally efficient ways of transferring images and they almost entirely remove the need to use data transfer app that can be found at the App Store. These apps can cost as much as $50, and unless you constantly need to transfer or manage data from one iPhone to another there is absolutely no need to purchase them.
Ollie Mattison
Ollie Mattison is a writer and a lover of all things video.
Follow @Ollie Mattison
Ollie Mattison
Mar 27, 2024• Proven solutions
Did you recently switch to iPhone X and now you are looking for a way to transfer your photos or videos to your new device? If this is the case you’ve come to the right place because we are going to show you a few different methods that will enable you to transfer all of your photos and videos to your new phone. Sharing is caring, so you will also be able to share your pictures and videos with your friends once you learn how to transfer photos and videos from an iPhone to an iPhone.
How to Transfer Photos and Videos from iPhone to iPhone X/8/7
Methods of transferring videos and photos listed below are simple, but you should choose the one that you find the most helpful.
Using the iCloud Photo Stream
Pros: Remarkably easy, and the transfer is automatic so you don’t really have to do anything.
Cons: Once you turn off the iCloud Photo Library all the files that weren’t transferred will be deleted. The storage space is limited, too.
In order to start transferring photos and videos from one iPhone to another, you must first enable the iCloud Photo Library on both devices and you must share the same Apple ID on both iPhones. Afterwards, head over to Settings, and open the iCloud feature, then tap on Photos and enable the Photo Stream. Once you do this the transfer will start automatically if you are connected to the Internet.

![]()
Using iTunes
Pros: You don’t depend on the quality of the WiFi connection.
Cons: You must transfer pictures twice, which can take a lot of time, especially if you are moving large files.
Even though this method doesn’t allow you to transfer photos and videos from iPhone to iPhone directly it is still one of the safest ways to move your images from one device to another.
If you are a Mac user, you should connect your iPhone to your Mac with a USB cable and open the iPhoto. Select the images you want to transfer and click on the Import or Import Selected option and wait for the transfer to end.
 SwifDoo PDF 2-Year Plan
![]()
The process of moving images and videos to a PC is fairly simple, just connect your iPhone to the computer with a USB cable and select the Import Pictures and Videos option when the AutoPlay window pops up. Pick the destination folder and click Import to start transferring your photos and videos.
You May Also Like:
How to Transfer Photos/Videos from iPhone to PC >>
How to Transfer Videos/Photos from PC to iPhone >>
Once the pictures and videos are on your computer, launch iTunes and connect the iPhone to which you want to transfer the photos and videos to a PC or Mac with a USB cable. Click on the Device button and select the Photos tab, then check the Sync Photo checkbox and choose the folder, afterward just click Apply.

Using AirDrop
Pros: This is by far the easiest method of transferring images from one iPhone to another.
Cons: This is not the best option if you want to transfer a large number of files.
In order to start transferring a photo from one iPhone to another, you must first enable AirDrop on both devices. Access the Control Center by swiping up from the bottom of the iPhone’s screen, tap on the AirDrop and choose the Everyone option.
Take the iPhone where the images you want to transfer are located, and go to the Photos app. Tap on the Select button and proceed to pick the pictures you’d like to move to the second iPhone. Tap on the Share button and select the name of the device to which you want to transfer the files.
A window will pop out on the iPhone which receives the files so just tap Accept to commence transferring images.
Other third-party applications
The methods we described in this article are not the only free methods of transferring photos and videos from an iPhone to another iPhone. GoogleDrive or Google Photos offer equally efficient ways of transferring images and they almost entirely remove the need to use data transfer app that can be found at the App Store. These apps can cost as much as $50, and unless you constantly need to transfer or manage data from one iPhone to another there is absolutely no need to purchase them.
Ollie Mattison
Ollie Mattison is a writer and a lover of all things video.
Follow @Ollie Mattison
Ollie Mattison
Mar 27, 2024• Proven solutions
Did you recently switch to iPhone X and now you are looking for a way to transfer your photos or videos to your new device? If this is the case you’ve come to the right place because we are going to show you a few different methods that will enable you to transfer all of your photos and videos to your new phone. Sharing is caring, so you will also be able to share your pictures and videos with your friends once you learn how to transfer photos and videos from an iPhone to an iPhone.
How to Transfer Photos and Videos from iPhone to iPhone X/8/7
Methods of transferring videos and photos listed below are simple, but you should choose the one that you find the most helpful.
Using the iCloud Photo Stream
Pros: Remarkably easy, and the transfer is automatic so you don’t really have to do anything.
Cons: Once you turn off the iCloud Photo Library all the files that weren’t transferred will be deleted. The storage space is limited, too.
In order to start transferring photos and videos from one iPhone to another, you must first enable the iCloud Photo Library on both devices and you must share the same Apple ID on both iPhones. Afterwards, head over to Settings, and open the iCloud feature, then tap on Photos and enable the Photo Stream. Once you do this the transfer will start automatically if you are connected to the Internet.
![]()
Using iTunes
Pros: You don’t depend on the quality of the WiFi connection.
Cons: You must transfer pictures twice, which can take a lot of time, especially if you are moving large files.
Even though this method doesn’t allow you to transfer photos and videos from iPhone to iPhone directly it is still one of the safest ways to move your images from one device to another.
If you are a Mac user, you should connect your iPhone to your Mac with a USB cable and open the iPhoto. Select the images you want to transfer and click on the Import or Import Selected option and wait for the transfer to end.
 Any DRM Removal for Mac: Remove DRM from Adobe, Kindle, Sony eReader, Kobo, etc, read your ebooks anywhere.
![]()
The process of moving images and videos to a PC is fairly simple, just connect your iPhone to the computer with a USB cable and select the Import Pictures and Videos option when the AutoPlay window pops up. Pick the destination folder and click Import to start transferring your photos and videos.
You May Also Like:
How to Transfer Photos/Videos from iPhone to PC >>
How to Transfer Videos/Photos from PC to iPhone >>
Once the pictures and videos are on your computer, launch iTunes and connect the iPhone to which you want to transfer the photos and videos to a PC or Mac with a USB cable. Click on the Device button and select the Photos tab, then check the Sync Photo checkbox and choose the folder, afterward just click Apply.

Using AirDrop
Pros: This is by far the easiest method of transferring images from one iPhone to another.
Cons: This is not the best option if you want to transfer a large number of files.
In order to start transferring a photo from one iPhone to another, you must first enable AirDrop on both devices. Access the Control Center by swiping up from the bottom of the iPhone’s screen, tap on the AirDrop and choose the Everyone option.
Take the iPhone where the images you want to transfer are located, and go to the Photos app. Tap on the Select button and proceed to pick the pictures you’d like to move to the second iPhone. Tap on the Share button and select the name of the device to which you want to transfer the files.
A window will pop out on the iPhone which receives the files so just tap Accept to commence transferring images.
Other third-party applications
The methods we described in this article are not the only free methods of transferring photos and videos from an iPhone to another iPhone. GoogleDrive or Google Photos offer equally efficient ways of transferring images and they almost entirely remove the need to use data transfer app that can be found at the App Store. These apps can cost as much as $50, and unless you constantly need to transfer or manage data from one iPhone to another there is absolutely no need to purchase them.
Ollie Mattison
Ollie Mattison is a writer and a lover of all things video.
Follow @Ollie Mattison
Ollie Mattison
Mar 27, 2024• Proven solutions
Did you recently switch to iPhone X and now you are looking for a way to transfer your photos or videos to your new device? If this is the case you’ve come to the right place because we are going to show you a few different methods that will enable you to transfer all of your photos and videos to your new phone. Sharing is caring, so you will also be able to share your pictures and videos with your friends once you learn how to transfer photos and videos from an iPhone to an iPhone.
How to Transfer Photos and Videos from iPhone to iPhone X/8/7
Methods of transferring videos and photos listed below are simple, but you should choose the one that you find the most helpful.
Using the iCloud Photo Stream
Pros: Remarkably easy, and the transfer is automatic so you don’t really have to do anything.
Cons: Once you turn off the iCloud Photo Library all the files that weren’t transferred will be deleted. The storage space is limited, too.
In order to start transferring photos and videos from one iPhone to another, you must first enable the iCloud Photo Library on both devices and you must share the same Apple ID on both iPhones. Afterwards, head over to Settings, and open the iCloud feature, then tap on Photos and enable the Photo Stream. Once you do this the transfer will start automatically if you are connected to the Internet.
 /a>
/a>![]()
Using iTunes
Pros: You don’t depend on the quality of the WiFi connection.
Cons: You must transfer pictures twice, which can take a lot of time, especially if you are moving large files.
Even though this method doesn’t allow you to transfer photos and videos from iPhone to iPhone directly it is still one of the safest ways to move your images from one device to another.
If you are a Mac user, you should connect your iPhone to your Mac with a USB cable and open the iPhoto. Select the images you want to transfer and click on the Import or Import Selected option and wait for the transfer to end.
![]()
The process of moving images and videos to a PC is fairly simple, just connect your iPhone to the computer with a USB cable and select the Import Pictures and Videos option when the AutoPlay window pops up. Pick the destination folder and click Import to start transferring your photos and videos.
You May Also Like:
How to Transfer Photos/Videos from iPhone to PC >>
How to Transfer Videos/Photos from PC to iPhone >>
Once the pictures and videos are on your computer, launch iTunes and connect the iPhone to which you want to transfer the photos and videos to a PC or Mac with a USB cable. Click on the Device button and select the Photos tab, then check the Sync Photo checkbox and choose the folder, afterward just click Apply.
Using AirDrop
Pros: This is by far the easiest method of transferring images from one iPhone to another.
Cons: This is not the best option if you want to transfer a large number of files.
In order to start transferring a photo from one iPhone to another, you must first enable AirDrop on both devices. Access the Control Center by swiping up from the bottom of the iPhone’s screen, tap on the AirDrop and choose the Everyone option.
Take the iPhone where the images you want to transfer are located, and go to the Photos app. Tap on the Select button and proceed to pick the pictures you’d like to move to the second iPhone. Tap on the Share button and select the name of the device to which you want to transfer the files.
A window will pop out on the iPhone which receives the files so just tap Accept to commence transferring images.
 PDF application, powered by AI-based OCR, for unified workflows with both digital and scanned documents.
 Other third-party applications
The methods we described in this article are not the only free methods of transferring photos and videos from an iPhone to another iPhone. GoogleDrive or Google Photos offer equally efficient ways of transferring images and they almost entirely remove the need to use data transfer app that can be found at the App Store. These apps can cost as much as $50, and unless you constantly need to transfer or manage data from one iPhone to another there is absolutely no need to purchase them.
 The Tube Sites Submitter is a fast and efficient tool for anyone who needs to upload videos quickly, easily and automatically to hundreds of tube sites in mere minutes .
Ollie Mattison
Ollie Mattison is a writer and a lover of all things video.
Follow @Ollie Mattison
- Title: Hands-On Instructions for iPhone Content Syncing
- Author: Joseph
- Created at : 2024-07-27 08:28:44
- Updated at : 2024-07-28 08:28:44
- Link: https://extra-tips.techidaily.com/hands-on-instructions-for-iphone-content-syncing/
- License: This work is licensed under CC BY-NC-SA 4.0.