"Crafting Vague Scenes Skillful Use of Gaussian Blur"
Crafting Vague Scenes: Skillful Use of Gaussian Blur
Create High-Quality Video - Wondershare Filmora
An easy and powerful YouTube video editor
Numerous video and audio effects to choose from
Detailed tutorials provided by the official channel
Photoshop allows you to blur images and faces to amplify motion, bring focus, and add various artistic elements to the photos. When viewers’ eyes have nothing else to focus on but the subject of the photo, they will take time to appreciate the subject’s beauty. They will be able to see the freckles on your cheeks and your eyes and connect with the expression you have on your face. In this article, we’ll give you a low-down on how to blur faces in Photoshop. You’ll also learn how to blur faces on videos.
In this article
01 How to Blur Faces/Background/Texts in Photoshop
02 Frequently Asked Questions About Blur Photos in Photoshop
03 How to Blur the Face in Video Using Filmora

How to Blur Faces/Background/Texts in Photoshop
Learning how to blur part of an image in Photoshop helps you enhance your images and hide details. With that in mind, here is how to blur texts, backgrounds, and faces in Photoshop.
How to Blur Faces in Photoshop
If you want to blur face Photoshop, follow the steps below.
- Launch Photoshop on your device.
- Click on the File button.
- Select the Open option and double-click the file you would like to work on.
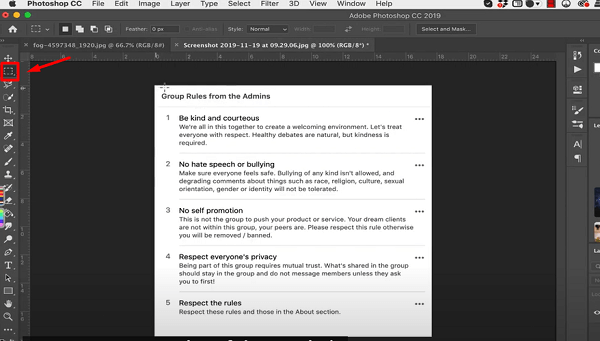
- Once you have opened your image in Photoshop, choose the Marquee Tool located in the Tool Bar. Alternatively, you can use the keyboard shortcut M.
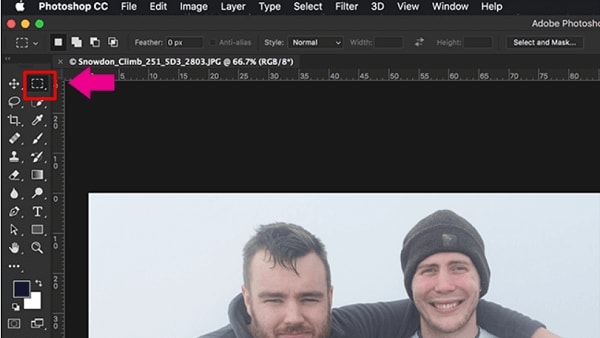
- Now, draw a selection around the face you would like to blur.
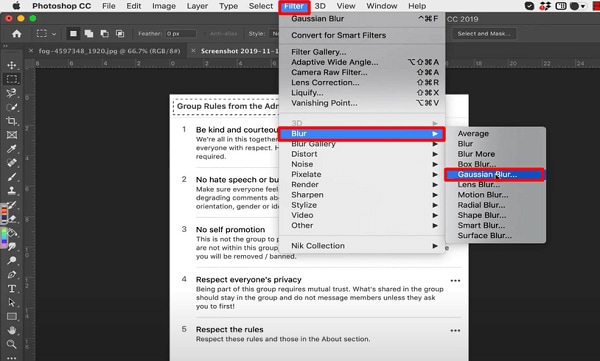
- Navigate to Filter and select the Blur option, then choose Gaussian Blur. You will see the Gaussian Blur menu and a preview of the effect of the blur on the area of the face you had selected.
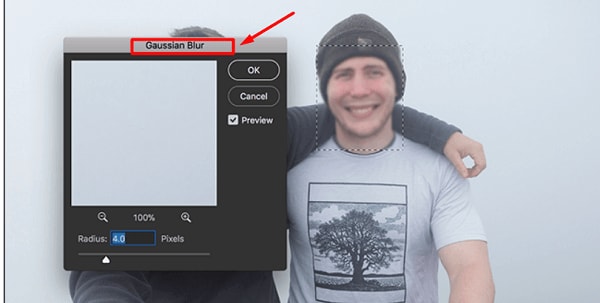
- Dial the radius up; do this until the face is completely blurred.
- Hit the OK button to apply the effect and save the new image on your device.
How to Blur the Background in Photoshop
You can create beautiful soft backgrounds in Photoshop using the blur effect. Using Photoshop blur part of image helps you increase the focus on a subject. To learn how to blur the background on photoshop, follow the steps below:
- Open Photoshop on your PC and click on the File button on its menu bar.
- Next, select the Open option from the dropdown menu and choose the photo you want to edit from your gallery.
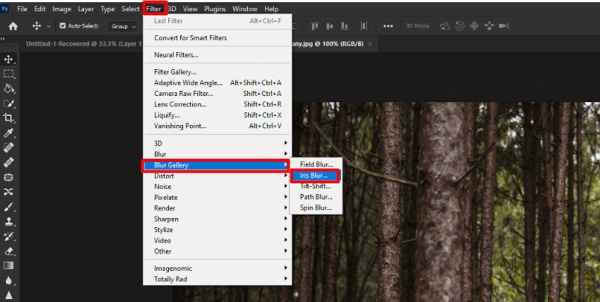
- On the menu bar, click the Filter function. Find the Blur Gallery option in the dropdown menu; you’ll see a list of several blur options when you click on it.
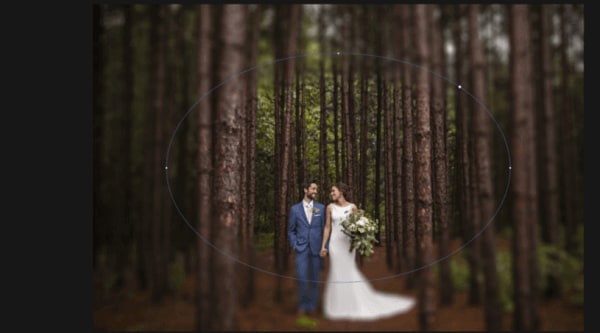
- Choose Iris Blur to blur the background; this option helps define a focal point in your image and blurs the rest of the photo.
- A large Blur Ring with Pin at the center will appear on your image. You’ll also see several dots around the Blur Ring. The Pin acts as a target; your image will get more blurry as you increase the distance from the center.
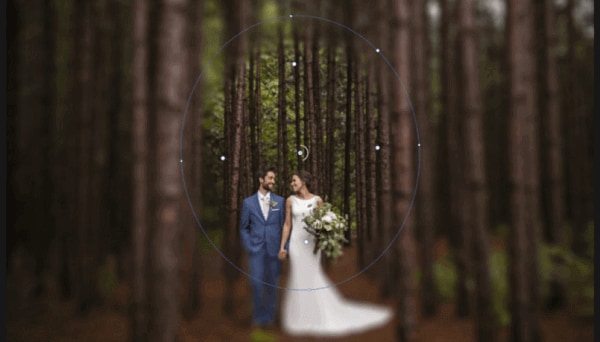
- Click the center of this pin, then drug it to the subject. To place the pin, release your mouse.
- Now you need to adjust the blur transition. There are four large white dots inside the Blur Ring, which define the blur transition area. Essentially, the blur transition will be sharper when you move these dots far from the focal point and smoother when you move them closer to the focal point. Clicking and dragging these dots allows you to adjust the blur transition area.
- You’ll see four small dots on the outer ring of your blur preview. Moving your mouse over any of these dots will make your cursor change to a curved arrow.
- You need to rotate the double-ended arrow clockwise by moving your mouse. This will increase the blur area. Moving the arrow counter-clockwise will decrease the blur area. Alternatively, you can click and drag the Blur Ring line.
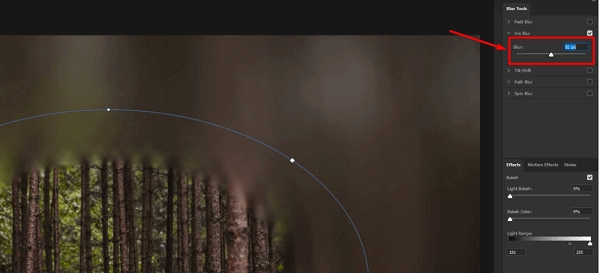
- Tune the blur amount by using the Blur Knob at the center of the Blur Preview close to the Pin. Rorate the Blur knob counter-clockwise to decrease the blur and move it clockwise to enhance the blur. Alternatively, you can use the Blur Slider found in the Blur Tools panel to adjust the blur.
- Once you’re satisfied with your background, hit the OK button to save your edits.

How to Blur Texts in Photoshop
Photoshop allows you to blur text on your image to hide some information from viewers. All you need to do is follow the steps below:
- Import the image with the text that you want to blur.
- Select the Marquee tool.
- Draw a selection around the text you want to blur.
- Now, go to Filter and choose Blur. Select the Gaussian Blur option.
- The Gaussian Blur menu will pop up, showing a preview.

- Increase or decrease the blur effect in the Radius option.
- Click on File on the menu bar and select Save As to save your edited image with blurred text.
Frequently Asked Questions About Blur Photos in Photoshop
What Options Do I Have When Using Photoshop to Blur Images?
The Blur Gallery offers five options for those who want to blur images. They are:
• Path-Blur: This option allows you to draw a specific path that the blur will follow. Path-Blur gives you the motion illusion in a still photo.
• Tilt-Shift Blur: This option mimics the style of tilt-shift cameras by blurring out the bottom and top of your image. Most people use it to create fake miniature scenes. Tilt-Shift Blur allows you to adjust the strength and size of the blurred areas, and you can rotate them.
• Iris Blur: This option allows you to choose a circle to remain in focus while the rest of the image remains blurred. You can also adjust the size and shape of the circles and adjust the blur’s strength.
• Field Blur: If you want to blur the background of your image, this is the ideal option. When you first choose the Field Blur, it will put a pin where the blur effect will happen. You can add another pin and adjust the strength of the blur to zero. Keep in mind that objects within the radius of your second pin will be in focus, while objects that are within the radius of your first pin will be blurred.
How Can I Fix Blurry Images in Photoshop?
You can fix blurry images in Photoshop, especially when there’s motion blur. But, this raster graphics editor cannot recover out-of-focus images effectively and still keep their natural look: it will create loads of digital artifacts.
You’ll find the tools to make your blurry images in Filters > Sharpen. You can use the Smart Sharpen and Shake Reduction options to make your images less blurry.
Can I Blur Images in Photoshop Using the Brush?
Yes. You can soften areas of your image and make viewers focus on your subject by using your favorite brush to apply the blur effect. You only need to select the Blur tool and choose a brush strength and tip; you can then drag it over the areas you would like to blur.
How to Blur the Face in Video Using Filmora
If you don’t want to reveal the identity of people in your videos, you can use Filmora to blur out their faces. This easy-to-use software is designed to make video editing a breeze. It comes with tons of exciting tools that will help you create high-quality, HD, and professional-like videos. That said, below is a step-by-step guide on how to use Filmora to blur faces in your videos.
For Win 7 or later (64-bit)
For macOS 10.12 or later
- Import the video you want to edit. You can browse the video file from your device or drag and drop it into Filmora.
- Drag and drop your video clip to the Video Timeline.
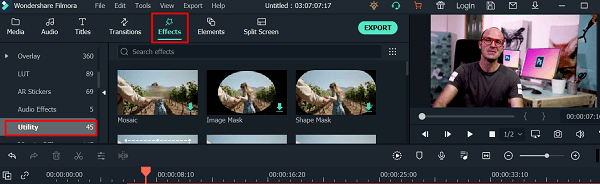
- Target the video clip on the timeline and click on the Effects options, then select Utility on the side menu.
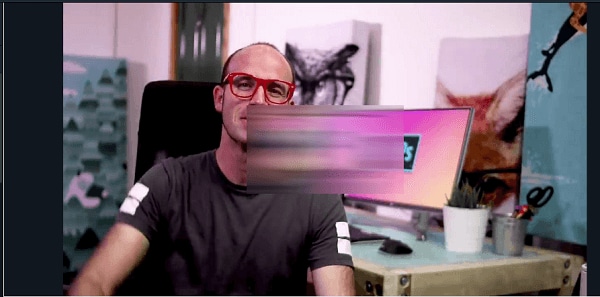
- Drag the Mosaic effect above the footage you want to edit. It will create a small blur area in the middle of the preview screen.
- Look at your main tracks before making adjustments to ensure you don’t move them by accident.
- Clicking on the preview window will end up highlighting the mosaic blurred layer.
- You can reshape, resize and move it around. You can also choose from six different mosaics on the upper lefts side of your screen.
- Adjust the blur and pixelation size and opacity, which allow you to select how transparent the blurred effect will be.
- Click OK to save the changes you have made.
- Export to save your video. Be sure to choose the right format for your video and the save option.
Conclusion
● Now that you know how to blur faces in Photoshop, you can use it to draw focus to your photos and enhance emotions. Use Filmora to blur faces on videos if you want to hide the identity of anyone in your videos.
Photoshop allows you to blur images and faces to amplify motion, bring focus, and add various artistic elements to the photos. When viewers’ eyes have nothing else to focus on but the subject of the photo, they will take time to appreciate the subject’s beauty. They will be able to see the freckles on your cheeks and your eyes and connect with the expression you have on your face. In this article, we’ll give you a low-down on how to blur faces in Photoshop. You’ll also learn how to blur faces on videos.
In this article
01 How to Blur Faces/Background/Texts in Photoshop
02 Frequently Asked Questions About Blur Photos in Photoshop
03 How to Blur the Face in Video Using Filmora
How to Blur Faces/Background/Texts in Photoshop
Learning how to blur part of an image in Photoshop helps you enhance your images and hide details. With that in mind, here is how to blur texts, backgrounds, and faces in Photoshop.
 Allavsoft Batch Download Online Videos, Music Offline to MP4, MP3, MOV, etc format
How to Blur Faces in Photoshop
If you want to blur face Photoshop, follow the steps below.
- Launch Photoshop on your device.
- Click on the File button.
- Select the Open option and double-click the file you would like to work on.
- Once you have opened your image in Photoshop, choose the Marquee Tool located in the Tool Bar. Alternatively, you can use the keyboard shortcut M.

- Now, draw a selection around the face you would like to blur.
- Navigate to Filter and select the Blur option, then choose Gaussian Blur. You will see the Gaussian Blur menu and a preview of the effect of the blur on the area of the face you had selected.
- Dial the radius up; do this until the face is completely blurred.
- Hit the OK button to apply the effect and save the new image on your device.
How to Blur the Background in Photoshop
You can create beautiful soft backgrounds in Photoshop using the blur effect. Using Photoshop blur part of image helps you increase the focus on a subject. To learn how to blur the background on photoshop, follow the steps below:
- Open Photoshop on your PC and click on the File button on its menu bar.
- Next, select the Open option from the dropdown menu and choose the photo you want to edit from your gallery.
- On the menu bar, click the Filter function. Find the Blur Gallery option in the dropdown menu; you’ll see a list of several blur options when you click on it.
- Choose Iris Blur to blur the background; this option helps define a focal point in your image and blurs the rest of the photo.
- A large Blur Ring with Pin at the center will appear on your image. You’ll also see several dots around the Blur Ring. The Pin acts as a target; your image will get more blurry as you increase the distance from the center.

- Click the center of this pin, then drug it to the subject. To place the pin, release your mouse.
- Now you need to adjust the blur transition. There are four large white dots inside the Blur Ring, which define the blur transition area. Essentially, the blur transition will be sharper when you move these dots far from the focal point and smoother when you move them closer to the focal point. Clicking and dragging these dots allows you to adjust the blur transition area.
- You’ll see four small dots on the outer ring of your blur preview. Moving your mouse over any of these dots will make your cursor change to a curved arrow.
- You need to rotate the double-ended arrow clockwise by moving your mouse. This will increase the blur area. Moving the arrow counter-clockwise will decrease the blur area. Alternatively, you can click and drag the Blur Ring line.
- Tune the blur amount by using the Blur Knob at the center of the Blur Preview close to the Pin. Rorate the Blur knob counter-clockwise to decrease the blur and move it clockwise to enhance the blur. Alternatively, you can use the Blur Slider found in the Blur Tools panel to adjust the blur.
- Once you’re satisfied with your background, hit the OK button to save your edits.
How to Blur Texts in Photoshop
Photoshop allows you to blur text on your image to hide some information from viewers. All you need to do is follow the steps below:
- Import the image with the text that you want to blur.
- Select the Marquee tool.
- Draw a selection around the text you want to blur.
- Now, go to Filter and choose Blur. Select the Gaussian Blur option.
- The Gaussian Blur menu will pop up, showing a preview.
- Increase or decrease the blur effect in the Radius option.
- Click on File on the menu bar and select Save As to save your edited image with blurred text.
Frequently Asked Questions About Blur Photos in Photoshop
What Options Do I Have When Using Photoshop to Blur Images?
The Blur Gallery offers five options for those who want to blur images. They are:
• Path-Blur: This option allows you to draw a specific path that the blur will follow. Path-Blur gives you the motion illusion in a still photo.
• Tilt-Shift Blur: This option mimics the style of tilt-shift cameras by blurring out the bottom and top of your image. Most people use it to create fake miniature scenes. Tilt-Shift Blur allows you to adjust the strength and size of the blurred areas, and you can rotate them.
• Iris Blur: This option allows you to choose a circle to remain in focus while the rest of the image remains blurred. You can also adjust the size and shape of the circles and adjust the blur’s strength.
• Field Blur: If you want to blur the background of your image, this is the ideal option. When you first choose the Field Blur, it will put a pin where the blur effect will happen. You can add another pin and adjust the strength of the blur to zero. Keep in mind that objects within the radius of your second pin will be in focus, while objects that are within the radius of your first pin will be blurred.
How Can I Fix Blurry Images in Photoshop?
You can fix blurry images in Photoshop, especially when there’s motion blur. But, this raster graphics editor cannot recover out-of-focus images effectively and still keep their natural look: it will create loads of digital artifacts.
You’ll find the tools to make your blurry images in Filters > Sharpen. You can use the Smart Sharpen and Shake Reduction options to make your images less blurry.
Can I Blur Images in Photoshop Using the Brush?
Yes. You can soften areas of your image and make viewers focus on your subject by using your favorite brush to apply the blur effect. You only need to select the Blur tool and choose a brush strength and tip; you can then drag it over the areas you would like to blur.
How to Blur the Face in Video Using Filmora
If you don’t want to reveal the identity of people in your videos, you can use Filmora to blur out their faces. This easy-to-use software is designed to make video editing a breeze. It comes with tons of exciting tools that will help you create high-quality, HD, and professional-like videos. That said, below is a step-by-step guide on how to use Filmora to blur faces in your videos.
For Win 7 or later (64-bit)
For macOS 10.12 or later
- Import the video you want to edit. You can browse the video file from your device or drag and drop it into Filmora.
- Drag and drop your video clip to the Video Timeline.
 PCDJ Karaoki is the complete professional karaoke software designed for KJs and karaoke venues. Karaoki includes an advanced automatic singer rotation list with singer history, key control, news ticker, next singers screen, a song book exporter and printer, a jukebox background music player and many other features designed so you can host karaoke shows faster and easier!
- Target the video clip on the timeline and click on the Effects options, then select Utility on the side menu.
- Drag the Mosaic effect above the footage you want to edit. It will create a small blur area in the middle of the preview screen.
- Look at your main tracks before making adjustments to ensure you don’t move them by accident.
- Clicking on the preview window will end up highlighting the mosaic blurred layer.
- You can reshape, resize and move it around. You can also choose from six different mosaics on the upper lefts side of your screen.
- Adjust the blur and pixelation size and opacity, which allow you to select how transparent the blurred effect will be.
- Click OK to save the changes you have made.
- Export to save your video. Be sure to choose the right format for your video and the save option.

WPS Office Premium ( File Recovery, Photo Scanning, Convert PDF)–Yearly
Conclusion
● Now that you know how to blur faces in Photoshop, you can use it to draw focus to your photos and enhance emotions. Use Filmora to blur faces on videos if you want to hide the identity of anyone in your videos.
Photoshop allows you to blur images and faces to amplify motion, bring focus, and add various artistic elements to the photos. When viewers’ eyes have nothing else to focus on but the subject of the photo, they will take time to appreciate the subject’s beauty. They will be able to see the freckles on your cheeks and your eyes and connect with the expression you have on your face. In this article, we’ll give you a low-down on how to blur faces in Photoshop. You’ll also learn how to blur faces on videos.
In this article
01 How to Blur Faces/Background/Texts in Photoshop
02 Frequently Asked Questions About Blur Photos in Photoshop
03 How to Blur the Face in Video Using Filmora
How to Blur Faces/Background/Texts in Photoshop
Learning how to blur part of an image in Photoshop helps you enhance your images and hide details. With that in mind, here is how to blur texts, backgrounds, and faces in Photoshop.
How to Blur Faces in Photoshop
If you want to blur face Photoshop, follow the steps below.
- Launch Photoshop on your device.
- Click on the File button.
- Select the Open option and double-click the file you would like to work on.
- Once you have opened your image in Photoshop, choose the Marquee Tool located in the Tool Bar. Alternatively, you can use the keyboard shortcut M.
- Now, draw a selection around the face you would like to blur.
- Navigate to Filter and select the Blur option, then choose Gaussian Blur. You will see the Gaussian Blur menu and a preview of the effect of the blur on the area of the face you had selected.
- Dial the radius up; do this until the face is completely blurred.
- Hit the OK button to apply the effect and save the new image on your device.
How to Blur the Background in Photoshop
You can create beautiful soft backgrounds in Photoshop using the blur effect. Using Photoshop blur part of image helps you increase the focus on a subject. To learn how to blur the background on photoshop, follow the steps below:
- Open Photoshop on your PC and click on the File button on its menu bar.
- Next, select the Open option from the dropdown menu and choose the photo you want to edit from your gallery.
- On the menu bar, click the Filter function. Find the Blur Gallery option in the dropdown menu; you’ll see a list of several blur options when you click on it.
- Choose Iris Blur to blur the background; this option helps define a focal point in your image and blurs the rest of the photo.
- A large Blur Ring with Pin at the center will appear on your image. You’ll also see several dots around the Blur Ring. The Pin acts as a target; your image will get more blurry as you increase the distance from the center.
- Click the center of this pin, then drug it to the subject. To place the pin, release your mouse.
- Now you need to adjust the blur transition. There are four large white dots inside the Blur Ring, which define the blur transition area. Essentially, the blur transition will be sharper when you move these dots far from the focal point and smoother when you move them closer to the focal point. Clicking and dragging these dots allows you to adjust the blur transition area.
- You’ll see four small dots on the outer ring of your blur preview. Moving your mouse over any of these dots will make your cursor change to a curved arrow.
- You need to rotate the double-ended arrow clockwise by moving your mouse. This will increase the blur area. Moving the arrow counter-clockwise will decrease the blur area. Alternatively, you can click and drag the Blur Ring line.
- Tune the blur amount by using the Blur Knob at the center of the Blur Preview close to the Pin. Rorate the Blur knob counter-clockwise to decrease the blur and move it clockwise to enhance the blur. Alternatively, you can use the Blur Slider found in the Blur Tools panel to adjust the blur.
- Once you’re satisfied with your background, hit the OK button to save your edits.
How to Blur Texts in Photoshop
Photoshop allows you to blur text on your image to hide some information from viewers. All you need to do is follow the steps below:
- Import the image with the text that you want to blur.
- Select the Marquee tool.
- Draw a selection around the text you want to blur.
- Now, go to Filter and choose Blur. Select the Gaussian Blur option.
- The Gaussian Blur menu will pop up, showing a preview.
- Increase or decrease the blur effect in the Radius option.
- Click on File on the menu bar and select Save As to save your edited image with blurred text.
Frequently Asked Questions About Blur Photos in Photoshop
What Options Do I Have When Using Photoshop to Blur Images?
The Blur Gallery offers five options for those who want to blur images. They are:
• Path-Blur: This option allows you to draw a specific path that the blur will follow. Path-Blur gives you the motion illusion in a still photo.
• Tilt-Shift Blur: This option mimics the style of tilt-shift cameras by blurring out the bottom and top of your image. Most people use it to create fake miniature scenes. Tilt-Shift Blur allows you to adjust the strength and size of the blurred areas, and you can rotate them.
• Iris Blur: This option allows you to choose a circle to remain in focus while the rest of the image remains blurred. You can also adjust the size and shape of the circles and adjust the blur’s strength.
• Field Blur: If you want to blur the background of your image, this is the ideal option. When you first choose the Field Blur, it will put a pin where the blur effect will happen. You can add another pin and adjust the strength of the blur to zero. Keep in mind that objects within the radius of your second pin will be in focus, while objects that are within the radius of your first pin will be blurred.
How Can I Fix Blurry Images in Photoshop?
You can fix blurry images in Photoshop, especially when there’s motion blur. But, this raster graphics editor cannot recover out-of-focus images effectively and still keep their natural look: it will create loads of digital artifacts.
You’ll find the tools to make your blurry images in Filters > Sharpen. You can use the Smart Sharpen and Shake Reduction options to make your images less blurry.
Can I Blur Images in Photoshop Using the Brush?
Yes. You can soften areas of your image and make viewers focus on your subject by using your favorite brush to apply the blur effect. You only need to select the Blur tool and choose a brush strength and tip; you can then drag it over the areas you would like to blur.
 PearlMountain Image Converter
How to Blur the Face in Video Using Filmora
If you don’t want to reveal the identity of people in your videos, you can use Filmora to blur out their faces. This easy-to-use software is designed to make video editing a breeze. It comes with tons of exciting tools that will help you create high-quality, HD, and professional-like videos. That said, below is a step-by-step guide on how to use Filmora to blur faces in your videos.
For Win 7 or later (64-bit)
For macOS 10.12 or later
- Import the video you want to edit. You can browse the video file from your device or drag and drop it into Filmora.
- Drag and drop your video clip to the Video Timeline.
- Target the video clip on the timeline and click on the Effects options, then select Utility on the side menu.

- Drag the Mosaic effect above the footage you want to edit. It will create a small blur area in the middle of the preview screen.
- Look at your main tracks before making adjustments to ensure you don’t move them by accident.
- Clicking on the preview window will end up highlighting the mosaic blurred layer.
- You can reshape, resize and move it around. You can also choose from six different mosaics on the upper lefts side of your screen.
- Adjust the blur and pixelation size and opacity, which allow you to select how transparent the blurred effect will be.
- Click OK to save the changes you have made.
- Export to save your video. Be sure to choose the right format for your video and the save option.
Conclusion
● Now that you know how to blur faces in Photoshop, you can use it to draw focus to your photos and enhance emotions. Use Filmora to blur faces on videos if you want to hide the identity of anyone in your videos.
Photoshop allows you to blur images and faces to amplify motion, bring focus, and add various artistic elements to the photos. When viewers’ eyes have nothing else to focus on but the subject of the photo, they will take time to appreciate the subject’s beauty. They will be able to see the freckles on your cheeks and your eyes and connect with the expression you have on your face. In this article, we’ll give you a low-down on how to blur faces in Photoshop. You’ll also learn how to blur faces on videos.
In this article
01 How to Blur Faces/Background/Texts in Photoshop
02 Frequently Asked Questions About Blur Photos in Photoshop
03 How to Blur the Face in Video Using Filmora

How to Blur Faces/Background/Texts in Photoshop
Learning how to blur part of an image in Photoshop helps you enhance your images and hide details. With that in mind, here is how to blur texts, backgrounds, and faces in Photoshop.
How to Blur Faces in Photoshop
If you want to blur face Photoshop, follow the steps below.
- Launch Photoshop on your device.
- Click on the File button.
- Select the Open option and double-click the file you would like to work on.
- Once you have opened your image in Photoshop, choose the Marquee Tool located in the Tool Bar. Alternatively, you can use the keyboard shortcut M.
- Now, draw a selection around the face you would like to blur.
- Navigate to Filter and select the Blur option, then choose Gaussian Blur. You will see the Gaussian Blur menu and a preview of the effect of the blur on the area of the face you had selected.

- Dial the radius up; do this until the face is completely blurred.
- Hit the OK button to apply the effect and save the new image on your device.
 vMix 4K - Software based live production. vMix 4K includes everything in vMix HD plus 4K support, PTZ control, External/Fullscreen output, 4 Virtual Outputs, 1 Replay, 4 vMix Call, and 2 Recorders.
How to Blur the Background in Photoshop
You can create beautiful soft backgrounds in Photoshop using the blur effect. Using Photoshop blur part of image helps you increase the focus on a subject. To learn how to blur the background on photoshop, follow the steps below:
- Open Photoshop on your PC and click on the File button on its menu bar.
- Next, select the Open option from the dropdown menu and choose the photo you want to edit from your gallery.
- On the menu bar, click the Filter function. Find the Blur Gallery option in the dropdown menu; you’ll see a list of several blur options when you click on it.
- Choose Iris Blur to blur the background; this option helps define a focal point in your image and blurs the rest of the photo.
- A large Blur Ring with Pin at the center will appear on your image. You’ll also see several dots around the Blur Ring. The Pin acts as a target; your image will get more blurry as you increase the distance from the center.
 OtsAV Radio Webcaster
- Click the center of this pin, then drug it to the subject. To place the pin, release your mouse.
- Now you need to adjust the blur transition. There are four large white dots inside the Blur Ring, which define the blur transition area. Essentially, the blur transition will be sharper when you move these dots far from the focal point and smoother when you move them closer to the focal point. Clicking and dragging these dots allows you to adjust the blur transition area.
- You’ll see four small dots on the outer ring of your blur preview. Moving your mouse over any of these dots will make your cursor change to a curved arrow.

- You need to rotate the double-ended arrow clockwise by moving your mouse. This will increase the blur area. Moving the arrow counter-clockwise will decrease the blur area. Alternatively, you can click and drag the Blur Ring line.
- Tune the blur amount by using the Blur Knob at the center of the Blur Preview close to the Pin. Rorate the Blur knob counter-clockwise to decrease the blur and move it clockwise to enhance the blur. Alternatively, you can use the Blur Slider found in the Blur Tools panel to adjust the blur.
- Once you’re satisfied with your background, hit the OK button to save your edits.
How to Blur Texts in Photoshop
Photoshop allows you to blur text on your image to hide some information from viewers. All you need to do is follow the steps below:
- Import the image with the text that you want to blur.
- Select the Marquee tool.
- Draw a selection around the text you want to blur.
- Now, go to Filter and choose Blur. Select the Gaussian Blur option.
 Glarysoft File Recovery Pro - Helps to recover your lost file/data, even permanently deleted data.
- The Gaussian Blur menu will pop up, showing a preview.
 /a>
/a>
- Increase or decrease the blur effect in the Radius option.
- Click on File on the menu bar and select Save As to save your edited image with blurred text.
Frequently Asked Questions About Blur Photos in Photoshop
What Options Do I Have When Using Photoshop to Blur Images?
The Blur Gallery offers five options for those who want to blur images. They are:
• Path-Blur: This option allows you to draw a specific path that the blur will follow. Path-Blur gives you the motion illusion in a still photo.
• Tilt-Shift Blur: This option mimics the style of tilt-shift cameras by blurring out the bottom and top of your image. Most people use it to create fake miniature scenes. Tilt-Shift Blur allows you to adjust the strength and size of the blurred areas, and you can rotate them.
• Iris Blur: This option allows you to choose a circle to remain in focus while the rest of the image remains blurred. You can also adjust the size and shape of the circles and adjust the blur’s strength.
• Field Blur: If you want to blur the background of your image, this is the ideal option. When you first choose the Field Blur, it will put a pin where the blur effect will happen. You can add another pin and adjust the strength of the blur to zero. Keep in mind that objects within the radius of your second pin will be in focus, while objects that are within the radius of your first pin will be blurred.
How Can I Fix Blurry Images in Photoshop?
You can fix blurry images in Photoshop, especially when there’s motion blur. But, this raster graphics editor cannot recover out-of-focus images effectively and still keep their natural look: it will create loads of digital artifacts.
You’ll find the tools to make your blurry images in Filters > Sharpen. You can use the Smart Sharpen and Shake Reduction options to make your images less blurry.
Can I Blur Images in Photoshop Using the Brush?
Yes. You can soften areas of your image and make viewers focus on your subject by using your favorite brush to apply the blur effect. You only need to select the Blur tool and choose a brush strength and tip; you can then drag it over the areas you would like to blur.
How to Blur the Face in Video Using Filmora
If you don’t want to reveal the identity of people in your videos, you can use Filmora to blur out their faces. This easy-to-use software is designed to make video editing a breeze. It comes with tons of exciting tools that will help you create high-quality, HD, and professional-like videos. That said, below is a step-by-step guide on how to use Filmora to blur faces in your videos.
For Win 7 or later (64-bit)
For macOS 10.12 or later
- Import the video you want to edit. You can browse the video file from your device or drag and drop it into Filmora.
- Drag and drop your video clip to the Video Timeline.
- Target the video clip on the timeline and click on the Effects options, then select Utility on the side menu.

- Drag the Mosaic effect above the footage you want to edit. It will create a small blur area in the middle of the preview screen.
- Look at your main tracks before making adjustments to ensure you don’t move them by accident.
- Clicking on the preview window will end up highlighting the mosaic blurred layer.
- You can reshape, resize and move it around. You can also choose from six different mosaics on the upper lefts side of your screen.
- Adjust the blur and pixelation size and opacity, which allow you to select how transparent the blurred effect will be.
- Click OK to save the changes you have made.
- Export to save your video. Be sure to choose the right format for your video and the save option.
Conclusion
● Now that you know how to blur faces in Photoshop, you can use it to draw focus to your photos and enhance emotions. Use Filmora to blur faces on videos if you want to hide the identity of anyone in your videos.
- Title: Crafting Vague Scenes Skillful Use of Gaussian Blur
- Author: Joseph
- Created at : 2024-07-27 08:25:10
- Updated at : 2024-07-28 08:25:10
- Link: https://extra-tips.techidaily.com/crafting-vague-scenes-skillful-use-of-gaussian-blur/
- License: This work is licensed under CC BY-NC-SA 4.0.