
"Conquering Low-Light Shots on iPhone for 2024"
Conquering Low-Light Shots on iPhone
iPhone Night Photography Tips: Take Night Photos with iPhone


Ollie Mattison
Mar 27, 2024• Proven solutions
iPhone cameras are powerful enough to enable you to embark on the night photography journey, but the quality of a camera is just one prerequisite for a complete low light photography experience.
In this tutorial we will provide you with a few tips that will significantly improve the night shots you take with your iPhone and we will also suggest a several iPhone apps that can make the process of taking a photo in low light conditions much easier.
Tips on How to Take Night Photos with an iPhone
Night photography can be rewarding because if you choose to take pictures by night you’ll be able to capture some breathtaking scenes, however, the tips listed below won’t help you improve your skills much if you don’t take nigh photos on a constant basis.
1. Use Long Exposures
The exposure is the amount of time the camera’s sensor is exposed to light. If you are taking a photo in broad daylight exposure value is going to 1/800 of a second or even less, while if you find yourself in a situation where light is scarce the exposure value should be anywhere between 3 to 30 seconds.
 dotConnect for Oracle is an ADO.NET data provider for Oracle with Entity Framework Support.
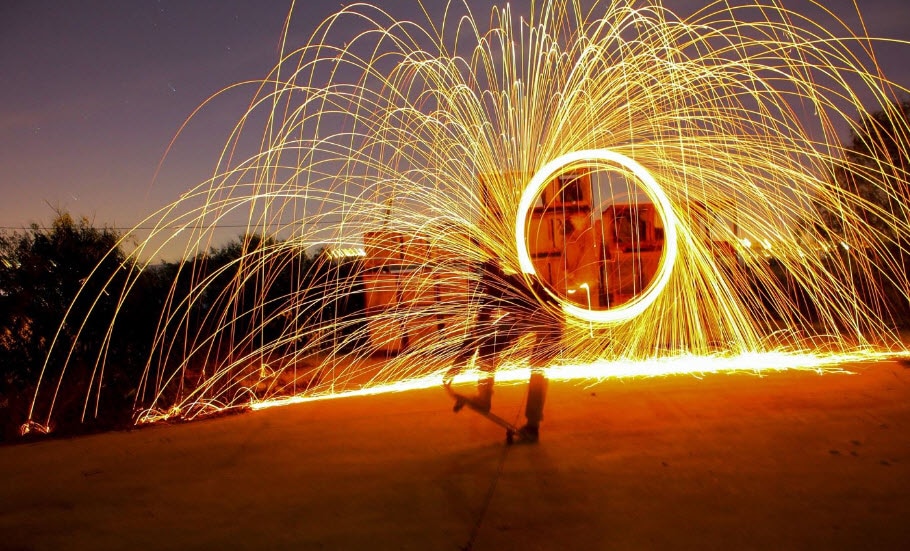
Image resource: iOS Gadget Hacks
In low light scenes, the long exposure will help your camera gather more light. However, long exposures can produce grainy photos.
2. Make Sure that Your iPhone is Perfectly Still
Any camera shake that occurs while the camera shutter is open will result in blurry photos. The exposure value you set determines how long the shutter is going to be open.
Holding a camera still for a long period of time is impossible, which is the reason why you should get a tripod if you want to take sharp night photos. Finding other ways to keep your iPhone steady, such as placing it on a firm, flat surface is also an option.
3. Experiment with Ambient Light and Shadows

Image resource: Contrastly
A good photographer always comes up with ways to work with what they’ve got, so instead of trying to avoid shadows and ambient lights, embrace them and make them a part of your photo. By doing so, you’ll be able to contribute to an overall impression of realism in a photo, and at the same time, you’ll create photos that have strong contrasts.
4. Find Creative Ways to Make Good Use of Backlighting
Taking photos by night means that you’re going to have a source of light in your shot. Backlight or a source of light in the background of your photo will enable you to get creative and capture people or objects in front of window shops, street lights or any other light source you can fathom.
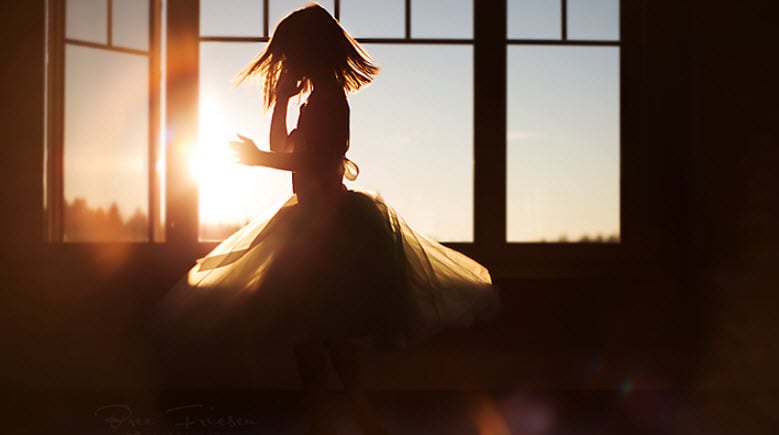
Image resource: Coles Classroom
5. Utilize Different Sources of Light to Illuminate the Subject of a Photo
The cities offer countless artificial sources of light during the night, so coming up with creative ways to incorporate these light sources into your night photos is a part of the creative challenge of night photography. Place the subject of your photo into a well-lit area, and try to surround it with a dark negative space in order to create a high contrast photo.
6. Convert Your Night Photos to Black and White


Image resource: Pexels
While some of the pictures taken by night can depict a rich spectrum of colors, others simply look better when stripped of color. Night photos often have strong contrasts of light and dark, and by converting your images to black and white you’ll be able to highlight this contrast even more.
It is easy to fall in love with black and white images, which is why it is important to make sure that your picture actually looks better when desaturated before sharing it with your friends.
3 Best Slow Shutter Camera Apps for iPhones
| App | Price | |
| ——————— | ———————————————————————————————————— | |
| Slow Shutter Cam | $1.99 | |
| Slow Shutter Fast Cam | Free | |
| LongExpo | Free | |
1. Slow Shutter Cam
Price: $1,99
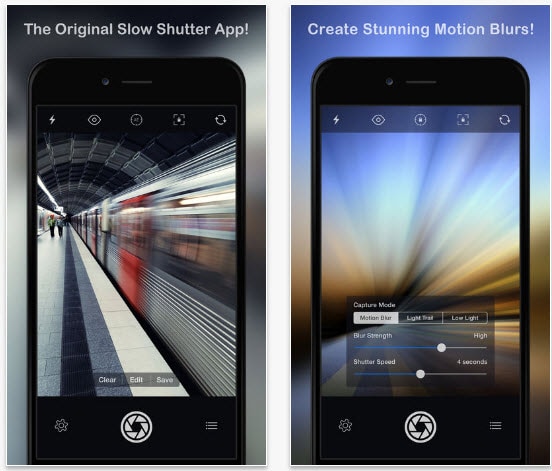
iPhone photographers in need of an app which extends the list of features that make night photography easier should consider purchasing this app. Alongside complete manual control over ISO and shutter speed settings, Slow Shutter Cam also enables you to take pictures in Motion Blur, Light Trail, and Low Light modes. Each mode lets you create a different type of a long exposure photo that will look like you used professional DSLR camera equipment to capture it.
2. Slow Shutter Fast Cam
Price: Free
The app offers Automatic, Manual and Light Trail modes, but unlike the Slow Shutter Cam, it allows you to share your photos to Email, Facebook or Twitter with a single tap. iPhone owners who opt to install this app on their device will be able to set shutter speeds that last between 0.5 and 15 seconds, and they also can control shutter speed values directly from their screen. The app lets its users adjust contrast, a feature that is particularly useful if you want to take a black and white night photo.
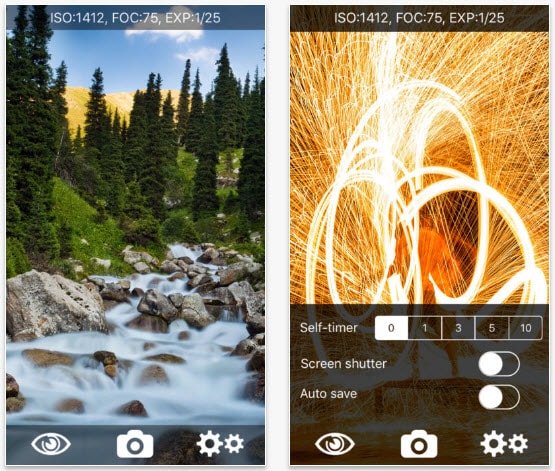
3. LongExpo
Price: Free
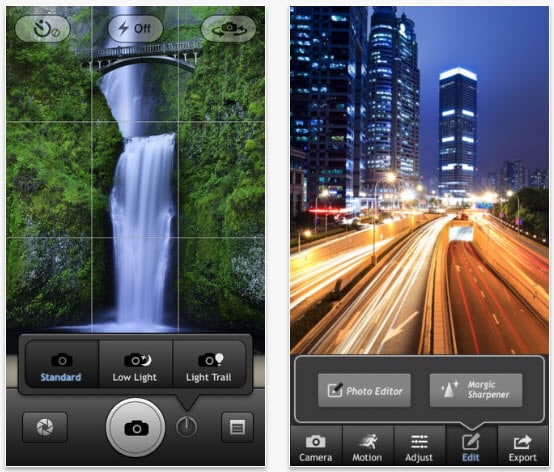
If you want to make sure that each night photo you take with your iPhone has a high resolution than LongExpo app is the best choice for you. The real-time view lets you see how your picture will look like after you take a shot, and you can adjust color, contrast or brightness from the app even after you snap a photo. LongExpo is designed to help iPhone users create amazing images in the worst light conditions and each feature it provides can be used to produce remarkable night shots.
Ollie Mattison
Ollie Mattison is a writer and a lover of all things video.
Follow @Ollie Mattison
Ollie Mattison
Mar 27, 2024• Proven solutions
iPhone cameras are powerful enough to enable you to embark on the night photography journey, but the quality of a camera is just one prerequisite for a complete low light photography experience.
In this tutorial we will provide you with a few tips that will significantly improve the night shots you take with your iPhone and we will also suggest a several iPhone apps that can make the process of taking a photo in low light conditions much easier.

Tips on How to Take Night Photos with an iPhone
Night photography can be rewarding because if you choose to take pictures by night you’ll be able to capture some breathtaking scenes, however, the tips listed below won’t help you improve your skills much if you don’t take nigh photos on a constant basis.
1. Use Long Exposures
The exposure is the amount of time the camera’s sensor is exposed to light. If you are taking a photo in broad daylight exposure value is going to 1/800 of a second or even less, while if you find yourself in a situation where light is scarce the exposure value should be anywhere between 3 to 30 seconds.
Image resource: iOS Gadget Hacks
In low light scenes, the long exposure will help your camera gather more light. However, long exposures can produce grainy photos.
2. Make Sure that Your iPhone is Perfectly Still
Any camera shake that occurs while the camera shutter is open will result in blurry photos. The exposure value you set determines how long the shutter is going to be open.
Holding a camera still for a long period of time is impossible, which is the reason why you should get a tripod if you want to take sharp night photos. Finding other ways to keep your iPhone steady, such as placing it on a firm, flat surface is also an option.
3. Experiment with Ambient Light and Shadows
Image resource: Contrastly
A good photographer always comes up with ways to work with what they’ve got, so instead of trying to avoid shadows and ambient lights, embrace them and make them a part of your photo. By doing so, you’ll be able to contribute to an overall impression of realism in a photo, and at the same time, you’ll create photos that have strong contrasts.
4. Find Creative Ways to Make Good Use of Backlighting
Taking photos by night means that you’re going to have a source of light in your shot. Backlight or a source of light in the background of your photo will enable you to get creative and capture people or objects in front of window shops, street lights or any other light source you can fathom.
Image resource: Coles Classroom
5. Utilize Different Sources of Light to Illuminate the Subject of a Photo
The cities offer countless artificial sources of light during the night, so coming up with creative ways to incorporate these light sources into your night photos is a part of the creative challenge of night photography. Place the subject of your photo into a well-lit area, and try to surround it with a dark negative space in order to create a high contrast photo.
6. Convert Your Night Photos to Black and White
Parental Control Software
Image resource: Pexels
While some of the pictures taken by night can depict a rich spectrum of colors, others simply look better when stripped of color. Night photos often have strong contrasts of light and dark, and by converting your images to black and white you’ll be able to highlight this contrast even more.
It is easy to fall in love with black and white images, which is why it is important to make sure that your picture actually looks better when desaturated before sharing it with your friends.
3 Best Slow Shutter Camera Apps for iPhones
| App | Price | |
| ——————— | ———————————————————————————————————— | |
| Slow Shutter Cam | $1.99 | |
| Slow Shutter Fast Cam | Free | |
| LongExpo | Free | |
1. Slow Shutter Cam
Price: $1,99
iPhone photographers in need of an app which extends the list of features that make night photography easier should consider purchasing this app. Alongside complete manual control over ISO and shutter speed settings, Slow Shutter Cam also enables you to take pictures in Motion Blur, Light Trail, and Low Light modes. Each mode lets you create a different type of a long exposure photo that will look like you used professional DSLR camera equipment to capture it.
2. Slow Shutter Fast Cam
Price: Free
The app offers Automatic, Manual and Light Trail modes, but unlike the Slow Shutter Cam, it allows you to share your photos to Email, Facebook or Twitter with a single tap. iPhone owners who opt to install this app on their device will be able to set shutter speeds that last between 0.5 and 15 seconds, and they also can control shutter speed values directly from their screen. The app lets its users adjust contrast, a feature that is particularly useful if you want to take a black and white night photo.
3. LongExpo
Price: Free
If you want to make sure that each night photo you take with your iPhone has a high resolution than LongExpo app is the best choice for you. The real-time view lets you see how your picture will look like after you take a shot, and you can adjust color, contrast or brightness from the app even after you snap a photo. LongExpo is designed to help iPhone users create amazing images in the worst light conditions and each feature it provides can be used to produce remarkable night shots.
Ollie Mattison
Ollie Mattison is a writer and a lover of all things video.
Follow @Ollie Mattison
Ollie Mattison
Mar 27, 2024• Proven solutions
iPhone cameras are powerful enough to enable you to embark on the night photography journey, but the quality of a camera is just one prerequisite for a complete low light photography experience.
In this tutorial we will provide you with a few tips that will significantly improve the night shots you take with your iPhone and we will also suggest a several iPhone apps that can make the process of taking a photo in low light conditions much easier.
Tips on How to Take Night Photos with an iPhone
Night photography can be rewarding because if you choose to take pictures by night you’ll be able to capture some breathtaking scenes, however, the tips listed below won’t help you improve your skills much if you don’t take nigh photos on a constant basis.
1. Use Long Exposures
The exposure is the amount of time the camera’s sensor is exposed to light. If you are taking a photo in broad daylight exposure value is going to 1/800 of a second or even less, while if you find yourself in a situation where light is scarce the exposure value should be anywhere between 3 to 30 seconds.
Image resource: iOS Gadget Hacks
In low light scenes, the long exposure will help your camera gather more light. However, long exposures can produce grainy photos.
2. Make Sure that Your iPhone is Perfectly Still
Any camera shake that occurs while the camera shutter is open will result in blurry photos. The exposure value you set determines how long the shutter is going to be open.
Holding a camera still for a long period of time is impossible, which is the reason why you should get a tripod if you want to take sharp night photos. Finding other ways to keep your iPhone steady, such as placing it on a firm, flat surface is also an option.
3. Experiment with Ambient Light and Shadows
 Epubor Audible Converter for Win: Download and convert Audible AAXC/AA/AAX to MP3 with 100% original quality preserved.
Image resource: Contrastly
A good photographer always comes up with ways to work with what they’ve got, so instead of trying to avoid shadows and ambient lights, embrace them and make them a part of your photo. By doing so, you’ll be able to contribute to an overall impression of realism in a photo, and at the same time, you’ll create photos that have strong contrasts.
4. Find Creative Ways to Make Good Use of Backlighting
Taking photos by night means that you’re going to have a source of light in your shot. Backlight or a source of light in the background of your photo will enable you to get creative and capture people or objects in front of window shops, street lights or any other light source you can fathom.
Image resource: Coles Classroom
5. Utilize Different Sources of Light to Illuminate the Subject of a Photo
The cities offer countless artificial sources of light during the night, so coming up with creative ways to incorporate these light sources into your night photos is a part of the creative challenge of night photography. Place the subject of your photo into a well-lit area, and try to surround it with a dark negative space in order to create a high contrast photo.
6. Convert Your Night Photos to Black and White
Image resource: Pexels
While some of the pictures taken by night can depict a rich spectrum of colors, others simply look better when stripped of color. Night photos often have strong contrasts of light and dark, and by converting your images to black and white you’ll be able to highlight this contrast even more.
It is easy to fall in love with black and white images, which is why it is important to make sure that your picture actually looks better when desaturated before sharing it with your friends.
3 Best Slow Shutter Camera Apps for iPhones
| App | Price | |
| ——————— | ———————————————————————————————————— | |
| Slow Shutter Cam | $1.99 | |
| Slow Shutter Fast Cam | Free | |
| LongExpo | Free | |
1. Slow Shutter Cam
Price: $1,99
iPhone photographers in need of an app which extends the list of features that make night photography easier should consider purchasing this app. Alongside complete manual control over ISO and shutter speed settings, Slow Shutter Cam also enables you to take pictures in Motion Blur, Light Trail, and Low Light modes. Each mode lets you create a different type of a long exposure photo that will look like you used professional DSLR camera equipment to capture it.
2. Slow Shutter Fast Cam
Price: Free
The app offers Automatic, Manual and Light Trail modes, but unlike the Slow Shutter Cam, it allows you to share your photos to Email, Facebook or Twitter with a single tap. iPhone owners who opt to install this app on their device will be able to set shutter speeds that last between 0.5 and 15 seconds, and they also can control shutter speed values directly from their screen. The app lets its users adjust contrast, a feature that is particularly useful if you want to take a black and white night photo.
3. LongExpo
Price: Free
If you want to make sure that each night photo you take with your iPhone has a high resolution than LongExpo app is the best choice for you. The real-time view lets you see how your picture will look like after you take a shot, and you can adjust color, contrast or brightness from the app even after you snap a photo. LongExpo is designed to help iPhone users create amazing images in the worst light conditions and each feature it provides can be used to produce remarkable night shots.
 PCDJ DEX 3 for Windows & MAC is the total entertainment DJ software solution, offering audio, video, and karaoke mixing ability. Automatic beat-sync, smart looping, 4 decks, DJ MIDI controller support, Karaoke Streaming and much more.
Ollie Mattison
Ollie Mattison is a writer and a lover of all things video.
Follow @Ollie Mattison
Ollie Mattison
Mar 27, 2024• Proven solutions
iPhone cameras are powerful enough to enable you to embark on the night photography journey, but the quality of a camera is just one prerequisite for a complete low light photography experience.
In this tutorial we will provide you with a few tips that will significantly improve the night shots you take with your iPhone and we will also suggest a several iPhone apps that can make the process of taking a photo in low light conditions much easier.
Tips on How to Take Night Photos with an iPhone
Night photography can be rewarding because if you choose to take pictures by night you’ll be able to capture some breathtaking scenes, however, the tips listed below won’t help you improve your skills much if you don’t take nigh photos on a constant basis.
1. Use Long Exposures
The exposure is the amount of time the camera’s sensor is exposed to light. If you are taking a photo in broad daylight exposure value is going to 1/800 of a second or even less, while if you find yourself in a situation where light is scarce the exposure value should be anywhere between 3 to 30 seconds.
Image resource: iOS Gadget Hacks
In low light scenes, the long exposure will help your camera gather more light. However, long exposures can produce grainy photos.
2. Make Sure that Your iPhone is Perfectly Still
Any camera shake that occurs while the camera shutter is open will result in blurry photos. The exposure value you set determines how long the shutter is going to be open.
Holding a camera still for a long period of time is impossible, which is the reason why you should get a tripod if you want to take sharp night photos. Finding other ways to keep your iPhone steady, such as placing it on a firm, flat surface is also an option.
3. Experiment with Ambient Light and Shadows
Image resource: Contrastly
A good photographer always comes up with ways to work with what they’ve got, so instead of trying to avoid shadows and ambient lights, embrace them and make them a part of your photo. By doing so, you’ll be able to contribute to an overall impression of realism in a photo, and at the same time, you’ll create photos that have strong contrasts.
4. Find Creative Ways to Make Good Use of Backlighting
Taking photos by night means that you’re going to have a source of light in your shot. Backlight or a source of light in the background of your photo will enable you to get creative and capture people or objects in front of window shops, street lights or any other light source you can fathom.
Image resource: Coles Classroom
5. Utilize Different Sources of Light to Illuminate the Subject of a Photo
The cities offer countless artificial sources of light during the night, so coming up with creative ways to incorporate these light sources into your night photos is a part of the creative challenge of night photography. Place the subject of your photo into a well-lit area, and try to surround it with a dark negative space in order to create a high contrast photo.
6. Convert Your Night Photos to Black and White
Image resource: Pexels
While some of the pictures taken by night can depict a rich spectrum of colors, others simply look better when stripped of color. Night photos often have strong contrasts of light and dark, and by converting your images to black and white you’ll be able to highlight this contrast even more.
It is easy to fall in love with black and white images, which is why it is important to make sure that your picture actually looks better when desaturated before sharing it with your friends.
3 Best Slow Shutter Camera Apps for iPhones
| App | Price | |
| ——————— | ———————————————————————————————————— | |
| Slow Shutter Cam | $1.99 | |
| Slow Shutter Fast Cam | Free | |
| LongExpo | Free | |
1. Slow Shutter Cam
Price: $1,99
iPhone photographers in need of an app which extends the list of features that make night photography easier should consider purchasing this app. Alongside complete manual control over ISO and shutter speed settings, Slow Shutter Cam also enables you to take pictures in Motion Blur, Light Trail, and Low Light modes. Each mode lets you create a different type of a long exposure photo that will look like you used professional DSLR camera equipment to capture it.
2. Slow Shutter Fast Cam
Price: Free
The app offers Automatic, Manual and Light Trail modes, but unlike the Slow Shutter Cam, it allows you to share your photos to Email, Facebook or Twitter with a single tap. iPhone owners who opt to install this app on their device will be able to set shutter speeds that last between 0.5 and 15 seconds, and they also can control shutter speed values directly from their screen. The app lets its users adjust contrast, a feature that is particularly useful if you want to take a black and white night photo.
3. LongExpo
Price: Free
If you want to make sure that each night photo you take with your iPhone has a high resolution than LongExpo app is the best choice for you. The real-time view lets you see how your picture will look like after you take a shot, and you can adjust color, contrast or brightness from the app even after you snap a photo. LongExpo is designed to help iPhone users create amazing images in the worst light conditions and each feature it provides can be used to produce remarkable night shots.
Ollie Mattison
Ollie Mattison is a writer and a lover of all things video.
Follow @Ollie Mattison
- Title: Conquering Low-Light Shots on iPhone for 2024
- Author: Joseph
- Created at : 2024-07-27 09:21:16
- Updated at : 2024-07-28 09:21:16
- Link: https://extra-tips.techidaily.com/conquering-low-light-shots-on-iphone-for-2024/
- License: This work is licensed under CC BY-NC-SA 4.0.