
Capturing Instantly with iPhone Timelapse Techniques for 2024
Capturing Instantly with iPhone Timelapse Techniques
Tips of Recording Time Lapse Video on iPhone

Ollie Mattison
Mar 27, 2024• Proven solutions
In time-lapse video, a large number of images are taken over a period of time then put together to create footage that seems to be sped up. Time-lapse videos are ideal for quickly showing how things develop over a period and are often created when buildings are being constructed, projects are being worked or to show how a scene changes over the course of a day. There are many different apps that you can download to your iPhone to obtain exceptional time-lapse video footage, with effects including Loop, Bounce and Long Exposure.
- Part1: How to record time-lapse video
- Part2: What you need to know before you begin
- Part3: Recommended third-party app
Part1: How to record time-lapse video
If you wish to record time-lapse video on your iPhone, you will need the most recent version of iOS. For best results and a higher-resolution, use a modern iPhone as these can even offer 4K video at a maximum of 30 frames-per-second. Here are the steps you need to take to get started.
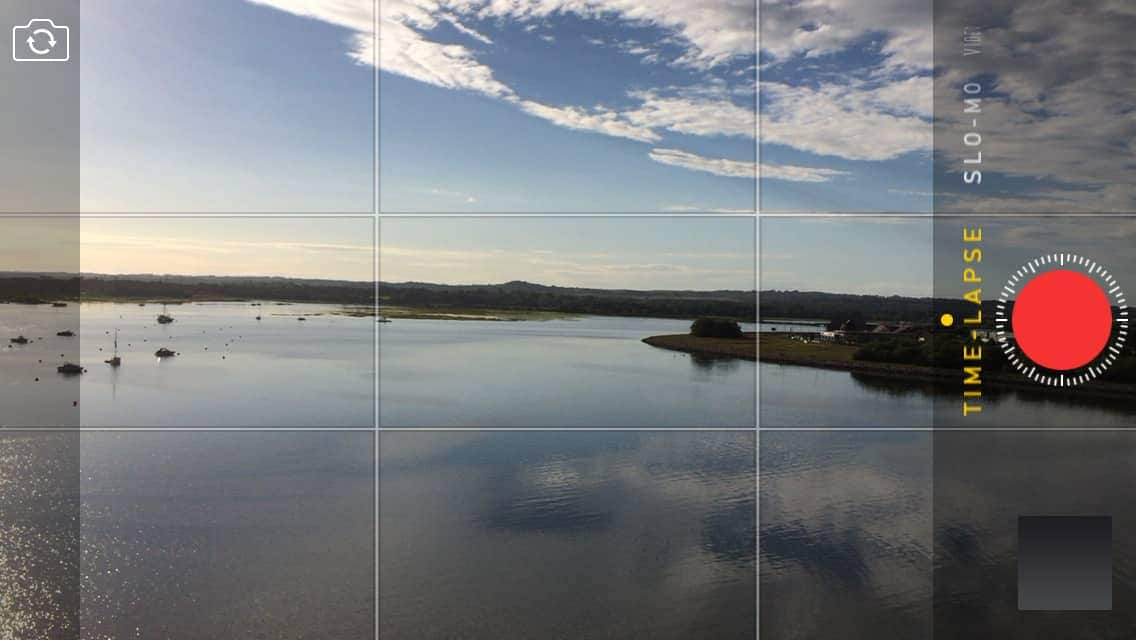
- Open the iPhone Camera app, swiping right or down to get to the Time-Lapse section.
- Tap the Record button to begin recording your video
- Tap again to stop and save the video.
- To find your video, head to the Photos app’s Recently Added, Camera Roll or Video sections.


Part2: What you need to know before you begin
Shorter time - It’s usually best to shoot for a long period of time to get the best results. The footage you obtain will be much shorter than the length of time you are shooting for, which means you will need to remain patient to get the best results. You can usually get around 40 seconds of time-lapse footage from a 10-minute session, which means you would need to shoot for around an hour to make a four-minute clip. The reason for this is that the footage is played at a specific number of frames per second, which is substantially more frames than the app you will be using can capture. The number of frames taken per second will depend not only on the app you are using but the settings you choose too.
Be stable - Your iPhone also needs to remain as stable as possible so you can prevent camera from motioning and jittering and avoid compromising the quality of the results. If you are able to use a tripod or stand rather than holding your device in your hand, this will be very helpful. Don’t forget to lock the focus, exposure or both before you start recording. You also need to ensure that your iPhone has enough storage space to capture and hold your video. Time-lapse videos can be data-heavy due to the way the feature uses a large buffer and video cache. This is especially important if you are shooting in hi-resolution.
Part3: Recommended third-party app
Though you may find the time-lapse functionality on the iPhone camera satisfactory, you can get much better results by downloading a third-party app. Here are two of the most popular iPhone apps on the market for capturing time-lapse footage.
1. Lapse It
Lapse It is an award-winning app offering a wide range of features that are designed to help you capture stunning time-lapse video without the need for costly camera equipment. The app is simple to use and you shouldn’t have any trouble getting to grips with it straight away. Lapse It also allows you to create stop motion videos and has received a great deal of media coverage, having featured on The Gadget Show in the UK. With Lapse It, you can import existing videos from your gallery and speed them up or slow them down. There are manual controls for focus, white balance, ISO and exposure available, whilst the zooming support enables zoom ramping over time. Exporting single images to the Photos app is easy.
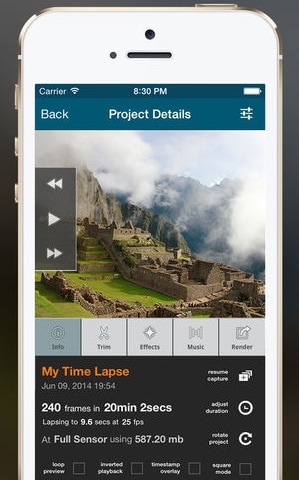
Features:
- Over 40 impressive new effect filters have recently been added to the app
- There is native support for iPad devices
- The app is completely free to use and offers time-lapse footage up to 240fps.
- You can also schedule your capture to begin and end automatically.
- You can also use the app to play and render reversed videos.
2. OSnap! Pro
OSnap! Pro is another leading time-lapse and stop-motion app that has been enjoyed by iPhone owners worldwide. The app is designed with casual and highly-experienced photographers in mind and has been described as the “best time-lapse photography app” for iOS. Coming complete with a vast number of useful features, it offers focus, white balance and exposure lock. Other features including pinch to zoom, a Listening mode triggers capturing with loud sounds and powerful editing options. There are also many special features for expert photographers and rapid timer settings, ideal for photo bursts.
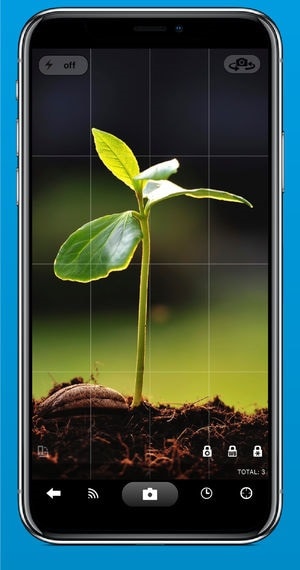
Features:
  * The app enables you to shoot in portrait, landscape and in 4:3.
  * Special features for expert photographers and rapid timer settings, ideal for photo bursts.
  * It allows you to create videos from 1-200 frames per second
  * 1080P and 4K video are supported

Conclusion
Many outstanding time-lapse videos have been created for the iPhone. You can also create stunning time-lapse videos for your iPhone with additional desktop editing software. If you wish to add truly incredible effects to your video, we recommend editing it on your desktop. With Filmora, you can easily create stunning time-lapse videos for iPhone, which can be exported directly to your device. Filmora simplifies the video editing process and allows you to add an extra touch of magic to your videos through its powerful editing tools.
Ollie Mattison
Ollie Mattison is a writer and a lover of all things video.
Follow @Ollie Mattison
Ollie Mattison
Mar 27, 2024• Proven solutions
In time-lapse video, a large number of images are taken over a period of time then put together to create footage that seems to be sped up. Time-lapse videos are ideal for quickly showing how things develop over a period and are often created when buildings are being constructed, projects are being worked or to show how a scene changes over the course of a day. There are many different apps that you can download to your iPhone to obtain exceptional time-lapse video footage, with effects including Loop, Bounce and Long Exposure.
- Part1: How to record time-lapse video
- Part2: What you need to know before you begin
- Part3: Recommended third-party app
Part1: How to record time-lapse video
If you wish to record time-lapse video on your iPhone, you will need the most recent version of iOS. For best results and a higher-resolution, use a modern iPhone as these can even offer 4K video at a maximum of 30 frames-per-second. Here are the steps you need to take to get started.
- Open the iPhone Camera app, swiping right or down to get to the Time-Lapse section.
- Tap the Record button to begin recording your video
- Tap again to stop and save the video.
- To find your video, head to the Photos app’s Recently Added, Camera Roll or Video sections.
Part2: What you need to know before you begin
Shorter time - It’s usually best to shoot for a long period of time to get the best results. The footage you obtain will be much shorter than the length of time you are shooting for, which means you will need to remain patient to get the best results. You can usually get around 40 seconds of time-lapse footage from a 10-minute session, which means you would need to shoot for around an hour to make a four-minute clip. The reason for this is that the footage is played at a specific number of frames per second, which is substantially more frames than the app you will be using can capture. The number of frames taken per second will depend not only on the app you are using but the settings you choose too.
Be stable - Your iPhone also needs to remain as stable as possible so you can prevent camera from motioning and jittering and avoid compromising the quality of the results. If you are able to use a tripod or stand rather than holding your device in your hand, this will be very helpful. Don’t forget to lock the focus, exposure or both before you start recording. You also need to ensure that your iPhone has enough storage space to capture and hold your video. Time-lapse videos can be data-heavy due to the way the feature uses a large buffer and video cache. This is especially important if you are shooting in hi-resolution.
Part3: Recommended third-party app
Though you may find the time-lapse functionality on the iPhone camera satisfactory, you can get much better results by downloading a third-party app. Here are two of the most popular iPhone apps on the market for capturing time-lapse footage.
1. Lapse It
Lapse It is an award-winning app offering a wide range of features that are designed to help you capture stunning time-lapse video without the need for costly camera equipment. The app is simple to use and you shouldn’t have any trouble getting to grips with it straight away. Lapse It also allows you to create stop motion videos and has received a great deal of media coverage, having featured on The Gadget Show in the UK. With Lapse It, you can import existing videos from your gallery and speed them up or slow them down. There are manual controls for focus, white balance, ISO and exposure available, whilst the zooming support enables zoom ramping over time. Exporting single images to the Photos app is easy.
Features:
- Over 40 impressive new effect filters have recently been added to the app
- There is native support for iPad devices
- The app is completely free to use and offers time-lapse footage up to 240fps.
- You can also schedule your capture to begin and end automatically.
- You can also use the app to play and render reversed videos.
2. OSnap! Pro
OSnap! Pro is another leading time-lapse and stop-motion app that has been enjoyed by iPhone owners worldwide. The app is designed with casual and highly-experienced photographers in mind and has been described as the “best time-lapse photography app” for iOS. Coming complete with a vast number of useful features, it offers focus, white balance and exposure lock. Other features including pinch to zoom, a Listening mode triggers capturing with loud sounds and powerful editing options. There are also many special features for expert photographers and rapid timer settings, ideal for photo bursts.
Features:
  * The app enables you to shoot in portrait, landscape and in 4:3.
  * Special features for expert photographers and rapid timer settings, ideal for photo bursts.
  * It allows you to create videos from 1-200 frames per second
  * 1080P and 4K video are supported
Conclusion
Many outstanding time-lapse videos have been created for the iPhone. You can also create stunning time-lapse videos for your iPhone with additional desktop editing software. If you wish to add truly incredible effects to your video, we recommend editing it on your desktop. With Filmora, you can easily create stunning time-lapse videos for iPhone, which can be exported directly to your device. Filmora simplifies the video editing process and allows you to add an extra touch of magic to your videos through its powerful editing tools.
 Nero Burning ROM:
The ultimate burning program for all your needs!
Ollie Mattison
Ollie Mattison is a writer and a lover of all things video.
Follow @Ollie Mattison
Ollie Mattison
Mar 27, 2024• Proven solutions
In time-lapse video, a large number of images are taken over a period of time then put together to create footage that seems to be sped up. Time-lapse videos are ideal for quickly showing how things develop over a period and are often created when buildings are being constructed, projects are being worked or to show how a scene changes over the course of a day. There are many different apps that you can download to your iPhone to obtain exceptional time-lapse video footage, with effects including Loop, Bounce and Long Exposure.
- Part1: How to record time-lapse video
- Part2: What you need to know before you begin
- Part3: Recommended third-party app
Part1: How to record time-lapse video
If you wish to record time-lapse video on your iPhone, you will need the most recent version of iOS. For best results and a higher-resolution, use a modern iPhone as these can even offer 4K video at a maximum of 30 frames-per-second. Here are the steps you need to take to get started.
- Open the iPhone Camera app, swiping right or down to get to the Time-Lapse section.
- Tap the Record button to begin recording your video
- Tap again to stop and save the video.
- To find your video, head to the Photos app’s Recently Added, Camera Roll or Video sections.
Part2: What you need to know before you begin
Shorter time - It’s usually best to shoot for a long period of time to get the best results. The footage you obtain will be much shorter than the length of time you are shooting for, which means you will need to remain patient to get the best results. You can usually get around 40 seconds of time-lapse footage from a 10-minute session, which means you would need to shoot for around an hour to make a four-minute clip. The reason for this is that the footage is played at a specific number of frames per second, which is substantially more frames than the app you will be using can capture. The number of frames taken per second will depend not only on the app you are using but the settings you choose too.
Be stable - Your iPhone also needs to remain as stable as possible so you can prevent camera from motioning and jittering and avoid compromising the quality of the results. If you are able to use a tripod or stand rather than holding your device in your hand, this will be very helpful. Don’t forget to lock the focus, exposure or both before you start recording. You also need to ensure that your iPhone has enough storage space to capture and hold your video. Time-lapse videos can be data-heavy due to the way the feature uses a large buffer and video cache. This is especially important if you are shooting in hi-resolution.
Part3: Recommended third-party app
Though you may find the time-lapse functionality on the iPhone camera satisfactory, you can get much better results by downloading a third-party app. Here are two of the most popular iPhone apps on the market for capturing time-lapse footage.
1. Lapse It
Lapse It is an award-winning app offering a wide range of features that are designed to help you capture stunning time-lapse video without the need for costly camera equipment. The app is simple to use and you shouldn’t have any trouble getting to grips with it straight away. Lapse It also allows you to create stop motion videos and has received a great deal of media coverage, having featured on The Gadget Show in the UK. With Lapse It, you can import existing videos from your gallery and speed them up or slow them down. There are manual controls for focus, white balance, ISO and exposure available, whilst the zooming support enables zoom ramping over time. Exporting single images to the Photos app is easy.
Features:
- Over 40 impressive new effect filters have recently been added to the app
- There is native support for iPad devices
- The app is completely free to use and offers time-lapse footage up to 240fps.
- You can also schedule your capture to begin and end automatically.
- You can also use the app to play and render reversed videos.
2. OSnap! Pro
OSnap! Pro is another leading time-lapse and stop-motion app that has been enjoyed by iPhone owners worldwide. The app is designed with casual and highly-experienced photographers in mind and has been described as the “best time-lapse photography app” for iOS. Coming complete with a vast number of useful features, it offers focus, white balance and exposure lock. Other features including pinch to zoom, a Listening mode triggers capturing with loud sounds and powerful editing options. There are also many special features for expert photographers and rapid timer settings, ideal for photo bursts.
Features:
  * The app enables you to shoot in portrait, landscape and in 4:3.
  * Special features for expert photographers and rapid timer settings, ideal for photo bursts.
  * It allows you to create videos from 1-200 frames per second
  * 1080P and 4K video are supported
Conclusion
Many outstanding time-lapse videos have been created for the iPhone. You can also create stunning time-lapse videos for your iPhone with additional desktop editing software. If you wish to add truly incredible effects to your video, we recommend editing it on your desktop. With Filmora, you can easily create stunning time-lapse videos for iPhone, which can be exported directly to your device. Filmora simplifies the video editing process and allows you to add an extra touch of magic to your videos through its powerful editing tools.
Ollie Mattison
Ollie Mattison is a writer and a lover of all things video.
Follow @Ollie Mattison
Ollie Mattison
Mar 27, 2024• Proven solutions
In time-lapse video, a large number of images are taken over a period of time then put together to create footage that seems to be sped up. Time-lapse videos are ideal for quickly showing how things develop over a period and are often created when buildings are being constructed, projects are being worked or to show how a scene changes over the course of a day. There are many different apps that you can download to your iPhone to obtain exceptional time-lapse video footage, with effects including Loop, Bounce and Long Exposure.
- Part1: How to record time-lapse video
- Part2: What you need to know before you begin
- Part3: Recommended third-party app
Part1: How to record time-lapse video
If you wish to record time-lapse video on your iPhone, you will need the most recent version of iOS. For best results and a higher-resolution, use a modern iPhone as these can even offer 4K video at a maximum of 30 frames-per-second. Here are the steps you need to take to get started.
- Open the iPhone Camera app, swiping right or down to get to the Time-Lapse section.
- Tap the Record button to begin recording your video
- Tap again to stop and save the video.
- To find your video, head to the Photos app’s Recently Added, Camera Roll or Video sections.

 vMix Basic HD - Software based live production. vMix Basic HD includes 4 inputs, 3 cameras, streaming, recording, playlist.
Part2: What you need to know before you begin
Shorter time - It’s usually best to shoot for a long period of time to get the best results. The footage you obtain will be much shorter than the length of time you are shooting for, which means you will need to remain patient to get the best results. You can usually get around 40 seconds of time-lapse footage from a 10-minute session, which means you would need to shoot for around an hour to make a four-minute clip. The reason for this is that the footage is played at a specific number of frames per second, which is substantially more frames than the app you will be using can capture. The number of frames taken per second will depend not only on the app you are using but the settings you choose too.
Be stable - Your iPhone also needs to remain as stable as possible so you can prevent camera from motioning and jittering and avoid compromising the quality of the results. If you are able to use a tripod or stand rather than holding your device in your hand, this will be very helpful. Don’t forget to lock the focus, exposure or both before you start recording. You also need to ensure that your iPhone has enough storage space to capture and hold your video. Time-lapse videos can be data-heavy due to the way the feature uses a large buffer and video cache. This is especially important if you are shooting in hi-resolution.

Part3: Recommended third-party app
Though you may find the time-lapse functionality on the iPhone camera satisfactory, you can get much better results by downloading a third-party app. Here are two of the most popular iPhone apps on the market for capturing time-lapse footage.
1. Lapse It
Lapse It is an award-winning app offering a wide range of features that are designed to help you capture stunning time-lapse video without the need for costly camera equipment. The app is simple to use and you shouldn’t have any trouble getting to grips with it straight away. Lapse It also allows you to create stop motion videos and has received a great deal of media coverage, having featured on The Gadget Show in the UK. With Lapse It, you can import existing videos from your gallery and speed them up or slow them down. There are manual controls for focus, white balance, ISO and exposure available, whilst the zooming support enables zoom ramping over time. Exporting single images to the Photos app is easy.
Features:
- Over 40 impressive new effect filters have recently been added to the app
- There is native support for iPad devices
- The app is completely free to use and offers time-lapse footage up to 240fps.
- You can also schedule your capture to begin and end automatically.
- You can also use the app to play and render reversed videos.
2. OSnap! Pro
OSnap! Pro is another leading time-lapse and stop-motion app that has been enjoyed by iPhone owners worldwide. The app is designed with casual and highly-experienced photographers in mind and has been described as the “best time-lapse photography app” for iOS. Coming complete with a vast number of useful features, it offers focus, white balance and exposure lock. Other features including pinch to zoom, a Listening mode triggers capturing with loud sounds and powerful editing options. There are also many special features for expert photographers and rapid timer settings, ideal for photo bursts.
Features:
  * The app enables you to shoot in portrait, landscape and in 4:3.
  * Special features for expert photographers and rapid timer settings, ideal for photo bursts.
  * It allows you to create videos from 1-200 frames per second
  * 1080P and 4K video are supported
Conclusion
Many outstanding time-lapse videos have been created for the iPhone. You can also create stunning time-lapse videos for your iPhone with additional desktop editing software. If you wish to add truly incredible effects to your video, we recommend editing it on your desktop. With Filmora, you can easily create stunning time-lapse videos for iPhone, which can be exported directly to your device. Filmora simplifies the video editing process and allows you to add an extra touch of magic to your videos through its powerful editing tools.
Ollie Mattison
Ollie Mattison is a writer and a lover of all things video.
Follow @Ollie Mattison
- Title: Capturing Instantly with iPhone Timelapse Techniques for 2024
- Author: Joseph
- Created at : 2024-07-27 08:57:02
- Updated at : 2024-07-28 08:57:02
- Link: https://extra-tips.techidaily.com/capturing-instantly-with-iphone-timelapse-techniques-for-2024/
- License: This work is licensed under CC BY-NC-SA 4.0.