
"Beginner's Guide Steady Sound Volume Rise in Editing"
Beginner’s Guide: Steady Sound Volume Rise in Editing
Adobe Audition, developed by Adobe Inc is a digital audio workstation. This is a great application one can use, for sound effect designing or video podcasting, to record and/or mix audio. Audition has two modes, accessible by clicking on the Waveform or Multitrack buttons present at the top, or by double clicking to open an audio file or multitrack session in the Files panel. Audition has several panels, each with a unique set of features.
Effects can be implemented at the same time by choosing them from the Effects menu or as a list in the Effects bar, enabling you to test with effect combinations before implementing them. Presets help you get started, and detailed controls allow you to fine-tune your adjustments. You can also batch-process audio files to remove 60 Hz hum or fit the amplitude of clips. It can be done using a variety of measures, including industry standard Broadcast Loudness options.
Part 1. Steps to Adobe Audition Fade In
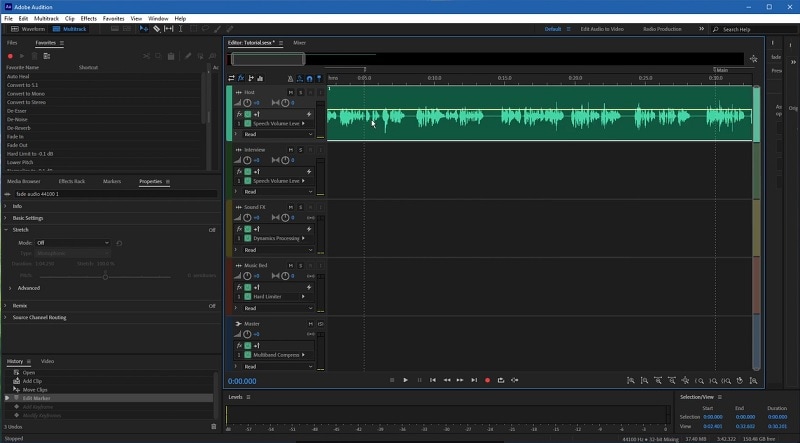
The multitrack view includes a comprehensive set of non-destructive editing tools and audio mixing. The changes you make in this mode have no effect on your original audio files. You can make multiple modifications to multitrack clips immediately, making it simple to quickly adjust a mix.
Consider adjusting the level of a clip to create it more audible. In audio transitions, fading is widely used. With Fade it, the sound begins silently and slowly increases to full volume. With Adobe audition fade out, the audio begins at full volume and slightly declines to silence.
If you have audio that starts quite abruptly and you’d like to add a fade, Audition makes this very easy. Here are some steps to follow:
- First, you have to do successful installation completion of Adobe Audition software.
- Open Adobe Audition and then opt for the selection of your desired audio file. You will notice that where it is dark, you will get a square broken into 2 triangles, one at the top left and one at the top right.

- Now, if you point these out, you will spot them on every piece of audio you open and if you hover the mouse over that, the left one is called Fade In. The right one is Fade Out.
- Now, if you pull the Heads-Up Display out of the way and click and then drag right on the icon, you will see a fade in there which is a little bit longer than you need.
- If you go up to your Effects menu and go to your Amplitude and Compression section, you have got a Fade Envelope and a Gain Envelope.
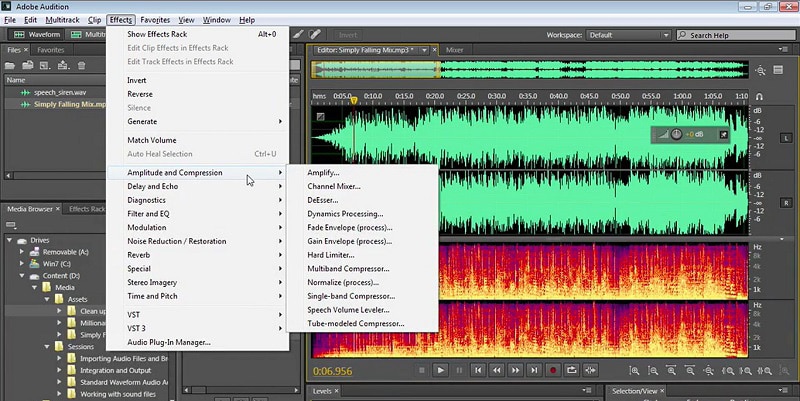
- Now, if you choose Fade Envelope and of course, it is giving you the fade right the way through the audio. It will adjust for you and this is based on a Smooth Fade In.
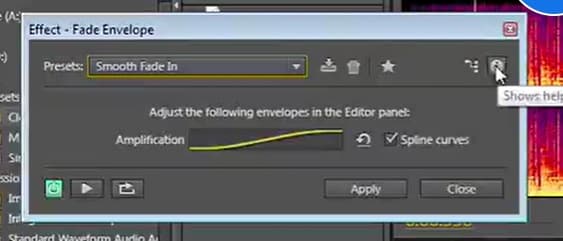
- Now, go back to the Effects, Amplitude, and Compression and Click on Fade Envelope. Then, choose a Smooth Fade Out and there you will see after zooming a little bit more, a yellow line has been drawn to show what fade effect is going to be applied.
- If you click on this yellow line, you can drag it in situ and reshape it any way you want and you can create any kind of stepped fade you want.
- If you go back into your effects, go back into Amplitude and Compression and this time, Choose Gain envelope. Now, you will get the yellow line flowing right the way through the audio.
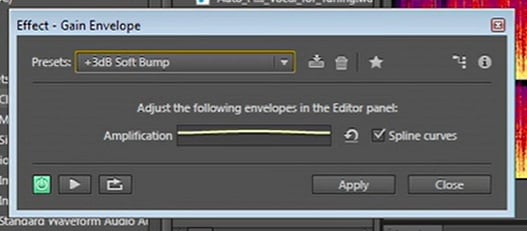
- Now exactly, in the same way, you can go in and begin to make adjustments. Now, when you make a selection here, Audition compresses your adjustments into that selected region. You will need to be a little careful about that when working with these effects. So, you can add fades very easily at any time by clicking on the handles at the top right and left of Waveform Display, or you can use dedicated effects for the purpose.

Part 2. Audition Alternative to Fade Audio
Filmora is another best audio editing tool that is a great alternative to Adobe Audition software. Wondershare Filmora, which is the latest version of Filmora, has the visual audio editing potential to guide you in editing audio files. There are many features available in this like you can add background music, detect music beats, etc.
You can also split audio, adjust audio, replace the original audio of a video, and do many more things with this. It is the one-stop tool to end your audio editing problems. You can get an insight and understand how you can edit and/or make adjustments to the audio in the video using the Filmora tool. Enlisted are the reqd. steps in Filmora that you can put to use for fade audio purposes:
Free Download For Win 7 or later(64-bit)
Free Download For macOS 10.14 or later
Steps to use Filmora to fade audio:
- First, do the installation of Filmora software from the home screen and set the default procedure for a successful installation, and then open it. Now, to your timeline, add your desired audio file, and then, opt for double-clicking on the same for opening the Audio editing menu.
- Drag the sliders and set fade-in along with fade-out effects.

- There is an alternative to this. You may opt for the selection of fade icons that is on the left and/or right side of the waveform portion so you are able to fade in and/or fade out faster.
- At the starting point of an audio clip, opt for dragging the fade-in maker that is to the right side. Then, opt for the application of the fade-in effect.
- Now, opt for the clip’s end, and then, opt for dragging the fade-out maker i.e. to the left side. This is for the addition of a fade-out effect. There is one thing to keep in mind if you drag it further, the fade effect lasts for a longer time.
Part 3. Related FAQs
1. How do you fade in multitrack in Audition?
If you want to fade in and fade out two clips at the same time, then controlling just one track or multiple tracks will allow you to do fades on multiple audios inside the multitrack in Adobe Audition.
2. How do you do a master fade in Audition?
Select the option of amplifying the effects i.e., amplitude and compression. Do the necessary adjustments there. Then, go to effects and click on Special, and from there, select Mastering.
3. Adobe Audition fade-out greyed out?
Fade-in and fade-out options are available in the top-left and right corners of the waveform. Right-clicking in the project panel will produce no ability to work in the audition. That option is called grey out. Whatever you want to look for won’t work in this view.
Conclusion
Adobe Audition has always been a powerful platform for audio editing. But as every coin has its two faces so is the case with this also. Due to the expensive price of a monthly subscription, not everyone will be able to use this and get the benefits from using this. Though if you want to excel in audio editing, you should go for a subscription. If you are doing podcasting or video editing and looking for a complementary product for your projects, Audition is a perfect match. This is particularly if you have already worked with other best-leading Adobe software like Photoshop or Premiere.
Free Download For Win 7 or later(64-bit)
Free Download For macOS 10.14 or later
Free Download For macOS 10.14 or later
Steps to use Filmora to fade audio:
- First, do the installation of Filmora software from the home screen and set the default procedure for a successful installation, and then open it. Now, to your timeline, add your desired audio file, and then, opt for double-clicking on the same for opening the Audio editing menu.
- Drag the sliders and set fade-in along with fade-out effects.
- There is an alternative to this. You may opt for the selection of fade icons that is on the left and/or right side of the waveform portion so you are able to fade in and/or fade out faster.
- At the starting point of an audio clip, opt for dragging the fade-in maker that is to the right side. Then, opt for the application of the fade-in effect.
- Now, opt for the clip’s end, and then, opt for dragging the fade-out maker i.e. to the left side. This is for the addition of a fade-out effect. There is one thing to keep in mind if you drag it further, the fade effect lasts for a longer time.
Part 3. Related FAQs
1. How do you fade in multitrack in Audition?
If you want to fade in and fade out two clips at the same time, then controlling just one track or multiple tracks will allow you to do fades on multiple audios inside the multitrack in Adobe Audition.
2. How do you do a master fade in Audition?
Select the option of amplifying the effects i.e., amplitude and compression. Do the necessary adjustments there. Then, go to effects and click on Special, and from there, select Mastering.
3. Adobe Audition fade-out greyed out?
Fade-in and fade-out options are available in the top-left and right corners of the waveform. Right-clicking in the project panel will produce no ability to work in the audition. That option is called grey out. Whatever you want to look for won’t work in this view.
Conclusion
Adobe Audition has always been a powerful platform for audio editing. But as every coin has its two faces so is the case with this also. Due to the expensive price of a monthly subscription, not everyone will be able to use this and get the benefits from using this. Though if you want to excel in audio editing, you should go for a subscription. If you are doing podcasting or video editing and looking for a complementary product for your projects, Audition is a perfect match. This is particularly if you have already worked with other best-leading Adobe software like Photoshop or Premiere.
Free Download For Win 7 or later(64-bit)
Free Download For macOS 10.14 or later
Also read:
- [New] In 2024, Decoding YouTube Income How Much Does Each 1,000 Viewer Earn?
- [RESOLVED] How to Fix 'Easy Anti-Cheat Failed to Start in New World' Issue
- [Updated] Constructing Premium Canon Chrono Images
- [Updated] The iSpring Screen Recorder Review
- 2024 Approved Comparing MAGIX Audio Tools
- 2024 Approved The YouTuber's Playbook Achieving Content Stardom
- Achieve Epic Results The Ultimate Guide to GoPro Time-Lapses for 2024
- Craft Professional Text The Best Affects Extensions Revealed
- How to Reset a Locked Xiaomi Redmi Note 12 Pro 4G Phone
- How to Unlock Apple iPhone XS Passcode without iTunes without Knowing Passcode?
- Mastering the Art of Selective Screenshots in Windows 10
- Rootjunky APK To Bypass Google FRP Lock For Nubia Red Magic 9 Pro
- YouTube Comment Discovery A Step-by-Step Walkthrough
- Title: Beginner's Guide Steady Sound Volume Rise in Editing
- Author: Joseph
- Created at : 2024-10-17 21:10:38
- Updated at : 2024-10-22 17:44:14
- Link: https://extra-tips.techidaily.com/beginners-guide-steady-sound-volume-rise-in-editing/
- License: This work is licensed under CC BY-NC-SA 4.0.