Android's Ultimate Capture Secrets Revealed for 2024
Android’s Ultimate Capture Secrets Revealed
Useful Tips and Apps for Taking Amazing Android Photography
 DLNow Video Downloader
Liza Brown
Mar 27, 2024• Proven solutions
Are you taking underexposed and blurry picture whenever you try out Android Photography on your device? Do you think all the stunning photos on the Internet are clicked by any high-end camera? Not always really. The Android can also shoot astonishing and attractive photos with its pro like camera.
This article will share with you some of the amazing tricks and tips of Android photography and the use of video editing apps to make the images appear professional as you see on the Internet. Checking out on the tips and apps for Android Photography can help you in mastering the skill and taking photography like a maven.
Preparation Can’t be Ignored
For a great Android photography, it is vital to prepare yourself and check out on the needful. So, just ensure 2 things.
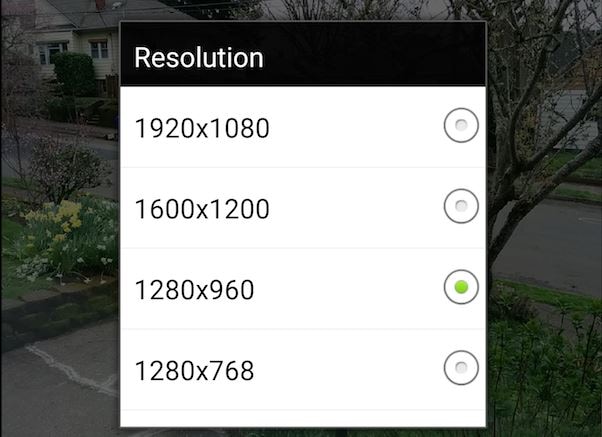
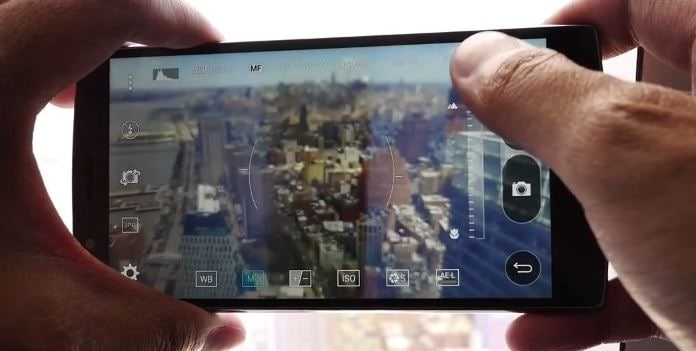
Go to Set Resolution
One thing you must remember is that when the resolution is set high, only then can your photos be of the best quality. While clicking a picture, always try to focus your subject than zooming in. The cropped photos are much better and high resolution than the zoomed in images. The only problem you can face with high resolution photos is storing. So, try to store the images in the photo sharing apps or in the cloud storage like Dropbox or Picasa.

Cleaning the Lens is Important
In Android photography second important thing to keep in mind is cleaning the lens of the device. Your mobile phone spends a lot of time in your pocket or in your hands. Your fingerprints and dust can conceal the lens of your Android phone obstructing a clear image while clicking. A grime filled lens tend to block the entry of light, resulting in cloudy and vague images. Use a cleaning solution and a microfiber cloth to clean the lens of your device for a crystal clear image using your Android phone.
 vMix Pro - Software based live production. vMix Pro includes everything in vMix 4K plus 8 channels of Replay and 8 vMix Call
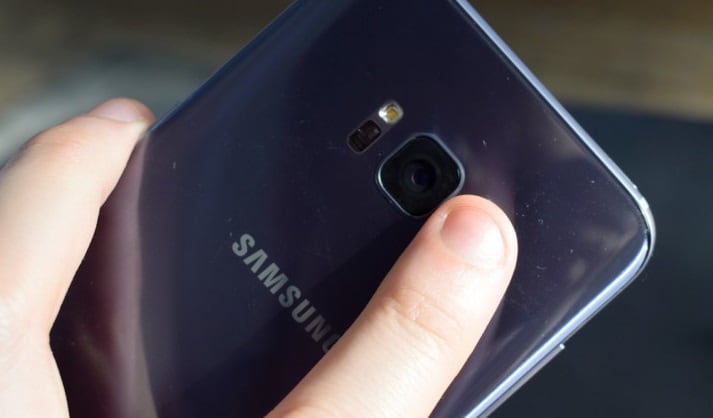

6 Tips for Amazing Android Photography
Make Use of Selfie-Stick
Have you ever faced stability problem while clicking a photo? Have you been frustrated for a blurred snap due to camera stability issues? A selfie stick or the monopod is a solution to all your problems. It is long enough to take a shot from a distance during the Android Photography, and most importantly it is best for the selfies. The tripods, on the other hand, are for slow-shutter speed. These are portable and you can use your Android phone from any angle to take the photos.
 With Screensaver Wonder you can easily make a screensaver from your own pictures and video files. Create screensavers for your own computer or create standalone, self-installing screensavers for easy sharing with your friends. Together with its sister product Screensaver Factory, Screensaver Wonder is one of the most popular screensaver software products in the world, helping thousands of users decorate their computer screens quickly and easily.
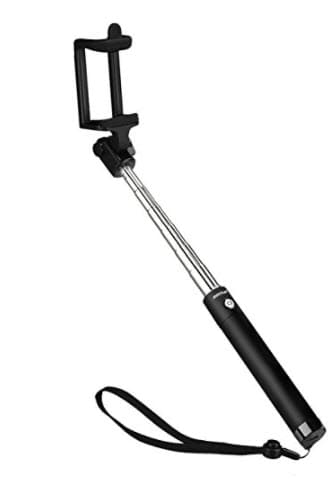
It is Always Light
While Android photography, it is important that your subject faces the light. Many Android phone cameras do not have the flash option. In such a case, if the subject is at the back of the light and you are facing light then the subject will appear dark. Unless a silhouette shot, you need not face the light, let your subject face it.

The Rule of Thirds
What is the rule of thirds? It is a compositional gridline to guide the inexperienced in photography and painting. It helps in taking photos by creating grids and dividing the photo into nine equal parts. The photos are better and interesting when the subjects astride the imaginary lines dividing the photograph into 2 vertical and 2 horizontal guide lines. For a more balanced image, ensure that the subject is slightly of the centre.

Change Your Focus
What is your subject? While clicking photos, your camera cannot track your subject by Auto focussing option. So to ensure a flawless photo, it is essential that you touch your finger on the screen to focus manually. You just need to touch right on your subject to set your focus completely.
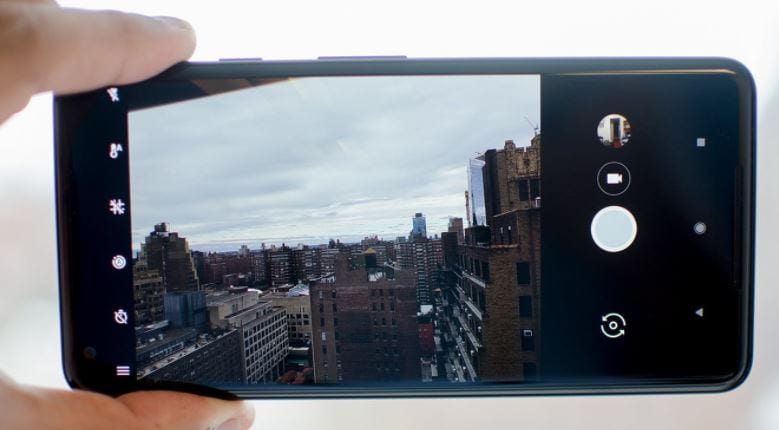
Do Not Zoom In/Out
As already mentioned earlier, in Android photography the digital zoom feature is not really worth it. Cropping a photo is far better an option than zooming in. Try to step closer to your subject, if you want to get a clear picture of it. If your cannot, then focus on your subject and click to crop it later. The digital zooming feature cannot be the solution to a clear picture.
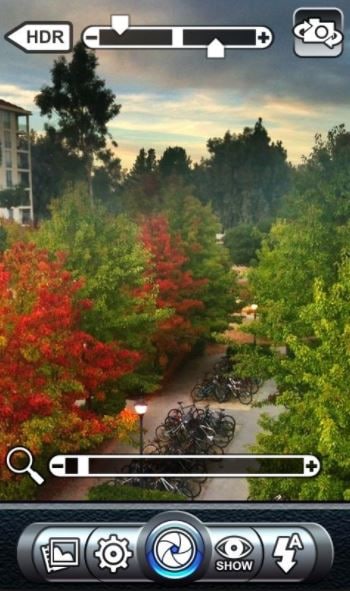
Use HDR Effect
The default camera apps include the HDR feature in the iOS and Android devices. The HDR or the high definition range is a filter that can be used as and when required. Get the HDR toggle on both the OSes, just on the shutter screen itself. The HDR in the Android photography keeps the balance between the dark and the light parts of your image. Keep the phone steady as it requires a long exposure.

Best Free Third-Party Editing Apps
The above-mentioned tips are definitely quite useful but there are certain times when these tips are not enough to make your photos perfect. When the Android photography lacks the special effect to make the images perfect, the only savior in such situations is the free third-party apps for editing. Let’s check out some of the free apps to make your Android photography completely amazing.
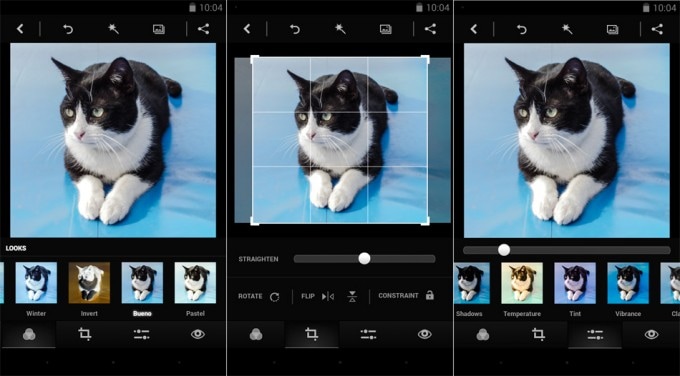
1. PhotoShop Express
An easy, yet, powerful Android photography editing tool, the Adobe Photoshop Express is a great collage maker with amazing advance correction features and more than 60 professional looks. From defogging to denoising, the Photoshop Express offers all. The features of this app includes-
- Flexibility and control of images in terms of border size, layouts, individual pan, zoom, and color
- Add personal touch to the photos by choosing from the range of frames and borders
- Crop, straighten, resize, rotate, refine, red-eye removal, contrast, brightness, exposure, white balance, and more
- Blemish removal, fine tune, even skin tone, one-touch heal, etc.
- Add text or graphical watermark on images
2. Snapseed
A Google developed photo editor, Snapseed contains a range of features that can help even a novice to become a professional photographer. The features are-
- Color balance adjustment
- Skewed lines fix and perfect the geometry of building or horizons
- Addition of fine glow to the images
- Multiple exposure effect addition
- From vintage, grainy, black and white to drama, retro, or edgy look
- Precise control over all styles
 Glarysoft File Recovery Pro Annually - Helps to recover your lost file/data, even permanently deleted data.
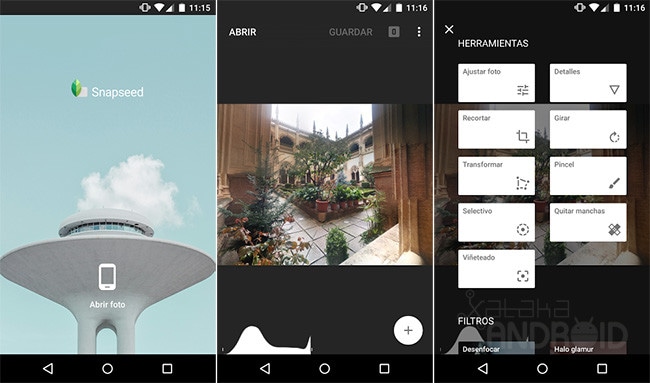
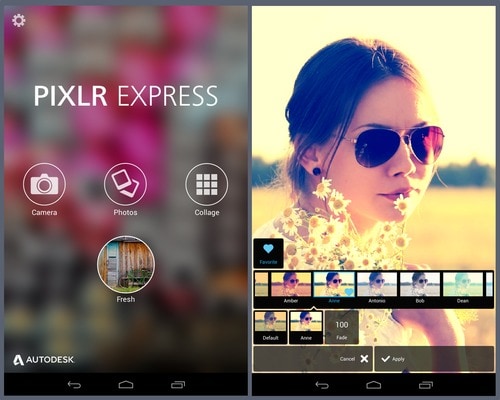
3. Pixlr
Capture the beautiful moments of your life and beautify it by adding over 2 million combination of effects. The features of this app include-
- Spacing, background, and layout choices
- Auto fic option to automatically fix the color balance
- Remove blemishes and red-eyes or teeth-whitening effects
- Adjust the photo mood with tone enhancement, cool it down, or add surreal shades
- Color Splash for focussing on one color and focal blur impact
Parental Control Software
 Video Converter Factory Pro
Conclusion
The above tips and apps can help you greatly in enhancing your Android photography to a great extent. But, none of the above can help in the addition of your photos to your videos. If you wish to add the professional looking photos to a high quality video and enhance it with music and voiceovers, try out the Filmora app. It is one of the best software, a complete package for photos and videos editing and enhancement.

Liza Brown
Liza Brown is a writer and a lover of all things video.
Follow @Liza Brown
Liza Brown
Mar 27, 2024• Proven solutions
Are you taking underexposed and blurry picture whenever you try out Android Photography on your device? Do you think all the stunning photos on the Internet are clicked by any high-end camera? Not always really. The Android can also shoot astonishing and attractive photos with its pro like camera.
This article will share with you some of the amazing tricks and tips of Android photography and the use of video editing apps to make the images appear professional as you see on the Internet. Checking out on the tips and apps for Android Photography can help you in mastering the skill and taking photography like a maven.
Preparation Can’t be Ignored
For a great Android photography, it is vital to prepare yourself and check out on the needful. So, just ensure 2 things.
Go to Set Resolution
One thing you must remember is that when the resolution is set high, only then can your photos be of the best quality. While clicking a picture, always try to focus your subject than zooming in. The cropped photos are much better and high resolution than the zoomed in images. The only problem you can face with high resolution photos is storing. So, try to store the images in the photo sharing apps or in the cloud storage like Dropbox or Picasa.
Cleaning the Lens is Important
In Android photography second important thing to keep in mind is cleaning the lens of the device. Your mobile phone spends a lot of time in your pocket or in your hands. Your fingerprints and dust can conceal the lens of your Android phone obstructing a clear image while clicking. A grime filled lens tend to block the entry of light, resulting in cloudy and vague images. Use a cleaning solution and a microfiber cloth to clean the lens of your device for a crystal clear image using your Android phone.
6 Tips for Amazing Android Photography
Make Use of Selfie-Stick
Have you ever faced stability problem while clicking a photo? Have you been frustrated for a blurred snap due to camera stability issues? A selfie stick or the monopod is a solution to all your problems. It is long enough to take a shot from a distance during the Android Photography, and most importantly it is best for the selfies. The tripods, on the other hand, are for slow-shutter speed. These are portable and you can use your Android phone from any angle to take the photos.
It is Always Light
While Android photography, it is important that your subject faces the light. Many Android phone cameras do not have the flash option. In such a case, if the subject is at the back of the light and you are facing light then the subject will appear dark. Unless a silhouette shot, you need not face the light, let your subject face it.
The Rule of Thirds
What is the rule of thirds? It is a compositional gridline to guide the inexperienced in photography and painting. It helps in taking photos by creating grids and dividing the photo into nine equal parts. The photos are better and interesting when the subjects astride the imaginary lines dividing the photograph into 2 vertical and 2 horizontal guide lines. For a more balanced image, ensure that the subject is slightly of the centre.
Change Your Focus
What is your subject? While clicking photos, your camera cannot track your subject by Auto focussing option. So to ensure a flawless photo, it is essential that you touch your finger on the screen to focus manually. You just need to touch right on your subject to set your focus completely.
Do Not Zoom In/Out
As already mentioned earlier, in Android photography the digital zoom feature is not really worth it. Cropping a photo is far better an option than zooming in. Try to step closer to your subject, if you want to get a clear picture of it. If your cannot, then focus on your subject and click to crop it later. The digital zooming feature cannot be the solution to a clear picture.
Use HDR Effect
The default camera apps include the HDR feature in the iOS and Android devices. The HDR or the high definition range is a filter that can be used as and when required. Get the HDR toggle on both the OSes, just on the shutter screen itself. The HDR in the Android photography keeps the balance between the dark and the light parts of your image. Keep the phone steady as it requires a long exposure.
Best Free Third-Party Editing Apps
The above-mentioned tips are definitely quite useful but there are certain times when these tips are not enough to make your photos perfect. When the Android photography lacks the special effect to make the images perfect, the only savior in such situations is the free third-party apps for editing. Let’s check out some of the free apps to make your Android photography completely amazing.
1. PhotoShop Express
An easy, yet, powerful Android photography editing tool, the Adobe Photoshop Express is a great collage maker with amazing advance correction features and more than 60 professional looks. From defogging to denoising, the Photoshop Express offers all. The features of this app includes-
- Flexibility and control of images in terms of border size, layouts, individual pan, zoom, and color
- Add personal touch to the photos by choosing from the range of frames and borders
- Crop, straighten, resize, rotate, refine, red-eye removal, contrast, brightness, exposure, white balance, and more
- Blemish removal, fine tune, even skin tone, one-touch heal, etc.
- Add text or graphical watermark on images
2. Snapseed
A Google developed photo editor, Snapseed contains a range of features that can help even a novice to become a professional photographer. The features are-
- Color balance adjustment
- Skewed lines fix and perfect the geometry of building or horizons
- Addition of fine glow to the images
- Multiple exposure effect addition
- From vintage, grainy, black and white to drama, retro, or edgy look
- Precise control over all styles
3. Pixlr
Capture the beautiful moments of your life and beautify it by adding over 2 million combination of effects. The features of this app include-
- Spacing, background, and layout choices
- Auto fic option to automatically fix the color balance
- Remove blemishes and red-eyes or teeth-whitening effects
- Adjust the photo mood with tone enhancement, cool it down, or add surreal shades
- Color Splash for focussing on one color and focal blur impact

Conclusion
The above tips and apps can help you greatly in enhancing your Android photography to a great extent. But, none of the above can help in the addition of your photos to your videos. If you wish to add the professional looking photos to a high quality video and enhance it with music and voiceovers, try out the Filmora app. It is one of the best software, a complete package for photos and videos editing and enhancement.
Liza Brown
Liza Brown is a writer and a lover of all things video.
Follow @Liza Brown
Liza Brown
Mar 27, 2024• Proven solutions
Are you taking underexposed and blurry picture whenever you try out Android Photography on your device? Do you think all the stunning photos on the Internet are clicked by any high-end camera? Not always really. The Android can also shoot astonishing and attractive photos with its pro like camera.
This article will share with you some of the amazing tricks and tips of Android photography and the use of video editing apps to make the images appear professional as you see on the Internet. Checking out on the tips and apps for Android Photography can help you in mastering the skill and taking photography like a maven.
Preparation Can’t be Ignored
For a great Android photography, it is vital to prepare yourself and check out on the needful. So, just ensure 2 things.
Go to Set Resolution
One thing you must remember is that when the resolution is set high, only then can your photos be of the best quality. While clicking a picture, always try to focus your subject than zooming in. The cropped photos are much better and high resolution than the zoomed in images. The only problem you can face with high resolution photos is storing. So, try to store the images in the photo sharing apps or in the cloud storage like Dropbox or Picasa.
Cleaning the Lens is Important
In Android photography second important thing to keep in mind is cleaning the lens of the device. Your mobile phone spends a lot of time in your pocket or in your hands. Your fingerprints and dust can conceal the lens of your Android phone obstructing a clear image while clicking. A grime filled lens tend to block the entry of light, resulting in cloudy and vague images. Use a cleaning solution and a microfiber cloth to clean the lens of your device for a crystal clear image using your Android phone.
6 Tips for Amazing Android Photography
Make Use of Selfie-Stick
Have you ever faced stability problem while clicking a photo? Have you been frustrated for a blurred snap due to camera stability issues? A selfie stick or the monopod is a solution to all your problems. It is long enough to take a shot from a distance during the Android Photography, and most importantly it is best for the selfies. The tripods, on the other hand, are for slow-shutter speed. These are portable and you can use your Android phone from any angle to take the photos.
It is Always Light
While Android photography, it is important that your subject faces the light. Many Android phone cameras do not have the flash option. In such a case, if the subject is at the back of the light and you are facing light then the subject will appear dark. Unless a silhouette shot, you need not face the light, let your subject face it.
The Rule of Thirds
What is the rule of thirds? It is a compositional gridline to guide the inexperienced in photography and painting. It helps in taking photos by creating grids and dividing the photo into nine equal parts. The photos are better and interesting when the subjects astride the imaginary lines dividing the photograph into 2 vertical and 2 horizontal guide lines. For a more balanced image, ensure that the subject is slightly of the centre.
Change Your Focus
What is your subject? While clicking photos, your camera cannot track your subject by Auto focussing option. So to ensure a flawless photo, it is essential that you touch your finger on the screen to focus manually. You just need to touch right on your subject to set your focus completely.
Do Not Zoom In/Out
As already mentioned earlier, in Android photography the digital zoom feature is not really worth it. Cropping a photo is far better an option than zooming in. Try to step closer to your subject, if you want to get a clear picture of it. If your cannot, then focus on your subject and click to crop it later. The digital zooming feature cannot be the solution to a clear picture.
 Allavsoft Batch Download Online Videos, Music Offline to MP4, MP3, MOV, etc format
Use HDR Effect
The default camera apps include the HDR feature in the iOS and Android devices. The HDR or the high definition range is a filter that can be used as and when required. Get the HDR toggle on both the OSes, just on the shutter screen itself. The HDR in the Android photography keeps the balance between the dark and the light parts of your image. Keep the phone steady as it requires a long exposure.

Best Free Third-Party Editing Apps
The above-mentioned tips are definitely quite useful but there are certain times when these tips are not enough to make your photos perfect. When the Android photography lacks the special effect to make the images perfect, the only savior in such situations is the free third-party apps for editing. Let’s check out some of the free apps to make your Android photography completely amazing.
1. PhotoShop Express
An easy, yet, powerful Android photography editing tool, the Adobe Photoshop Express is a great collage maker with amazing advance correction features and more than 60 professional looks. From defogging to denoising, the Photoshop Express offers all. The features of this app includes-
- Flexibility and control of images in terms of border size, layouts, individual pan, zoom, and color
- Add personal touch to the photos by choosing from the range of frames and borders
- Crop, straighten, resize, rotate, refine, red-eye removal, contrast, brightness, exposure, white balance, and more
- Blemish removal, fine tune, even skin tone, one-touch heal, etc.
- Add text or graphical watermark on images
2. Snapseed
A Google developed photo editor, Snapseed contains a range of features that can help even a novice to become a professional photographer. The features are-
- Color balance adjustment
- Skewed lines fix and perfect the geometry of building or horizons
- Addition of fine glow to the images
- Multiple exposure effect addition
- From vintage, grainy, black and white to drama, retro, or edgy look
- Precise control over all styles
3. Pixlr
Capture the beautiful moments of your life and beautify it by adding over 2 million combination of effects. The features of this app include-
- Spacing, background, and layout choices
- Auto fic option to automatically fix the color balance
- Remove blemishes and red-eyes or teeth-whitening effects
- Adjust the photo mood with tone enhancement, cool it down, or add surreal shades
- Color Splash for focussing on one color and focal blur impact
Conclusion
The above tips and apps can help you greatly in enhancing your Android photography to a great extent. But, none of the above can help in the addition of your photos to your videos. If you wish to add the professional looking photos to a high quality video and enhance it with music and voiceovers, try out the Filmora app. It is one of the best software, a complete package for photos and videos editing and enhancement.
Liza Brown
Liza Brown is a writer and a lover of all things video.
Follow @Liza Brown
Liza Brown
Mar 27, 2024• Proven solutions
Are you taking underexposed and blurry picture whenever you try out Android Photography on your device? Do you think all the stunning photos on the Internet are clicked by any high-end camera? Not always really. The Android can also shoot astonishing and attractive photos with its pro like camera.
This article will share with you some of the amazing tricks and tips of Android photography and the use of video editing apps to make the images appear professional as you see on the Internet. Checking out on the tips and apps for Android Photography can help you in mastering the skill and taking photography like a maven.
Preparation Can’t be Ignored
For a great Android photography, it is vital to prepare yourself and check out on the needful. So, just ensure 2 things.
Go to Set Resolution
One thing you must remember is that when the resolution is set high, only then can your photos be of the best quality. While clicking a picture, always try to focus your subject than zooming in. The cropped photos are much better and high resolution than the zoomed in images. The only problem you can face with high resolution photos is storing. So, try to store the images in the photo sharing apps or in the cloud storage like Dropbox or Picasa.
 OtsAV Radio Webcaster
Cleaning the Lens is Important
In Android photography second important thing to keep in mind is cleaning the lens of the device. Your mobile phone spends a lot of time in your pocket or in your hands. Your fingerprints and dust can conceal the lens of your Android phone obstructing a clear image while clicking. A grime filled lens tend to block the entry of light, resulting in cloudy and vague images. Use a cleaning solution and a microfiber cloth to clean the lens of your device for a crystal clear image using your Android phone.
6 Tips for Amazing Android Photography
Make Use of Selfie-Stick
Have you ever faced stability problem while clicking a photo? Have you been frustrated for a blurred snap due to camera stability issues? A selfie stick or the monopod is a solution to all your problems. It is long enough to take a shot from a distance during the Android Photography, and most importantly it is best for the selfies. The tripods, on the other hand, are for slow-shutter speed. These are portable and you can use your Android phone from any angle to take the photos.
It is Always Light
While Android photography, it is important that your subject faces the light. Many Android phone cameras do not have the flash option. In such a case, if the subject is at the back of the light and you are facing light then the subject will appear dark. Unless a silhouette shot, you need not face the light, let your subject face it.
The Rule of Thirds
What is the rule of thirds? It is a compositional gridline to guide the inexperienced in photography and painting. It helps in taking photos by creating grids and dividing the photo into nine equal parts. The photos are better and interesting when the subjects astride the imaginary lines dividing the photograph into 2 vertical and 2 horizontal guide lines. For a more balanced image, ensure that the subject is slightly of the centre.

Change Your Focus
What is your subject? While clicking photos, your camera cannot track your subject by Auto focussing option. So to ensure a flawless photo, it is essential that you touch your finger on the screen to focus manually. You just need to touch right on your subject to set your focus completely.
Do Not Zoom In/Out
As already mentioned earlier, in Android photography the digital zoom feature is not really worth it. Cropping a photo is far better an option than zooming in. Try to step closer to your subject, if you want to get a clear picture of it. If your cannot, then focus on your subject and click to crop it later. The digital zooming feature cannot be the solution to a clear picture.
Use HDR Effect
The default camera apps include the HDR feature in the iOS and Android devices. The HDR or the high definition range is a filter that can be used as and when required. Get the HDR toggle on both the OSes, just on the shutter screen itself. The HDR in the Android photography keeps the balance between the dark and the light parts of your image. Keep the phone steady as it requires a long exposure.
Best Free Third-Party Editing Apps
The above-mentioned tips are definitely quite useful but there are certain times when these tips are not enough to make your photos perfect. When the Android photography lacks the special effect to make the images perfect, the only savior in such situations is the free third-party apps for editing. Let’s check out some of the free apps to make your Android photography completely amazing.
1. PhotoShop Express
An easy, yet, powerful Android photography editing tool, the Adobe Photoshop Express is a great collage maker with amazing advance correction features and more than 60 professional looks. From defogging to denoising, the Photoshop Express offers all. The features of this app includes-
- Flexibility and control of images in terms of border size, layouts, individual pan, zoom, and color
- Add personal touch to the photos by choosing from the range of frames and borders
- Crop, straighten, resize, rotate, refine, red-eye removal, contrast, brightness, exposure, white balance, and more
- Blemish removal, fine tune, even skin tone, one-touch heal, etc.
- Add text or graphical watermark on images

2. Snapseed
A Google developed photo editor, Snapseed contains a range of features that can help even a novice to become a professional photographer. The features are-
- Color balance adjustment
- Skewed lines fix and perfect the geometry of building or horizons
- Addition of fine glow to the images
- Multiple exposure effect addition
- From vintage, grainy, black and white to drama, retro, or edgy look
- Precise control over all styles
3. Pixlr
Capture the beautiful moments of your life and beautify it by adding over 2 million combination of effects. The features of this app include-
- Spacing, background, and layout choices
- Auto fic option to automatically fix the color balance
- Remove blemishes and red-eyes or teeth-whitening effects
- Adjust the photo mood with tone enhancement, cool it down, or add surreal shades
- Color Splash for focussing on one color and focal blur impact

Conclusion
The above tips and apps can help you greatly in enhancing your Android photography to a great extent. But, none of the above can help in the addition of your photos to your videos. If you wish to add the professional looking photos to a high quality video and enhance it with music and voiceovers, try out the Filmora app. It is one of the best software, a complete package for photos and videos editing and enhancement.
Liza Brown
Liza Brown is a writer and a lover of all things video.
Follow @Liza Brown
- Title: Android's Ultimate Capture Secrets Revealed for 2024
- Author: Joseph
- Created at : 2024-07-27 09:41:46
- Updated at : 2024-07-28 09:41:46
- Link: https://extra-tips.techidaily.com/androids-ultimate-capture-secrets-revealed-for-2024/
- License: This work is licensed under CC BY-NC-SA 4.0.